Following the release of our new NanoBeacon BLE Scanner mobile app, we thought it would be great to publish a few tutorials on how you would use the new app along with our popular NanoBeacon IN100 beacon.隨著我們新的NanoBeacon BLE掃描器移動應用程序的發(fā)布,我們認為發(fā)布一些關于如何使用新的應用程序和我們流行的NanoBeacon IN100信標的教程將是非常好的。
In this series of tutorials, we will cover:
在這一系列的教程中,我們將涵蓋:
Installation and setup steps.
安裝和設置步驟。
Detailed walkthroughs of various examples and how to utilize the mobile app for these use cases.
各種例子的詳細演練,以及如何在這些使用情況下利用移動應用程序。
The differences between the iOS and Android versions of the app.
應用程序的iOS和Android版本之間的差異。
How to export logs from the app for captured advertising sets and packets.
如何從應用中導出捕獲的廣播集和數據包的日志。
How to use the new NanoBeaconLib, which provides a framework for building your own custom mobile app with minimal effort.
如何使用新的NanoBeaconLib,它提供了一個框架,以最小的努力建立自己的自定義移動應用程序。
Requirements, Installation, and Setup要求、安裝和設置
Before diving into the details of using the mobile app, you will need the following:
在深入了解使用移動應用程序的細節(jié)之前,你將需要以下條件:
An IN100 EVK, specifically a programmer board, an IN100 development board, and a micro USB cable to connect them to your PC.
一塊IN100 EVK,特別是一塊編程板,一塊IN100開發(fā)板,以及一根Micro USB數據線,將它們連接到你的PC。
The NanoBeacon Config Tool PC app, version 3.2.15 or later (available for Windows, macOS, and Linux). You can download ithere.
NanoBeacon配置工具PC應用程序,3.2.15或更高版本(可用于Windows、macOS和Linux)。你可以在這里下載。(NanoBeacon Config Tool — InPlay (inplay-tech.com))
The latest version of the NanoBeacon BLE Scanner mobile app, which is available for both Android and iOS. You can download it here.
最新版本的NanoBeacon BLE掃描器移動應用程序,可用于Android和iOS。你可以在這里下載。(NanoBeacon Config Tool — InPlay (inplay-tech.com))
Once you have all the necessary components and applications, you’re ready to move on.
一旦你有了所有必要的組件和應用程序,你就可以繼續(xù)前進了。
Overview of the NanoBeacon Mobile App (iOS)
NanoBeacon移動應用程序(iOS)的概述
There are a few UI and functional differences between the iOS and Android versions of the mobile app due to the limitations and differences between the two operating systems. Still, most of the functionality should be very similar.
由于兩個操作系統(tǒng)的限制和差異,iOS和Android版本的移動應用程序之間有一些UI和功能的差異。不過,大部分功能應該是非常相似的。
In this tutorial, we will be focusing on the Android app.
在本教程中,我們將專注于Android應用程序。
After launching the mobile app, you will be presented with the Scanner view:
啟動移動應用程序后,你將看到掃描器視圖:
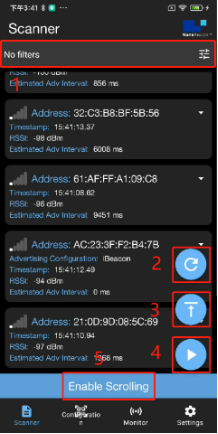
The different buttons within this view are:
該視圖中的不同按鈕是:
1.Filters: allow you to filter out and only display devices that match specific filters.
1.過濾器:允許你過濾掉,只顯示符合特定過濾條件的設備。
2.Clear:clears the list of discovered devices.
2.清除:清除已發(fā)現(xiàn)設備的列表。
3.Scroll to Top: this allows you to scroll to the top of the list when the number of discovered items extends beyond a single-screen view.
3.滾動到頂部:當發(fā)現(xiàn)的項目數量超出單屏視圖時,這允許你滾動到列表的頂部。
4.Resume Scanning: the difference between this andRescan is that it does not clear the list of discovered devices.
4.恢復掃描:這和重新掃描的區(qū)別是,它不會清除已發(fā)現(xiàn)的設備的列表。
5.Enable Scrolling: this enables automatic scrolling to always show the latest discovered devices.
5.啟用滾動:這將啟用自動滾動,以始終顯示最新發(fā)現(xiàn)的設備。
Filter Options篩選選項
When clicking the Filter options button (three sliders icon), you’re presented with the following view and options:
當點擊過濾選項按鈕(三個滑塊圖標)時,你會看到以下視圖和選項:
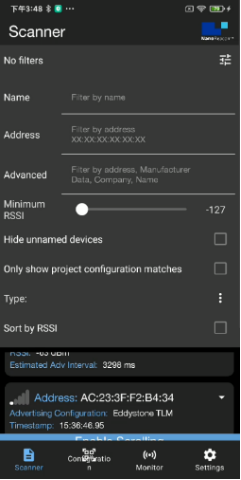
Name: this allows you to filter by device name.
名稱:這允許你按設備名稱過濾。
Advanced: allows you to filter by raw data included in the advertising data, company name, etc. On Android, filtering by Bluetooth Address is also possible.
高級:允許你按廣播數據中包含的原始數據、公司名稱等進行過濾。在安卓系統(tǒng)上,也可以通過藍牙地址進行過濾。
Minimum RSSI: this allows you to filter out devices that are discovered with an RSSI lower than the set value.
最小RSSI:這允許你過濾掉那些發(fā)現(xiàn)的RSSI低于設定值的設備。
Hide unnamed devices: this allows you to hide devices that do not advertise a device name.
隱藏未命名的設備:這允許你隱藏那些沒有公布設備名稱的設備。
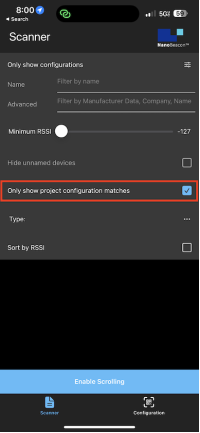
Only show project configuration matches: allows you to only show devices that match the imported IN100 configuration (via scanning the QR code from the NanoBeacon Config Tool app).
只顯示項目配置匹配:允許你只顯示與導入的IN100配置匹配的設備(通過掃描NanoBeacon配置工具應用程序的QR碼)。
Sort by RSSI: this allows you to sort the list of devices by detected RSSI (starting with the device with the strongest signal).
按RSSI排序: 這允許你按檢測到的RSSI對設備列表進行排序(從信號最強的設備開始)。
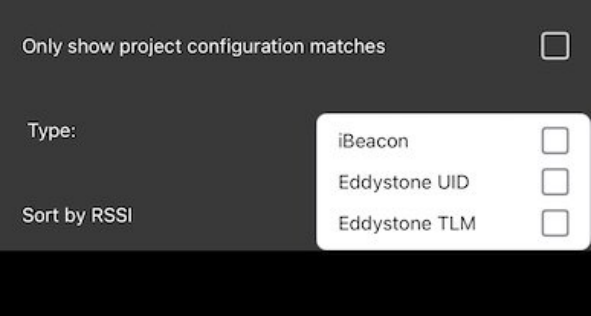
Type: allows you to only show any combination of iBeacon, Eddystone UID, and Eddystone TLM advertising devices, as shown below:
類型:允許你只顯示iBeacon、Eddystone UID和Eddystone TLM廣播設備的任何組合,如下所示:
The other view (accessible from the bottom section of the app) is the “Configuration” view:
另一個視圖(可從應用程序的底部部分訪問)是 "配置 "視圖:
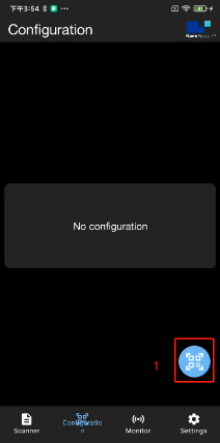
QR Code Scan button allow you to scan the QR Code that the NanoBeacon Config Tool displays to import the IN100 configuration into the mobile app:
QR代碼掃描按鈕允許你掃描NanoBeacon配置工具顯示的QR代碼,將IN100的配置導入移動應用程序:
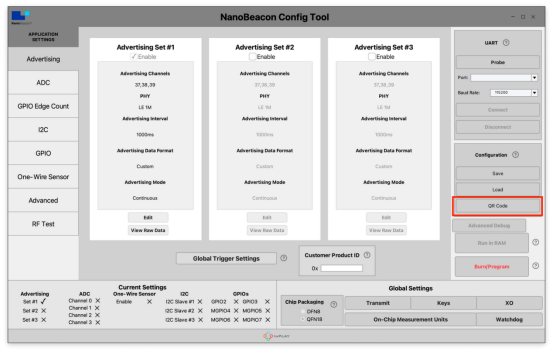
Once the configuration is imported into the mobile app, the Configurationview will show the details of the configuration:
一旦配置被導入移動應用程序,配置視圖將顯示配置的細節(jié):
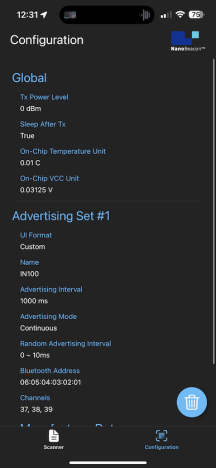
To import a new configuration, you can delete the existing one by clicking the Trash icon.()After that, the QR Scan and Import Configuration buttons will become visible on the screen.
要導入一個新的配置,您可以通過點擊垃圾桶圖標()刪除現(xiàn)有的配置。之后,QR掃描和導入配置按鈕將在屏幕上可見。
Let’s run through a couple of test cases to show how this works!
讓我們通過幾個測試案例來說明這是如何工作的!
Test Case #1: One Advertising Set (iBeacon)
測試案例#1:一個廣播集(iBeacon)
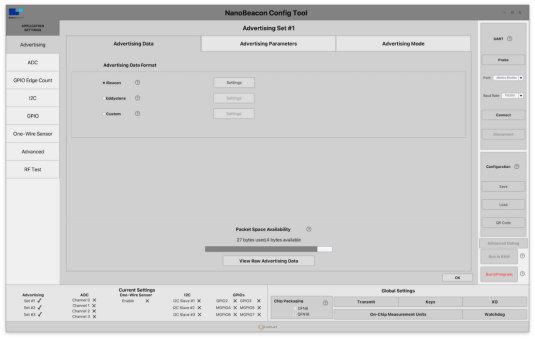
Let’s first start by configuring the IN100 in the NanoBeacon Config Tool application on the PC. We will configure it with the following:
讓我們首先在PC上的NanoBeacon配置工具應用程序中配置IN100。我們將對其進行如下配置:
One Advertising Set (Continuous)
一個廣播組(連續(xù))
iBeacon type
iBeacon類型
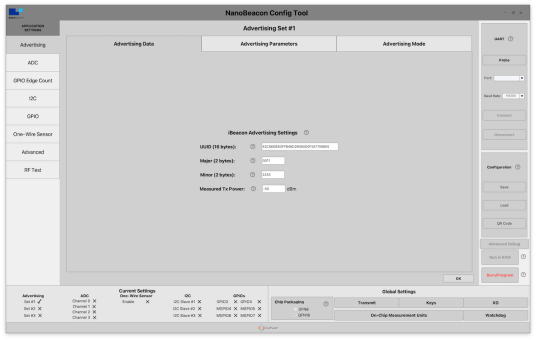
UUID: E2C56DB5DFFB48D2B060D0F5A71096E0 (randomly generated, you can generate your own UUID here)
UUID: E2C56DB5DFFB48D2B060D0F5A71096E0(隨機生成,你可以在這里生成你自己的UUID)
Major: 0011
Minor: 2233
Tx Power: -30 dBm
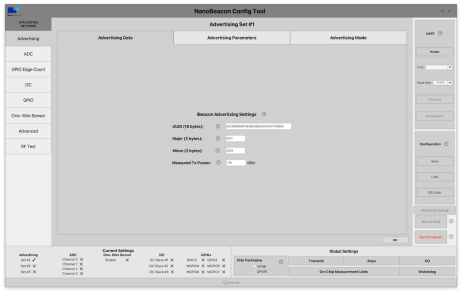
Make sure your IN100 development and programmer boards are connected together and to the PC. Next, you’ll want to Probe and Connect to the device within NanoBeacon Config Tool. Finally, click the “Run in RAM” button.
確保你的IN100開發(fā)板和編程板連接在一起并與電腦連接。接下來,你要在NanoBeacon配置工具中探測和連接到設備。最后,點擊 "在RAM中運行 "按鈕。
Now, to import the configuration into the mobile app, we will use the new QR Code button available in NanoBeacon Config Tool. To import, navigate to the Configuration view and click the QR Code Scanner (or the Load Configuration) button.
現(xiàn)在,為了將配置導入移動應用程序,我們將使用NanoBeacon配置工具中的新QR碼按鈕。要導入,導航到配置視圖,點擊QR碼掃描器(或加載配置)按鈕。
Once the configuration is imported, we can see the settings on the screen:
一旦配置被導入,我們就可以看到屏幕上的設置:
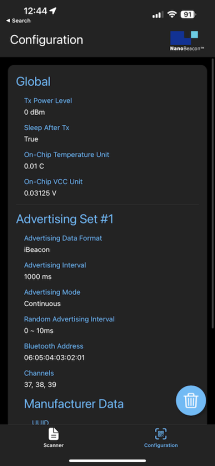
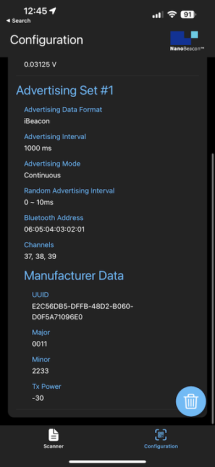
Now we can switch to the Scanner view to discover our device.
現(xiàn)在我們可以切換到掃描器視圖來發(fā)現(xiàn)我們的設備。
In the Scanner view, you’ll likely see many discovered devices, which makes it difficult to find your specific device. One way around that is to look for the device that shows “Configuration Match” in its title:
在掃描器視圖中,你可能會看到許多已發(fā)現(xiàn)的設備,這使你很難找到你的特定設備。解決這個問題的一個方法是尋找標題中顯示 "配置匹配 "的設備:
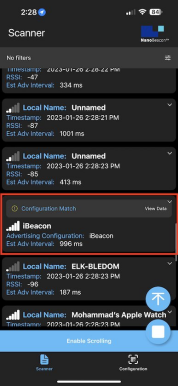
But the more straightforward method is to apply the filter “Only show project configuration matches,” which will filter out all other non-matching devices.
但更直接的方法是應用過濾器 "只顯示項目配置匹配",這將過濾掉所有其他不匹配的設備。
Once applied, you’ll get a much better view:
一旦應用,你會得到一個更好的視圖:
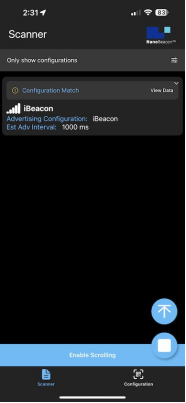
You can then click on the area (in the red box below) with the device information to view more details:
然后你可以點擊有設備信息的區(qū)域(在下面的紅框內),查看更多細節(jié):
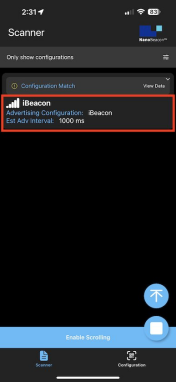
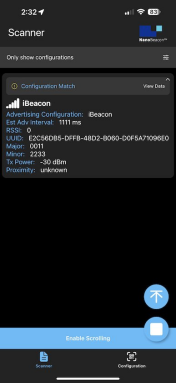
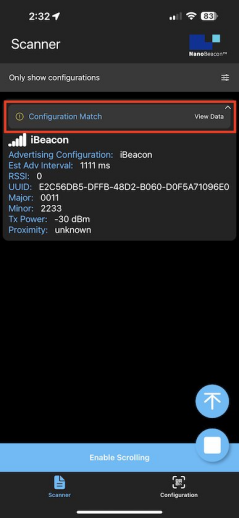
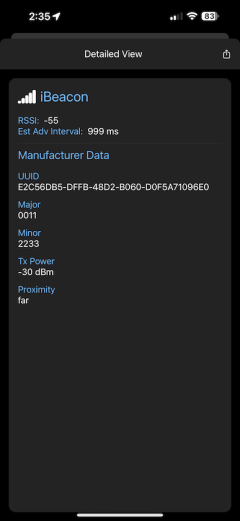
For even more details (especially for types other than iBeacon), click on the “View Data” area (in the redbox below):
要想了解更多細節(jié)(尤其是iBeacon以外的類型),請點擊 "查看數據 "區(qū)域(在下面的紅框內):
Test Case #2: Three Advertising Sets (iBeacon, Eddystone, Custom Data)
測試案例#2:三個廣播集(iBeacon、Eddystone、自定義數據)。
For a more advanced test case, let’s set up three advertising sets:
對于一個更高級的測試案例,讓我們設置三個廣播集:
1.iBeacon(same as in Test Case #1):
1. iBeacon(與測試案例#1相同):
2. Eddystone UID
2. Eddystone UID
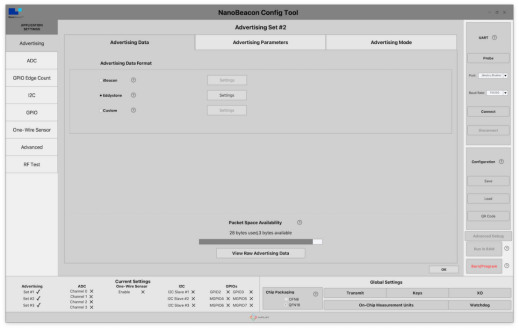
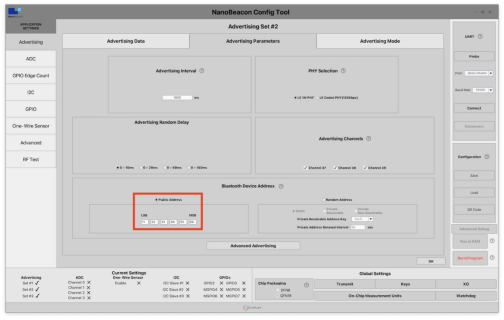
Modify the Bluetooth Address to something different than what’s set in Advertising Set #1. This is necessary for the mobile app to be able to distinguish between the different advertising sets and display them as separate “devices.” This setting can be found under “Advertising Parameters.”
將藍牙地址修改為與廣播集#1中的設置不同的內容。這是必要的,以便移動應用程序能夠區(qū)分不同的廣播集,并將它們顯示為獨立的 "設備"。這個設置可以在 "廣播參數 "下找到。
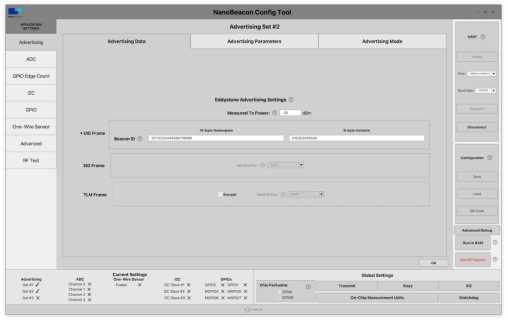
Measured Tx Power: -25 dBm
Beacon ID:
① 10-byte Namespace: 00112233445566778899
① 10字節(jié)的名稱空間:00112233445566778899
② 6-byte Instance: 010203040506
② 6字節(jié)的實例:010203040506
Here are screenshots showing this configuration in NanoBeacon Config Tool:
下面是在NanoBeacon配置工具中顯示此配置的截圖:
3. Custom Type(Triggered)
3. 自定義類型(觸發(fā)式)
Modify the Bluetooth Addressto something different than what’s set in Advertising Set #1. This is necessary for the mobile app to be able to distinguish between the different advertising sets and display them as separate “devices.” This setting can be found under “Advertising Parameters.”
將藍牙地址修改為與廣播集#1中的設置不同的內容。這是必要的,以便移動應用程序能夠區(qū)分不同的廣播集,并將它們作為獨立的 "設備 "顯示。這個設置可以在 "廣播參數 "下找到。
Device Name:“IN100”
Manufacturer Specific Data:
· Company ID: 0505 (InPlay)
· 公司ID: 0505 (InPlay)
· VCC
· VCC
· Internal Temperature
· 內部溫度
Triggered Advertising:
觸發(fā)式廣播:
We will be configuring this advertising set as aTriggeredtype.
我們將把這個廣播集配置成一個觸發(fā)式的類型。
This will ensure that the advertising packets are only sent when specific conditions are met.
這將確保廣播數據包只在滿足特定條件時發(fā)送。
We will set a High Threshold Trigger to 25 degrees Celsius (Internal Temperature), meaning that when the internal temperature reaches 25 degrees C, this specific advertising set will be triggered and will then show up in the mobile app.
我們將把高閾值觸發(fā)器設置為25攝氏度(內部溫度),這意味著當內部溫度達到25攝氏度時,這個特定的廣播集將被觸發(fā),然后在移動應用程序中顯示出來。
To configure this, do the following:
要配置這一點,請執(zhí)行以下操作:
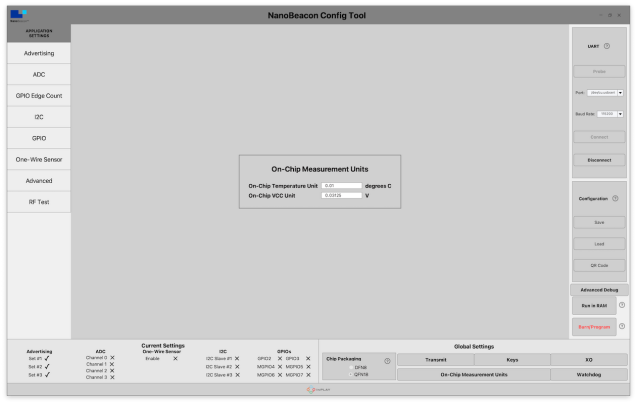
Navigate to Global Triggersettings → For Trigger #2, modify select Internal Temperature as the source → set the High Threshold to 2500 (this translates to Threshold * Unit,whereUnit is found in the On-Chip Measurement Units settings).
導航到全局觸發(fā)器設置→對于觸發(fā)器#2,修改選擇內部溫度作為來源→將高閾值設置為2500(這轉化為閾值*單位,其中單位在On-Chip MeasurementUnits設置中找到)。
Next, we need to modify the Advertising Mode to be of the Triggeredtype → under the "Advertising Mode” tab, select “Triggered Advertising,” and under “Sensor Trigger Source,” check the box next to “High Trigger 2”.
接下來,我們需要將廣播模式修改為觸發(fā)式→在 "Advertising Mode"標簽下,選擇 "Triggered Advertising",在 "傳感器觸發(fā)源 "下,選中 "高觸發(fā)器2 "旁邊的方框。
Here are screenshots showing these configuration settings within NanoBeacon Config Tool:
下面是在NanoBeacon配置工具中顯示這些配置設置的屏幕截圖:
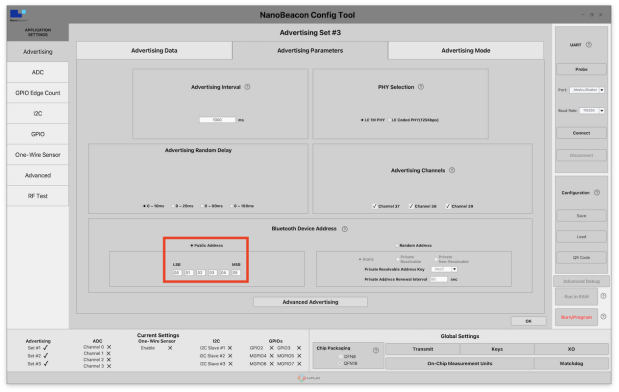
Bluetooth Address (Adv Set #3)
藍牙地址(Adv Set #3)
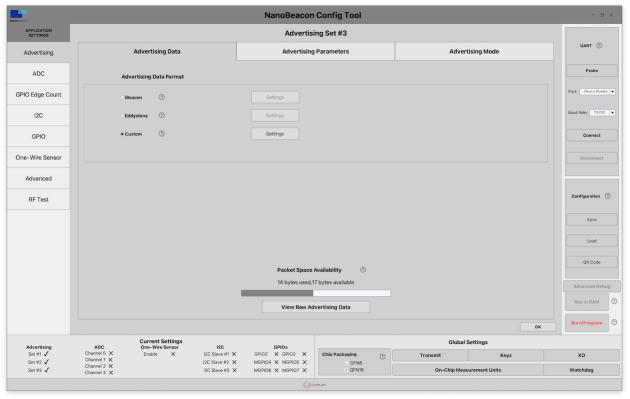
Custom Adv Data Format
自定義Adv數據格式
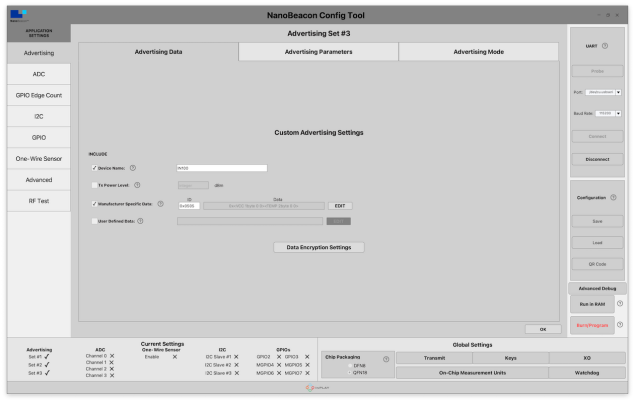
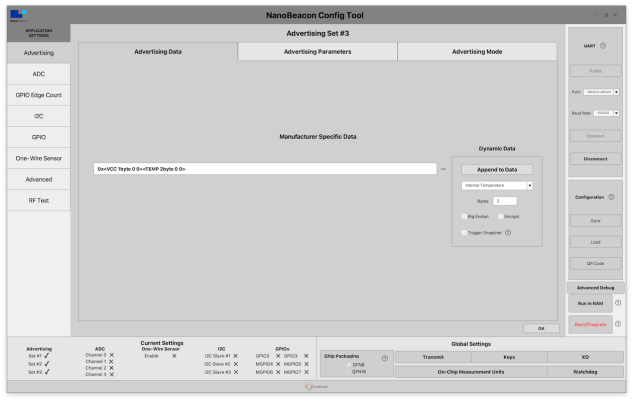
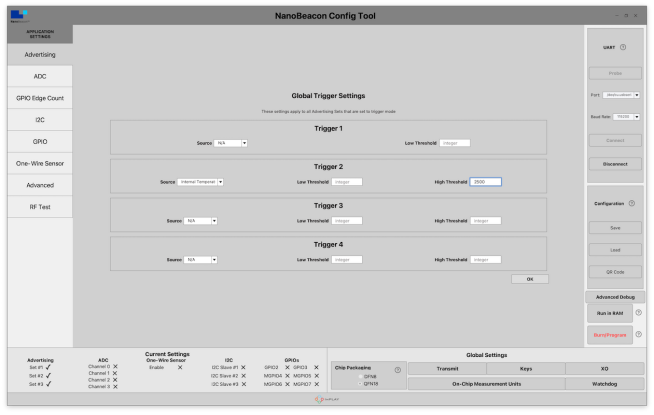
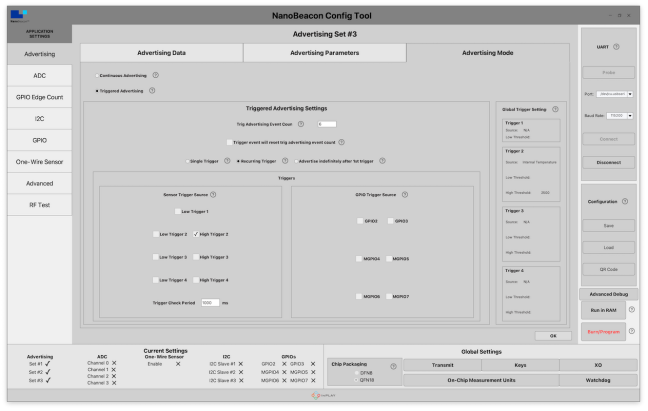
Now, we’re ready to run the configuration, import it into the mobile app, and start testing!
現(xiàn)在,我們已經準備好運行配置,將其導入到移動應用程序,并開始測試了!
Once you’ve imported the configuration, you should see the following in your Configuration view:
一旦你導入了配置,你應該在你的配置視圖中看到以下內容:
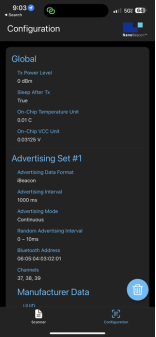
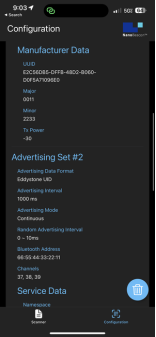
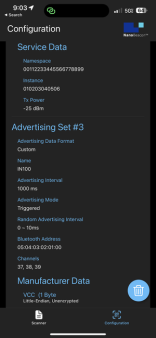
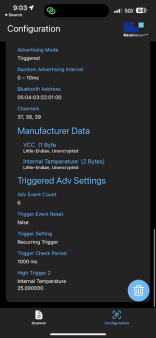
After importing the configuration, we are now ready to start scanning. Let’s switch to the Scannerview.
導入配置后,我們現(xiàn)在準備開始掃描。讓我們切換到掃描器視圖。
We’ll also double-check to make sure that the “Only show project configuration matches” is enabled. The scanner should now show us the two advertising sets (#1 & #2), the iBeacon and Eddystone advertising sets:
我們還將仔細檢查,以確保 "只顯示項目配置匹配 "被啟用。掃描儀現(xiàn)在應該向我們顯示兩個廣播集(#1和#2),即iBeacon和Eddystone廣播集:
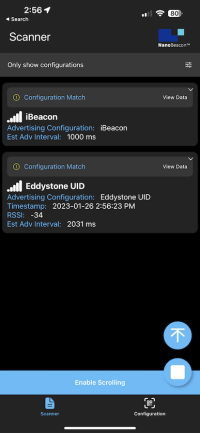
And we can navigate into the detailed views each of these advertising sets:
而且我們可以瀏覽到這些廣播集的每一個詳細視圖:
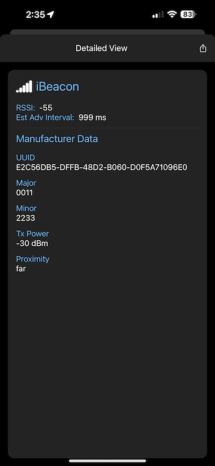

Notice the third advertising set (which is configured for a Triggered Custom Advertising Data Type) does not show up in the list. This is because the current internal temperature reading is under 25 deg C (at room temperature, around 21 deg C).
注意第三個廣播集(它被配置為觸發(fā)式自定義廣播數據類型)沒有顯示在列表中。這是因為當前的內部溫度讀數低于25攝氏度(在室溫下,大約21攝氏度)。
To test out the triggered advertisements, I will apply some heat to the IN100 chipset on the development board (by simply pressing down on it for a few seconds). Once the temperature reaches 25 deg C, we start seeing the third advertising set in the list:
為了測試觸發(fā)式廣播,我將對開發(fā)板上的IN100芯片組施加一些熱量(通過簡單地按下它幾秒鐘)。一旦溫度達到25攝氏度,我們就開始看到列表中的第三個廣播集:
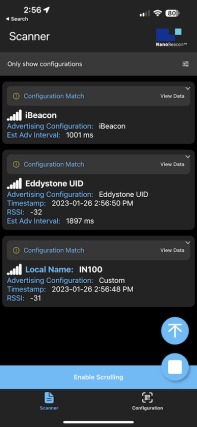
Let’s go into the detailed view to look at the advertising data:
讓我們進入詳細視圖,看看廣播數據:
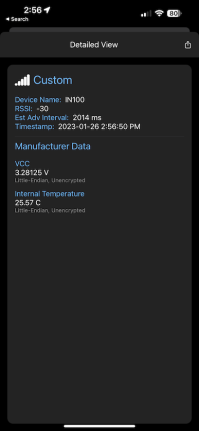
Notice that the data is actually parsed into a human-readable format and not just hex values! This is the power of using our mobile app in combination with the IN100.
請注意,數據實際上被解析成了人類可讀的格式,而不僅僅是十六進制的數值!這就是使用我們的移動應用程序與IN100相結合的力量!
We also see that the Internal Temperature value has crossed the 25 deg C mark confirming the functionality of the Triggered Advertising Mode.
我們還看到,內部溫度值已經超過了25攝氏度,證實了觸發(fā)式廣播模式的功能。
Summary & Closing 總結與結束
In the following tutorials in this series, we will cover lots more, including:
在本系列的后續(xù)教程中,我們將涵蓋更多內容,包括:
How to export logging data for captured advertising sets and analyze them
如何為捕獲的廣播集導出日志數據并進行分析
App notifications for Triggered Advertising Mode advertising sets
觸發(fā)式廣播模式廣播集的應用程序通知
The differences between the Android and iOS apps
安卓和iOS應用程序之間的差異
Diving more into the various filtering options
深入研究各種過濾選
The new NanoBeaconLib mobile app library (allows you to develop a custom N100-interfacing mobile app in no time!)
新的NanoBeaconLib移動應用程序庫(允許你在短時間內開發(fā)一個自定義的與IN100連接的移動應用程序!)
and more!
以及更多!
Be sure to download our?free?mobile app(NanoBeacon Config Tool — InPlay (inplay-tech.com))and check it out for yourself!
請務必下載我們的免費移動應用程序,并親自檢查一下!
-
BLE
+關注
關注
12文章
669瀏覽量
59494 -
掃描器
+關注
關注
0文章
170瀏覽量
11939
發(fā)布評論請先 登錄
相關推薦
DAC348X EVM的I路輸出電路,畫圈的那一部分有什么作用?0L電感L40有什么作用?
工業(yè)固定式掃描器怎樣用?固定式工業(yè)條碼掃描器解決方案
如何設置條形碼掃描器模塊,掃碼器常見技術問題的解決
Air780EP硬件設計原理解析(第一部分)
干貨分享:Air700ECQ的硬件設計,第一部分
0.5mm層疊封裝應用處理器的PCB設計指南,第一部分

0.4毫米層疊封裝(PoP)的PCB設計指南,第一部分

高性能電壓監(jiān)控器詳解—-- 第一部分
求助,opa695的datesheet問題求解
庫克:Vision Pro已成為日常生活中不可或缺的一部分
什么是固定式條碼掃描器?固定式掃描器怎么選?


 NanoBeacon? BLE掃描器教程(第一部分)


評論