

概述
人臉識別,是基于人的臉部特征信息進行身份識別的一種生物識別技術。用攝像機或攝像頭采集含有人臉的圖像或視頻流,并自動在圖像中檢測和跟蹤人臉,進而對檢測到的人臉進行臉部識別。

本項目中我們將實現攝像頭人臉識別效果,包含人名標簽和識別框,并結合燈帶的亮燈狀態制作人臉識別門禁系統。
(最終效果視頻)
項目基礎
人臉識別
硬件準備:
AI主控:LattePanda
輸入輸出設備:5英寸顯示屏、鍵盤、鼠標、攝像頭
人臉信息錄入:
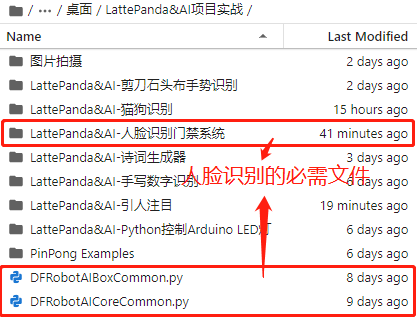
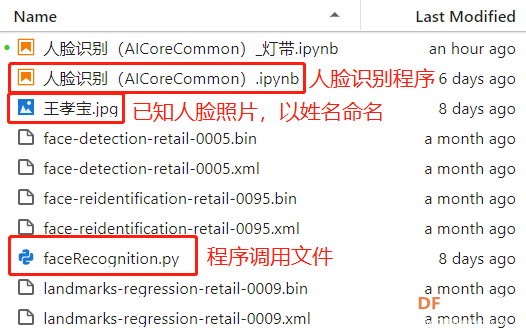
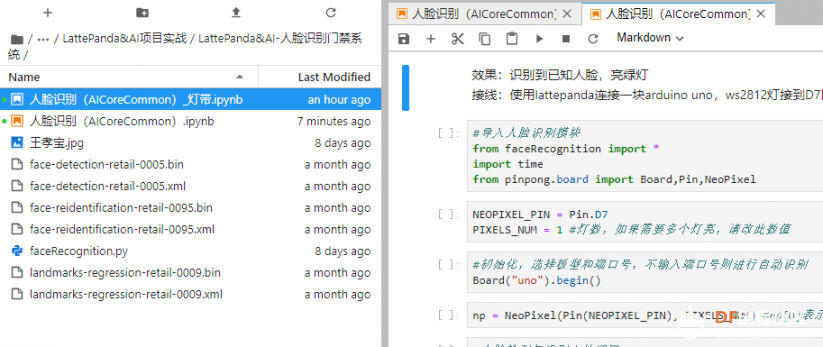
1、雙擊桌面上的“startpage.sh”,打開JupyterLab,切換到“home/lattepanda/桌面/LattePanda&AI項目實戰/”目錄下,如下圖,檢查一下項目必需的3個文件;
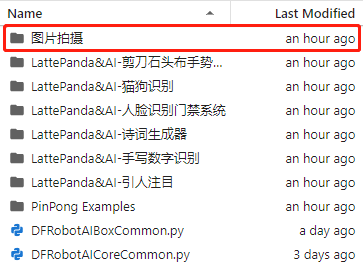
2、雙擊進入“圖片拍攝”文件夾;
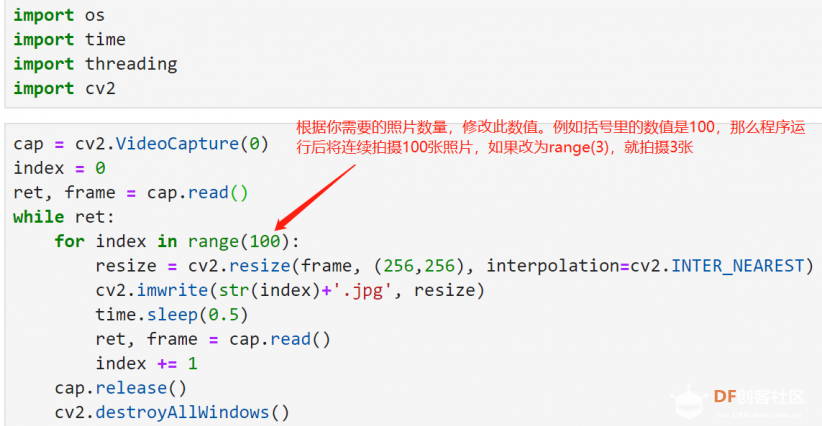
3、雙擊打開程序,修改拍攝的照片數量,例如for index in range(3);
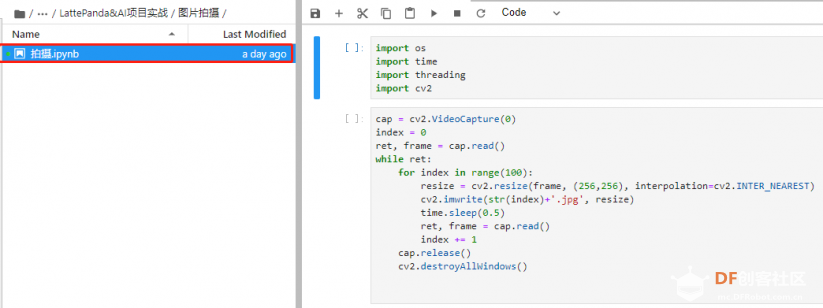
樣例代碼:
4、選擇無其他人、無雜物的背景,正眼看著攝像頭,然后運行程序,拍攝的圖片會在程序同目錄下依次出現;

5、雙擊圖片查看拍攝效果;
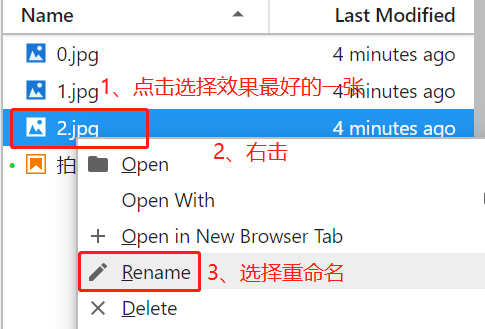
6、選擇效果最好的一張,重命名為此人的姓名;
7、將照片復制到“LattePanda&AI-人臉識別門禁系統”文件夾下。
程序編寫:
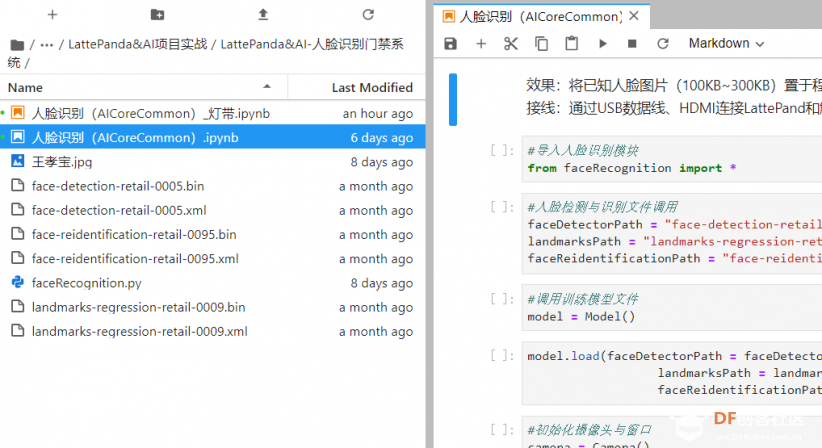
1、雙擊打開“人臉識別.ipynb”;
樣例代碼:
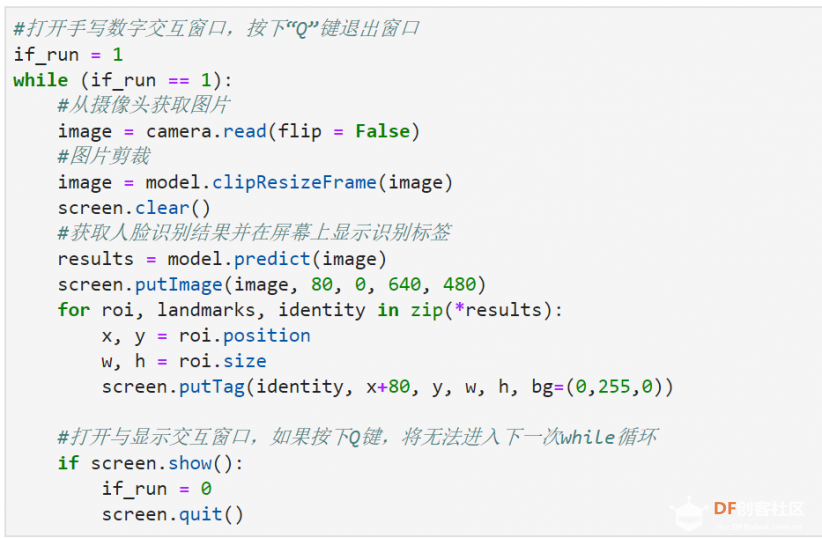
復制代碼 隱藏代碼
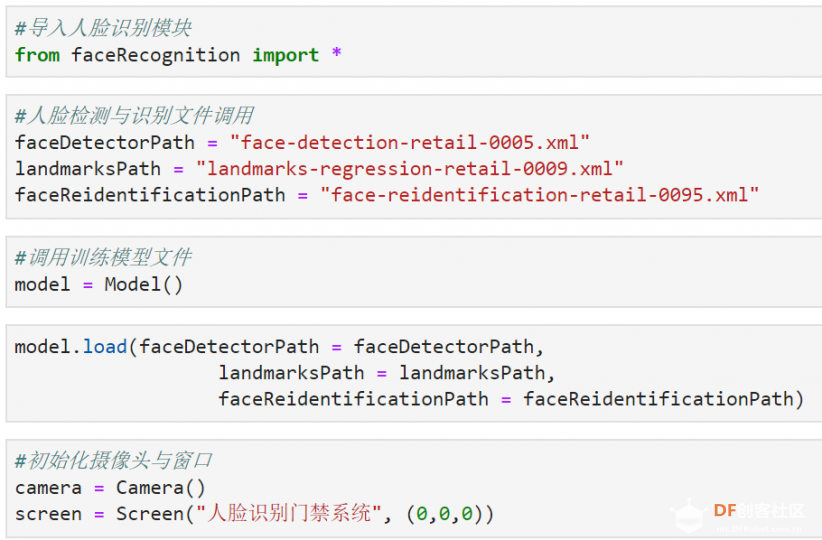
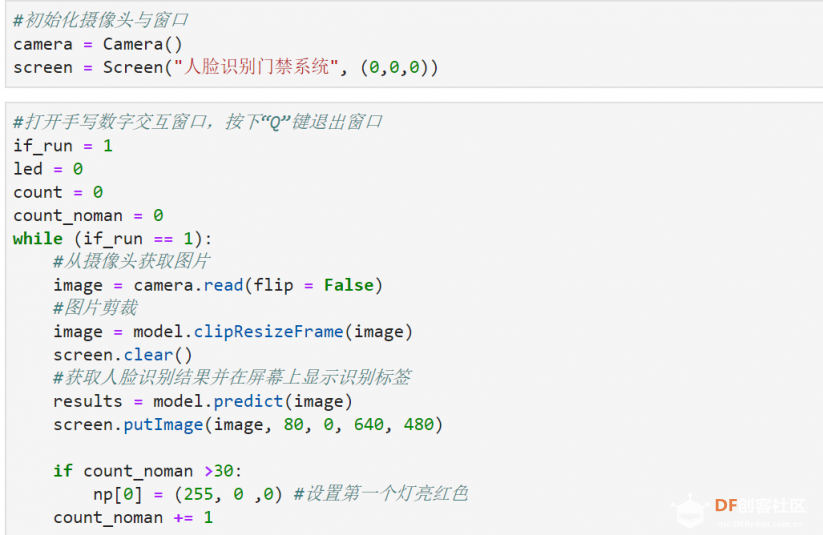
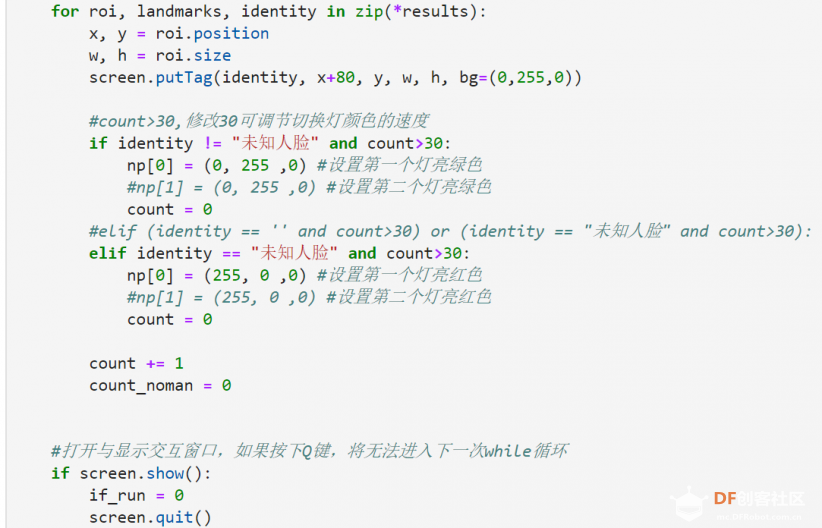
#導入人臉識別模塊fromfaceRecognition import *#人臉檢測與識別文件調用faceDetectorPath="face-detection-retail-0005.xml"landmarksPath="landmarks-regression-retail-0009.xml"faceReidentificationPath="face-reidentification-retail-0095.xml"#調用訓練模型文件model= Model()model.load(faceDetectorPath = faceDetectorPath,landmarksPath= landmarksPath,faceReidentificationPath= faceReidentificationPath)#初始化攝像頭與窗口camera= Camera()screen= Screen("人臉識別門禁系統", (0,0,0))#打開手寫數字交互窗口,按下“Q”鍵退出窗口if_run=1while(if_run ==1):#從攝像頭獲取圖片image= camera.read(flip = False)#圖片剪裁image= model.clipResizeFrame(image)screen.clear()#獲取人臉識別結果并在屏幕上顯示識別標簽results= model.predict(image)screen.putImage(image,80,0,640,480)forroi, landmarks, identity in zip(*results):x, y = roi.positionw, h = roi.sizescreen.putTag(identity, x+80, y, w, h, bg=(0,255,0))#打開與顯示交互窗口,如果按下Q鍵,將無法進入下一次while循環ifscreen.show():if_run=0screen.quit()
復制代碼
2、運行程序,當執行到最后一個單元格時,會打開交互窗口。
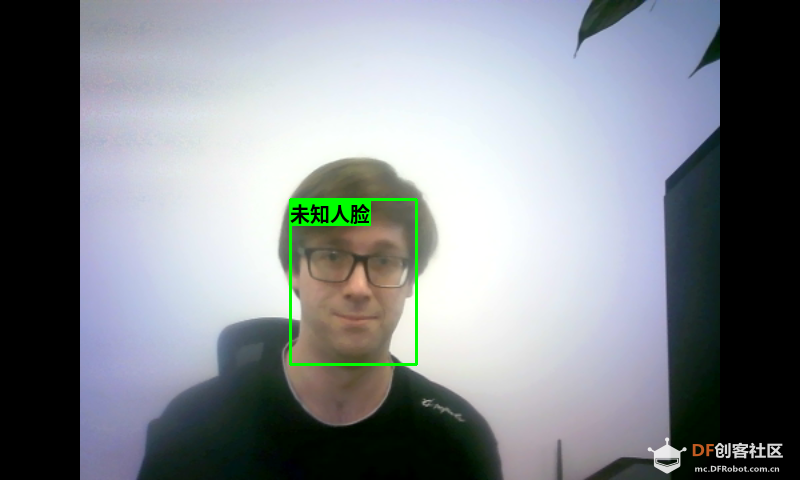
未識別到人臉:
檢測到未知人臉:
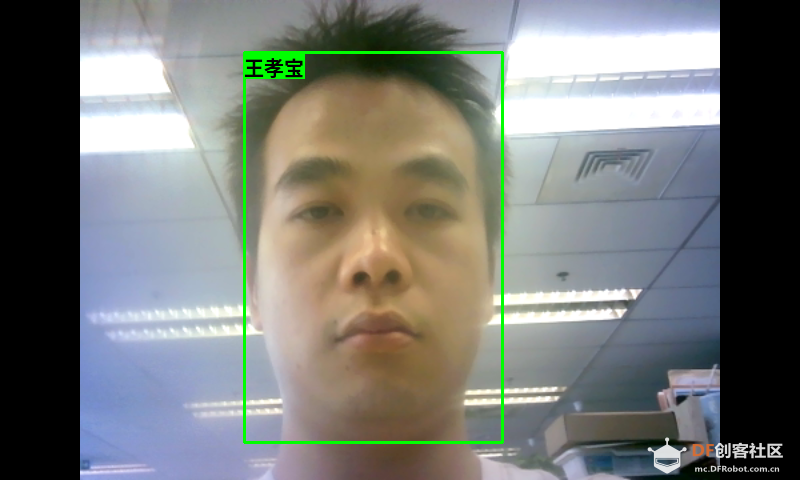
識別到已知人臉,并顯示此人姓名:
3、按鍵盤上的“Q”鍵可退出交互窗口。
項目進階
人臉識別門禁系統
如果讓人臉作為門禁系統的鑰匙,會使我們的生活更方便快捷。當識別到主人的人臉時,燈帶亮綠燈,表示準許進入;否則顯示紅燈。
硬件準備:
主控:Arduino UNO、IO 傳感器擴展板 V7.1
模塊:WS2812 RGB 全彩燈帶
硬件連接圖:
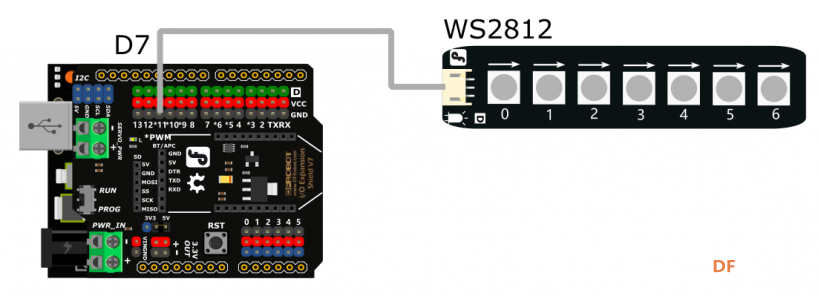
*WS2812上有7個RGB燈,程序中的np[0]表示第一個燈,程序中的np[1]表示第二個燈。
程序編寫:
雙擊打開“人臉識別_燈帶.ipynb”;
樣例代碼:

復制代碼 隱藏代碼
#導入人臉識別模塊fromfaceRecognition import *importtimefrompinpong.board import Board,Pin,NeoPixelNEOPIXEL_PIN= Pin.D7PIXELS_NUM=1#燈數,如果需要多個燈亮,請改此數值#初始化,選擇板型和端口號Board("uno","/dev/ttyUSB0").begin()np= NeoPixel(Pin(NEOPIXEL_PIN), PIXELS_NUM) #np[0]表示第一個燈,np[1]表示第二個燈,以此類推#人臉檢測與識別文件調用faceDetectorPath="face-detection-retail-0005.xml"landmarksPath="landmarks-regression-retail-0009.xml"faceReidentificationPath="face-reidentification-retail-0095.xml"#調用訓練模型文件model= Model()model.load(faceDetectorPath = faceDetectorPath,landmarksPath= landmarksPath,faceReidentificationPath= faceReidentificationPath)#初始化攝像頭與窗口camera= Camera()screen= Screen("人臉識別門禁系統", (0,0,0))#打開手寫數字交互窗口,按下“Q”鍵退出窗口if_run=1led=0count=0while(if_run ==1):#從攝像頭獲取圖片image= camera.read(flip = False)#圖片剪裁image= model.clipResizeFrame(image)screen.clear()#獲取人臉識別結果并在屏幕上顯示識別標簽results= model.predict(image)screen.putImage(image,80,0,640,480)forroi, landmarks, identity in zip(*results):x, y = roi.positionw, h = roi.sizescreen.putTag(identity, x+80, y, w, h, bg=(0,255,0))#count>30,修改30可調節切換燈顏色的速度ifidentity !="未知人臉"and count>30:np[0] = (0,255,0) #設置第一個燈亮綠色#np[1] = (0, 255 ,0) #設置第二個燈亮綠色count=0elifidentity =="未知人臉"and count>30:np[0] = (255,0,0) #設置第一個燈亮紅色#np[1] = (255, 0 ,0) #設置第二個燈亮紅色count=0count+=1#打開與顯示交互窗口,如果按下Q鍵,將無法進入下一次while循環ifscreen.show():if_run=0screen.quit()
復制代碼
運行效果:
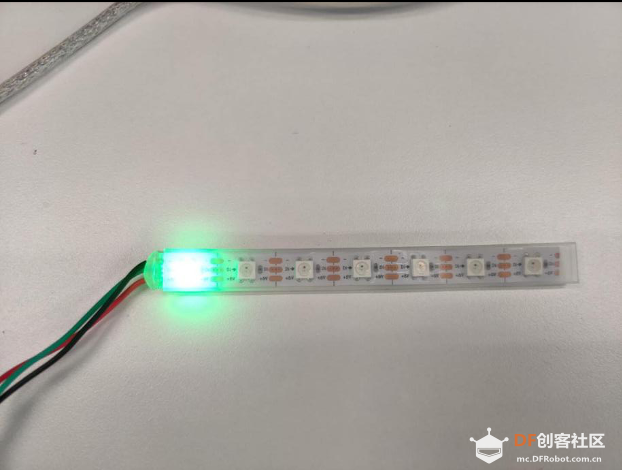
當識別到已知人臉時,燈帶的第一個燈亮綠色;
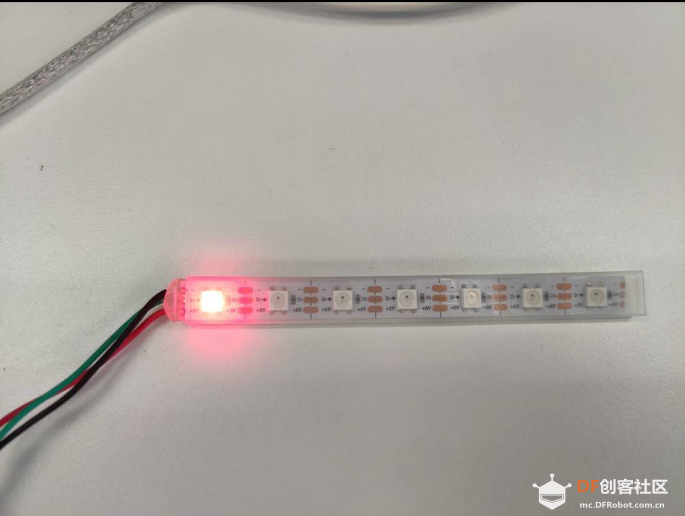
當屏幕中沒有人臉或者是未知人臉時,燈帶的第一個燈亮紅色。
本文轉載至:DF創客社區
原文鏈接:https://mc.dfrobot.com.cn/thread-306871-1-1.html
-
英特爾
+關注
關注
61文章
10130瀏覽量
173484 -
操作系統
+關注
關注
37文章
7007瀏覽量
124637 -
開發板
+關注
關注
25文章
5375瀏覽量
100603 -
Win10
+關注
關注
2文章
710瀏覽量
40644
發布評論請先 登錄
相關推薦
辦公園區使用人臉識別門禁終端,除了用來打卡還有什么功能?

人臉識別技術的優勢與劣勢
幾款性價比很不錯的門禁人臉識別系統及其常見應用
如何選擇合適的人臉門禁系統?人臉打卡門禁哪款好?

如何提升人臉門禁一體機的識別準確率?
隧道口門禁人臉識別是一種先進的安全管理技術
隧道門禁人臉識別系統是專為隧道安全管理設計的先進技術系統
隧道人臉識別門禁系統應用于隧道工程等場所的智能化安全管理系統


 工商網監
工商網監

評論