本文將介紹如何使用 cpp 編寫用于小型系統的 app。
Ability相關介紹
Ability 是應用所具備能力的抽象,也是應用程序的重要組成部分。Ability 是系統調度應用的最小單元,是能夠完成一個獨立功能的組件。
一個應用可以包含一個或多個 Ability。其中 Ability 又分為 Page 類型的和 Service 類型的,前者是為用戶提供人機交互能力的,后者是提供后臺任務機制的。
簡單來講就是 Page 帶界面,Service 不帶界面。這里將重點介紹 Page 類型的 Ability。
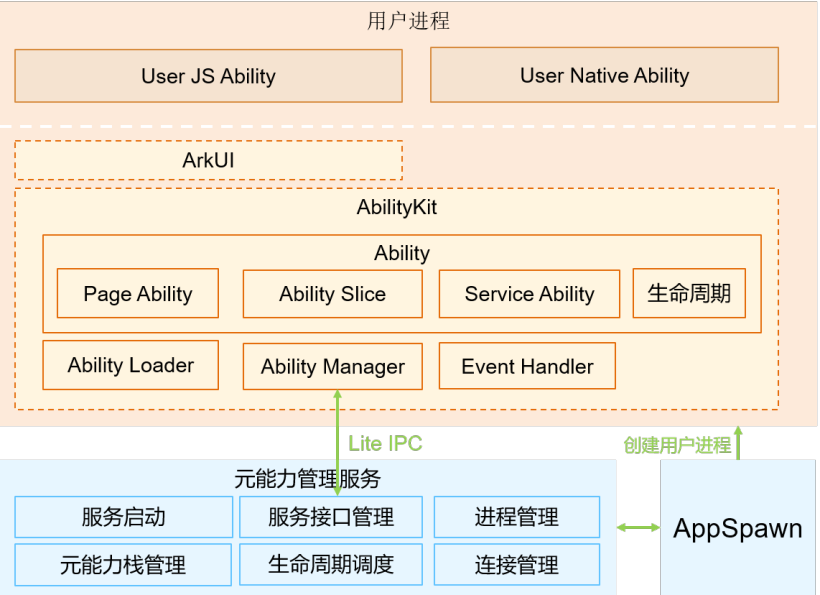
使用到的子系統有 Ability 子系統、包管理子系統和圖形 UI 子系統。
Ability 子系統是管理 OpenHarmony 應用運行狀態的開發框架;包管理子系統是 OpenHarmony 為開發者提供的安裝包管理框架;圖形 UI 子系統提供基礎 UI 組件和容器類組件。
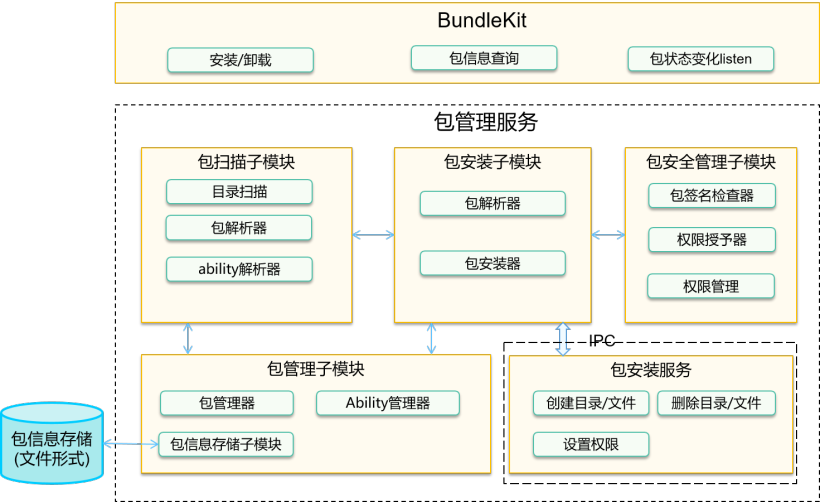
簡單實現
①ability 和 abilityslice
abilityslice 是單個頁面及其控制邏輯的總和,是 Page 類型 Ability 特有的組件。
一個 Page 類型的 Ability 可以包含多個 AbilitySlice,此時,這些頁面提供的業務能力應當是高度相關的。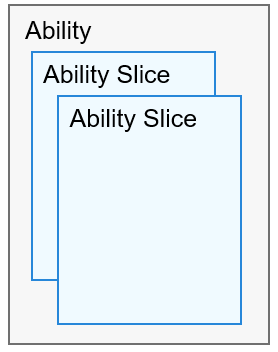
②生命周期
整體流程下來大致有 OnStart()、OnAvtive()、OnInactive()、OnBackground() 和 OnStop() 五階段。
abilityslice 生命周期與 ability 相似,但是仍要區分。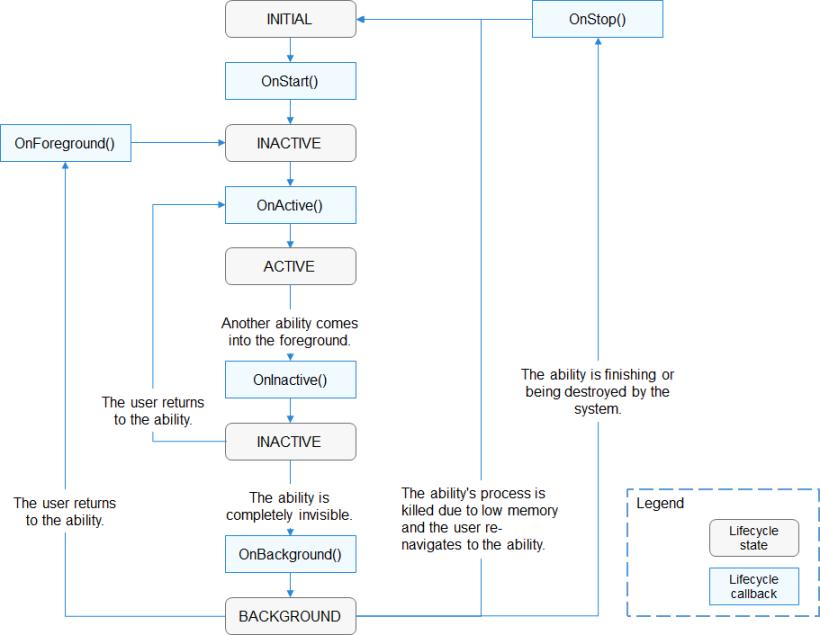
③hello world
./helloworld/
├──config.json//配置文件
├──resource//資源
└──src//主要文件
├──include
│├──main_ability.h
│└──main_ability_slice.h
└──main
├──main_ability.cpp
└──main_ability_slice.cpp
首先定義并注冊 ability:
//main_ability.h
#ifndefHELLO_MAIN_ABILITY_H
#defineHELLO_MAIN_ABILITY_H

#include"ability_loader.h"

namespaceOHOS{
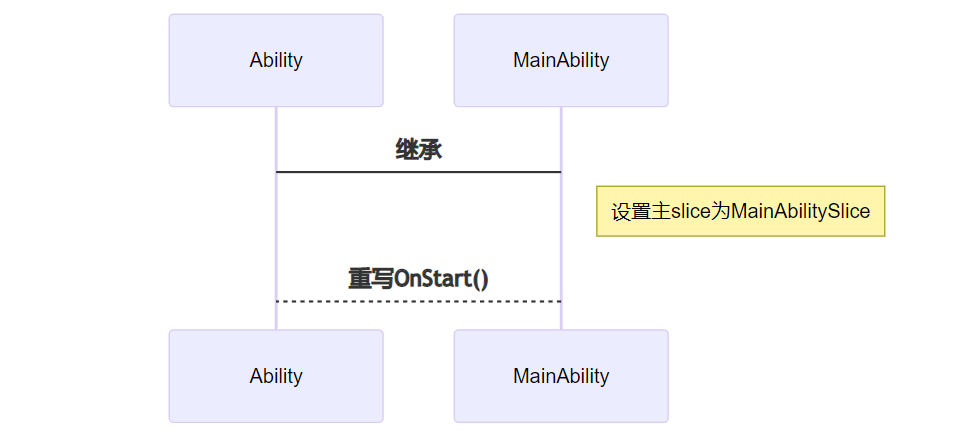
classMainAbility:publicAbility{
protected:
voidOnStart(constWant&want)override;//Want結構體,ability的相關信息
/*
*由于在這里我們只要簡單的展示helloworld標簽,其它函數不需要重載。
*/
//voidOnInactive()override;
//voidOnActive(constWant&want)override;
//voidOnBackground()override;
//voidOnStop()override;
};
}

#endif
//main_ability.cpp
#include"main_ability.h"

namespaceOHOS{
REGISTER_AA(MainAbility)//使用REGISTER_AA注冊ability

voidMainAbility::OnStart(constWant&want)
{
printf("ThisisMainAbilityOnStartstatus!
");
SetMainRoute("MainAbilitySlice");//設置主頁面為MainAbilitySlice,這要與后續的slice名字匹配

Ability::OnStart(want);
}
}
//main_ability_slice.h
#ifndefHELLO_ABILITY_SLICE_H
#defineHELLO_ABILITY_SLICE_H

#include"ability_loader.h"
#include"ability_manager.h"
#include"bundle_manager.h"
#include"components/ui_label.h"

namespaceOHOS{
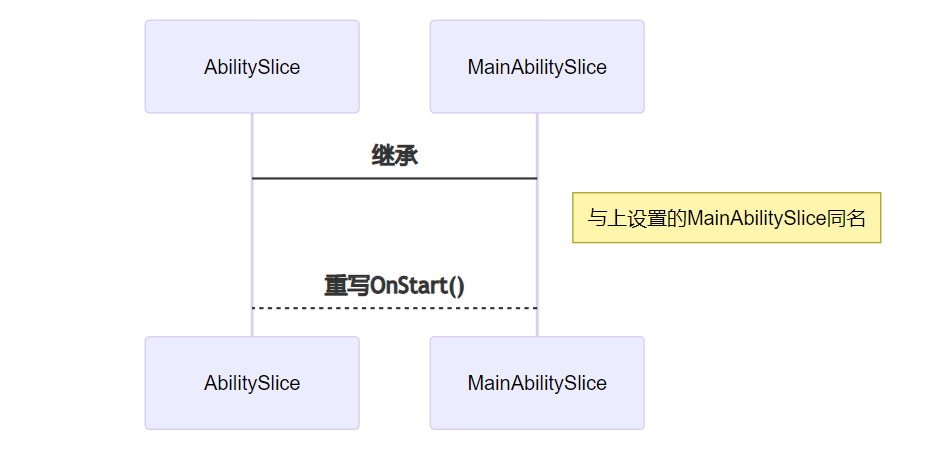
classMainAbilitySlice:publicAbilitySlice{//創建AbilitySlice類與上面同名
public:
MainAbilitySlice()=default;
virtual~MainAbilitySlice();

protected:
voidOnStart(constWant&want)override;
/*
*同理
*/
//voidOnInactive()override;
//voidOnActive(constWant&want)override;
//voidOnBackground()override;
//voidOnStop()override;
};
}
#endif
//main_ability_slice.cpp
#include"main_ability_slice.h"
constintscreen_width=720;
constintscreen_height=1280;

namespaceOHOS{
REGISTER_AS(MainAbilitySlice)

MainAbilitySlice::~MainAbilitySlice()
{
printf("Thisis~MainAbilitySlice!rn");
}

voidMainAbilitySlice::OnStart(constWant&want)
{
AbilitySlice::OnStart(want);
RootView*rootView_=RootView::GetWindowRootView();//創建底層界面
rootView_->SetPosition(0,0,screen_width,screen_height);
rootView_->SetStyle(STYLE_BACKGROUND_COLOR,Color::Black()));
rootView_->SetFocusable(true);
rootView_->SetInterceptFocus(false);

UILabel*label=newUILabel();//創建label寫入HelloWorld
label->SetPosition(0,0,720,64);
label->SetText("HelloWorld!");
label->SetFont("SourceHanSansSC-Regular.otf",64);
label->SetStyle(STYLE_TEXT_COLOR,Color::White()));

rootView_->Add(label);//將label放入rootView

SetUIContent(rootView_);//設置顯示RootViewUI
}
}
#endif
④config.json 的編寫
//config.json
{
"app":{
"bundleName":"com.sample.hello",
"vendor":"sample",
"version":{
"code":1,
"name":"1.0"
},
"apiVersion":{
"compatible":3,
"target":4
}
},
"deviceConfig":{
"default":{
}
},
"module":{
"package":"com.sample.hello",
"name":".MyHarmonyAbilityPackage",
"deviceType":[
"phone",
"tv",
"tablet",
"pc",
"car",
"smartWatch",
"sportsWatch",
"smartVision"
],
"distro":{
"deliveryWithInstall":true,
"moduleName":"hello",
"moduleType":"entry"
},
"abilities":[//ability配置聲明
{
"name":"MainAbility",
"label":"helloworldapp",
"launchType":"standard",
"type":"page",
"visible":true
}
]
}
}
hap編譯
①通過 BUILD.gn 與系統一并編譯使用到編譯鏈中的 hap_pack,添加配置:
import(“/ildte/config/hap_pack.gni”)
import("http://build/lite/config/hap_pack.gni")

shared_library("hello"){
sources=[
"src/main/main_ability.cpp",
"src/main/main_ability_slice.cpp"
]#將主要文件編譯出庫

deps=[
"${aafwk_lite_path}/frameworks/ability_lite:aafwk_abilitykit_lite",
"${appexecfwk_lite_path}/frameworks/bundle_lite:bundle",
"http://foundation/graphic/ui:lite_ui",
"http://foundation/graphic/utils:lite_graphic_utils",
"http://foundation/systemabilitymgr/samgr_lite/samgr:samgr",
]

include_dirs=[
"src/include",
"${aafwk_lite_path}/interfaces/kits/ability_lite",
"${aafwk_lite_path}/interfaces/kits/want_lite",
"${appexecfwk_lite_path}/interfaces/kits/bundle_lite",
]

ldflags=["-shared"]
ldflags+=["-lstdc++"]
ldflags+=["-L$ohos_root_path/sysroot/usr/lib"]
ldflags+=["-Wl,-rpath-link=$ohos_root_path/sysroot/usr/lib"]
ldflags+=[
"-lui",
"-lability",
]#添加依賴

defines=[
"ENABLE_WINDOW=1",
"ABILITY_WINDOW_SUPPORT",
"OHOS_APPEXECFWK_BMS_BUNDLEMANAGER",
]#配置定義
}

hap_pack("hello_hap"){#打包成hap
deps=[":hello"]
mode="hap"
json_path="config.json"
ability_so_path="$root_out_dir/libhello.so"#編譯后的庫文件
force="true"
cert_profile="com.huawei.launcher_AppProvision_release.p7b"#由于不清楚獲取證書方法先用源碼案例自帶的證書代替
resources_path="resources"
hap_name="hello"
}
②通過 app_packing_tool 單獨編譯
該打包工具在源碼目錄 developtools/packing_tool/jar 下。
主要參數如下:

./out/
├──config.json
└──libhello.so
最后使用 java -jar app_packing_tool.jar 進行打包,如下:
java-jarapp_packing_tool.jar|
--modehap|
--json-path./config.json|
--ability-out-path./libhello.so|
--out-path./hello.hap
hap安裝
①安裝命令 bm
由于小型系統不支持使用 HDC 工具,我們需要使用到 bm 命令進行安裝程序。
bmset-sdisable//取消簽名安裝。
bminstall-psystem/internal/hello.hap//使用BUILD.gn一起編譯的hap默認會在這個路徑,如果使用工具打包的,視情況填寫路徑。
②相關參數
#bm
Usage:installhap-path[options]
Description:
--help|-hhelpmenu
--happath|-plocationofthehaptoinstall
Usage:uninstallbundle-name[options]
Description:
--help|-hhelpmenu
--bundlename|-nnameofthebundletouninstall
Usage:dump[options]
OptionDescription:
--help|-hhelpmenu
--list|-lapplist
--bundlename|-ndumpinstalledhap'sinfo
--metadatakey|-mdumpbundleNamesmatchmetaDatakey
Usage:set[options]
OptionDescription:
--externalmode|-estatusenableexternalmode
--debugmode|-dstatusenabledebugmode
--signmode|-sstatusenablesignmode
小型系統的 bm 指令是標準系統的閹割版。
安裝成功后就可以打開該 app,部分小型系統的設備屏幕沒有觸摸功能和鼠標驅動,我們可以使用 aa 命令來啟動 app。
aastart-pcom.sample.hello-nMainAbility//包名和ability名都在config.json中定義
#aa
Usage:
aastart-pbundlename-nability_name
aastopability-pbundlename-nability_name
aaterminate-pbundlename
aadump-pbundlename-nability_name-eextra_option
aadump-a

Options:
-h(--help)Showthehelpinformation.[eg:aa-h]
-p(--bundlename)Appointthebundlenamename.[eg:-pcom.huawei]
-n(--abilityname)Appointtheabilityname.[eg:-nMyAbility]
-a(--all)[Unnecessary]dumpallabilityinfo.[eg:-a]
-e(--extra)[Unnecessary]extrainfowhendump.[eg:-e]

Commands:
aastartStartthetargetability.
aastopabilityStopthetargetserviceability.
aaterminateTerminatethetargetapp.
aadumpDumpability
總結
使用 cpp 編寫用戶應用程序,我們可以更方便有效的調用南向接口,這將會在開發和調試的過程中給我們帶來極大的便利。
審核編輯 :李倩
-
APP
+關注
關注
33文章
1577瀏覽量
72648 -
應用程序
+關注
關注
38文章
3291瀏覽量
57823 -
OpenHarmony
+關注
關注
25文章
3744瀏覽量
16473
原文標題:OpenHarmony上編寫app
文章出處:【微信號:gh_834c4b3d87fe,微信公眾號:OpenHarmony技術社區】歡迎添加關注!文章轉載請注明出處。
發布評論請先 登錄
相關推薦
idf4.4在cmakelists中設置了main.cpp依然找不到app_main ?為什么?
CPP和C共存的訣竅是什么?
Stm32的bootloader和App的編寫注意事項有哪些?
OpenHarmony輕量與小型系統入門概述
idf4.4在cmakelists.txt中設置了main.cpp依然找不到app_main是為什么?
(遠程控制)App inventor 編寫安卓app控制 ESP8266


 如何使用cpp編寫用于小型系統的app


評論