1、stm32控制4位共陽數碼管輸出計數
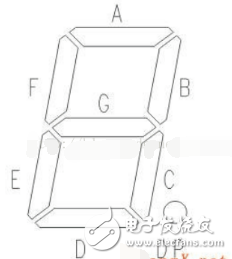
用stm32控制4位數碼管,需要用到GPIO口 PA0~PA11共12個引腳。首先我們來看看數碼管的原理圖。


因為是共陽所以12,9,8,6為電源輸入,其他引腳均為接地,所以對于芯片來說12,9,8,6高位輸出,其他設定為低位即可。
//設定下GPIO口
void GPIO_Num_Init(void)
{
GPIO_InitTypeDef GPIO_InitStructure;
RCC_APB2PeriphClockCmd(RCC_APB2Periph_GPIOA,ENABLE);
GPIO_PinRemapConfig(GPIO_Remap_SWJ_Disable, ENABLE);
GPIO_InitStructure.GPIO_Pin = GPIO_Pin_All;
GPIO_InitStructure.GPIO_Mode = GPIO_Mode_Out_PP;
GPIO_InitStructure.GPIO_Speed = GPIO_Speed_50MHz;
GPIO_Init(GPIOA,&GPIO_InitStructure);
}
這里有個要注意的,根據原理圖可以看出數碼管一次只能輸出一位數組,所以如果是多位的必須使用掃描的方式輸出,縮短切換的間隔,就可以達到不閃爍的效果。
//輸出封裝
void DisPlayNum(int n)
{
if (n 《 9999)
{ int i;
int s;
s = n;
i=0;
for (i=0;i《4;i++)
{
GPIO_ResetBits(GPIOA,GPIO_Pin_All);
switch (i)
{
case 0:
GPIO_SetBits(GPIOA,GPIO_Pin_5);
break;
case 1:
GPIO_SetBits(GPIOA,GPIO_Pin_7);
break;
case 2:
GPIO_SetBits(GPIOA,GPIO_Pin_8);
break;
case 3:
GPIO_SetBits(GPIOA,GPIO_Pin_11);
break;
}
switch (s % 10)
{
case 0:
GPIO_SetBits(GPIOA,GPIO_Pin_2|GPIO_Pin_4);
break;
case 1:
GPIO_SetBits(GPIOA,GPIO_Pin_2|GPIO_Pin_0|GPIO_Pin_1|GPIO_Pin_4|GPIO_Pin_9|GPIO_Pin_10);
break;
case 2:
GPIO_SetBits(GPIOA,GPIO_Pin_2|GPIO_Pin_3|GPIO_Pin_9);
break;
case 3:
GPIO_SetBits(GPIOA,GPIO_Pin_2|GPIO_Pin_0|GPIO_Pin_9);
break;
case 4:
GPIO_SetBits(GPIOA,GPIO_Pin_2|GPIO_Pin_0|GPIO_Pin_1|GPIO_Pin_10);
break;
case 5:
GPIO_SetBits(GPIOA,GPIO_Pin_2|GPIO_Pin_0|GPIO_Pin_6);
break;
case 6:
GPIO_SetBits(GPIOA,GPIO_Pin_2|GPIO_Pin_6);
break;
case 7:
GPIO_SetBits(GPIOA,GPIO_Pin_2|GPIO_Pin_0|GPIO_Pin_1|GPIO_Pin_4|GPIO_Pin_9);
break;
case 8:
GPIO_SetBits(GPIOA,GPIO_Pin_2);
break;
case 9:
GPIO_SetBits(GPIOA,GPIO_Pin_2|GPIO_Pin_0);
break;}
s = s / 10;
delay_ms(1);
if (s==0)
break;}}}
