前言 (閑聊)
之前在上移動平臺開發課的過程中,對android的開發算是有一個大概的初步了解,但是知之甚淺。印象最深刻的就是但凡遇到圖片視頻方面的處理就會變得非常復雜以及容易出錯。那時對于我這個小白來說想調用一個視頻播放器來播放一小段視頻都是一個"大"工程了,至于什么實時的視頻對話想都不想去想,因為太復雜且麻煩!!!
但是有了功能齊全的SDK ,這次的實時視頻開發,卻是與以前完全不同的體驗。直觀感受就好像是我這種菜雞做機器學習模型有了Python的sklearn庫,菜雞的大雄有了多啦A夢那樣,擁有了一個萬能的百寶箱。當你想實現一個想著就十分復雜的功能時例如直播的推拉流之類的,這里面就已經集成了對應的函數。
所用SDK介紹
關于SDK的安裝本文不做過多描述,我使用的是ZEGO EXPRESS SDK,相應的安裝詳細過程請直接看鏈接
https://doc-zh.zego.im/zh/215.html,同時記得按照步驟申請對應的AppID以及AppSign.
使用此SDK的優點:代碼簡單易懂,文檔內容較為全面,實現簡單。
本文實際內容可以有些長,所以可以根據目錄篩選查看內容
目錄
一.所實現項目的功能
1.項目實現核心截圖
2.所實現的功能
3.適用的應用場景
二.實現流程
1.布局的設計
2.核心邏輯代碼
2.1推流和拉流的概念
2.2正式開始及全局變量的聲明
2.2.1 onCreate函數內操作
1.申請AppID
2.初始化SDK
3.初始化用戶及登錄房間
4.獲取所在房間內的所有推流
2.2.2 點擊事件
1.推拉流
2.麥克風按鈕處理
3.與本地相機美顏、改變攝像頭前后置等本地擴展功能
4.退出按鈕
三.源代碼
四.不足以及可以繼續開發的地方
一.所實現項目的功能
1.項目實現核心截圖
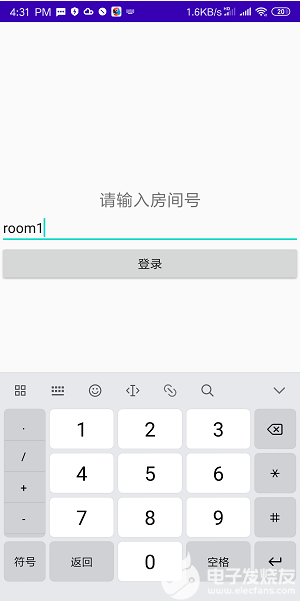
登錄界面
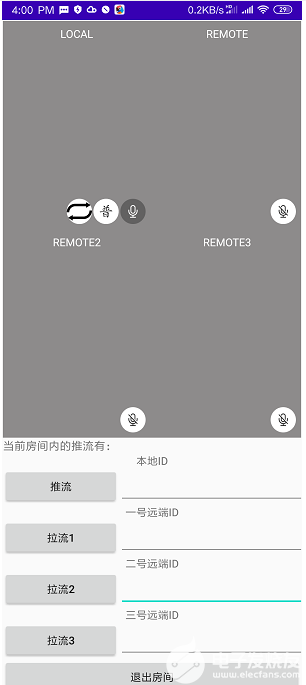
核心視頻UI
2.所實現的功能
(1).從登錄界面到視頻界面的跳轉,以及傳遞所輸入的房間號ID。以及在核心視頻UI界面的退出到登錄界面的跳轉.
(2) 四人可同時正常視頻通話,且對應每個流所呈現的畫面進行打開關閉收音.
(3).實時的將同一房間號的正在推流的流ID全部顯示在第二排視頻下的TextView上(在該房間的用戶可根據次項流ID內容)
(4).實現對本地界面中的前后置攝像頭進行切換,美顏效果的實現。
3.適用的應用場景
家庭聊天,同事或者同學聊天以及簡單的面對面會議。
二.實現流程
**1.**先說簡單說一下界面布局的設計。這個相對簡單,看上述的界面也大概也能明白一些,說一下我做的過程中遇到的問題吧。
第一個因為只需要輸入房間ID,所以登陸界面很簡單,線性布局垂直方向, 再加上TextView + EditText + Button就解決了的最簡單登陸界面。實在不懂可以直接看第三部分的源代碼。
第二個界面對于新手來說還是有些困難的,首先由于四人視頻所占空間很大,一個屏幕的大小不能輕易放下,這種需要滾動條的情況就可以采用三種手段來解決分別是RecyclerView,ListView以及ScrollView來解決。本文采用的是相對來說最簡單的ScrollView來解決。這里就要注意了,**ScrollView當中只有一個子元素**,所以如果你想像我一樣,把ScrollView作為最外層的話,需要在內部再嵌套一個線性布局,這樣才能用。
相連視頻的畫面采用的是相對布局,這樣更加方便做微調,視頻本身使用TextureView來做。
我代碼的整體設計布局框架如下(要注意的是本文對于核心視頻UI的布局上圖片的點擊事件,都是在圖片的屬性中添加的android:onClick處理解決方法,這里看不懂沒關系,后面也會說。)
```xml
...(省略拉流1和2的TextView+LinearLayout的組合,寫法類似下面這個框架的)
```
更詳盡的代碼見第三部分的全部源碼
**2.**下面就是核心邏輯代碼的實現了
**注意:以下只展示核心的代碼,并不能直接運行,具體操作請看第三部分。**
**2.1**首先,如果不理解**推流**和**拉流**的概念的話,首先要快速理解一下。
實際上我們可以用一個簡單過程來幫助理解。
首先來說,推流就是你發送出去一串代碼(流ID)以及你本地的照相機所拍攝的實時畫面(所謂的流) 上網絡且到達服務器并存儲。且如果你不停止推流就要一直發送,就好像水流一樣源源不斷,但是服務器里面就好像是有門堵著的,水是不能輕易漏出來。
別人想在這個服務器上看你的視頻咋辦? 他就要拉你對應的流,咋拉呢?就通過你發的那個推出去的流ID來拉。如果他知道這個流ID ,就好像是找到了服務器對應一扇門的一把鎖鑰匙似的,把你不斷發送到服務器的"流"大門打開,水流涌出來了一直到他的手機上,這樣他就看到你的畫面了。
而你如果停止了推流,水就沒了,他自然就接收不到畫面了。他停止拉流,等于是把之前那扇門又關上了,他手機上也不會再接收你的畫面。
**2.2**理解之后,如果你的SDK已經按照最頂上鏈接集成完畢后,開發過程就可以正式開始了!
以下要用到很多的全局變量,首先展示一下他們的聲明以及初始值,如果下面的有些看不懂的可以返回過來看一看這里所寫的內容,以及注釋。
```java
public static ZegoExpressEngine engine = null;
boolean publishMicEnable = true; // 初始的自己麥克風為開著的
boolean playStreamMute = true; //其余屏幕人的初始狀態都為靜音
boolean playStreamMute2 = true;
boolean playStreamMute3 = true;
boolean isBeauty = false;//初始無美顏
boolean isFrontCamera = true; // 初始為前置攝像頭
ImageButton ib_local_mic; //本地麥克風
ImageButton ib_remote_stream_audio;//拉流1外部視角的音量
ImageButton ib_remote_stream_audio2;//拉流2外部視角的音量
ImageButton ib_remote_stream_audio3;//拉流3外部視角的音量
ImageButton ib_beauty; //美顏按鍵
String LocalStreamID; //本地推流ID
String RemoteStreamID; //拉流1 ID
String RemoteStreamID2; //拉流2 ID
String RemoteStreamID3;//拉流3 ID
ArrayList
private String userID;//用戶ID
String roomID;//房間ID
//寫好自己的ID和sign,以下為我所申請的ID,如果要自己使用或者商用請自行申請并修改
long appID = ;? // 請通過官網注冊獲取,格式為 123456789L
String appSign = "";? //64個字符,請通過官網注冊獲取,格式為"0123456789012345678901234567890123456789012345678901234567890123"
```
**2.2.1** onCreate函數部分
**(1).**申請AppID,這一步如果不做的話根本后面做不了!!所以要先申請一各APPID,可以看我最上方附的那個鏈接?
**(2)**根據你的appID以及appsign進行初始化SDK,使用測試環境,通用場景接入。如果這一步成功了,那么恭喜你,你已經獲得了一個強大的神奇engine,他功能強大,后面所有所有都是依靠他來實現的,什么推流拉流就是一行代碼的事情.
```java
engine = ZegoExpressEngine.createEngine(appID, appSign, true, ZegoScenario.GENERAL, getApplication(), null);
```
**(3).**初始化用戶,并將用戶登錄至房間內。這步也是在進行視頻通話之前的必須一步,我們每個人都是在服務器上一個獨立的個體,想要實現特定用戶群體之間的交流。房間是很好的一個工具。這個userid和name在全局中不能有任何重復,最好有一定意義,但我面向的場景主要是家庭場景,不太需要,如果是商用開發還是很有必要開發的。為了防止重復,我采用的是生成隨機數,這樣的話重復的概率就小很多了。
我這里的roomID,從登錄界面時的intent的所傳遞的數據來定義的
```java
//用戶注冊
String randomSuffix = String.valueOf(new Date().getTime() % (new Date().getTime() / 1000));
userID = "user" + randomSuffix;
ZegoUser user = new ZegoUser(userID);
...
//房間登錄
ntent intent = getIntent();
roomID = intent.getStringExtra("room_id");//getXxxExtra方法獲取Intent傳遞過來的roomID
engine.loginRoom(roomID, user);//有了房間號,將用戶登錄到該房間
```
**(4).**獲取所在房間內的所有推流。這里面主要就是要用到監聽房間相關事件回調來實現主要用到的是回調中的onRoomStreamUpdate 要注意的是:這里的流更新指的是房間內其他用戶的,用戶自己的流產生變化,自己的這個回調函數是沒有反應的。
想實現此功能,首先要創建一個ArrayList來記錄房間內存在的所有的流ID。可以看到如下的RoomStreamList我是在全局變量的地方事先聲明過了。(其他全局變量的聲明我會放到后面函數部分說明) 這里放入的第一個元素的目的是為了方便在后面講ArrayList中所有元素連接成為一行具體的內容.
```java
RoomStreamList = new ArrayList
RoomStreamList.add("當前房間內的推流有:");
```
onRoomStreamUpdate的具體寫法如下所示,看起來好像挺長,實際上思路就是如果有一個流ID狀態發生改變,我就看我的列表當中是不是有這個流ID如果有那就去掉,如果沒有就加入進去。實在不懂,根據注釋也能看個大概,這里面需要提一下的是sentenceId += 這個并不是真正的加法,而是java中的字符串拼接,將ArrayList中所有元素拼成一句話,并找到要顯示的TextView并顯示出來。
```java
engine.setEventHandler(new IZegoEventHandler() {
...
public void onRoomStreamUpdate(String roomID, ZegoUpdateType updateType, ArrayList
/* 流狀態更新,登陸房間后,當房間內有用戶新推送或刪除音視頻流時,SDK會通過該回調通知 */
//自己的推流不會被記入
for (int i = 0; i < streamList.size(); i++)//加入或退出房間流的所有推流id全都遍歷一遍
{
Toast.makeText(getApplicationContext(), streamList.get(i).streamID + " room stream changed", Toast.LENGTH_LONG).show();
if (RoomStreamList.contains(streamList.get(i).streamID)) {//如果現有列表中包含這個,就移除
RoomStreamList.remove(streamList.get(i).streamID);
} else {//如果現有列表中不包含這個就加入
RoomStreamList.add(streamList.get(i).streamID);
}
}
String SentenceId = "";// 用于記錄下當前房間內還有的流ID
for (int i = 0; i < RoomStreamList.size(); i++) {
SentenceId += RoomStreamList.get(i) + " ";//利用字符串拼接,將當前房間還在的所有流ID全部記下
}
TextView ViewIdlist = findViewById(R.id.stream_id_list);//找到用于顯示流ID的TextView
ViewIdlist.setText(SentenceId);//設置文字信息在TextView上體現出來
}
});
```
**(5).**動態權限申請,代碼如下。若需要申請更多權限則自行添加。
```java
String[] permissionNeeded = {
"android.permission.CAMERA",
"android.permission.RECORD_AUDIO"};
if (Build.VERSION.SDK_INT >= Build.VERSION_CODES.M) {
if (ContextCompat.checkSelfPermission(this, "android.permission.CAMERA") != PackageManager.PERMISSION_GRANTED ||
ContextCompat.checkSelfPermission(this, "android.permission.RECORD_AUDIO") != PackageManager.PERMISSION_GRANTED) {
requestPermissions(permissionNeeded, 101);}
}
```
**2.2.2** 接下來要做的就是逐步完成每個在視圖中注冊的點擊事件,其中包括四個部分,分別是1.推拉流 2.麥克風按鈕處理
**3.**與本地相機美顏、改變攝像頭前后置等本地擴展功能 4.退出按鈕
**(1)**.推拉流
這也是視頻通話最為主要的部分。但是卻是十分簡單的,核心的代碼就只需要調用兩個接口也就是兩行代碼就可以解決。但是還是有些要注意的事項。如下為推流**核心**代碼,有所省略,具體實現詳見第三部分。 實際上可以看出來,核心的邏輯就是判斷推流按鈕上的字是否是"推流",如果是的話就就行推流再把文字設置稱為"停止推流"。
其中也包含了核心的接口就是startPublishingStream,stopPublishingStream以及startpreview和stoppreview來獲取本地圖像。
```java
public void ClickPublish(View view) {
...
if (button.getText().equals("推流")) {//若上面的文字是推流,則說明還未推流。
/* 開始推流 */
EditText et = findViewById(R.id.ed_publish_stream_id);//找到,旁邊的EditText的實例
LocalStreamID = et.getText().toString();//獲取其文字內容,并賦值給全局變量LocalStreamID
engine.startPublishingStream(LocalStreamID);//推流
/* 開始預覽并設置本地預覽視圖 */
/* Start preview and set the local preview view. */
View local_view = findViewById(R.id.local_view);//獲取預覽圖像的TextureView實例
engine.startPreview(new ZegoCanvas(local_view));//開始預覽
button.setText("停止推流");//文字從推流改變為停止推流
} else {//若上面文字不是推流
/* 停止推流 */
engine.stopPublishingStream();//停止推流
/* 停止本地預覽 */
/* Start stop preview */
engine.stopPreview();//停止預覽
button.setText("推流");//文字變為推流
}
}
```
以拉流1按鈕為例,拉流的實現實際上與推流十分類似甚至還簡單一些。核心邏輯也是相似的判斷按鈕上的字是否為拉流1。核心的接口就是startPlayingStream和stopPlayingStream兩個。
要注意的是,我這里首先對要拉的流默認是先靜音的。這里的playStreamMute是一個全局變量默認值為True.
```java
public void ClickPlay(View view) {
...
if (button.getText().equals("拉流1")) {//若文字為拉流1
/* 開始拉流 */
/* Begin to play stream */
EditText et = findViewById(R.id.ed_play_stream_id);//獲取拉流旁的EditText實例
RemoteStreamID = et.getText().toString();//獲取其字符串,作為1號拉流ID
View play_view = findViewById(R.id.remote_view);//獲取播放實例
engine.startPlayingStream(RemoteStreamID, new ZegoCanvas(play_view));//開始拉流
engine.mutePlayStreamAudio(RemoteStreamID, playStreamMute);//首先對各用戶采取靜音
button.setText("停止拉流");//文字變為停止拉流
} else {
/* 停止拉流 */
/* Begin to stop play stream */
engine.stopPlayingStream(RemoteStreamID);//停止拉流
button.setText("拉流1");//文字轉變為拉流1
}
}
```
**(2)**.麥克風按鈕處理
首先來說本地話筒,如下的publishMicEnable是一個bool類型的全局變量,初始值為true,根據注釋可以大概看懂。
要注意的就是核心接口engine.muteMicrophone(!publishMicEnable);這里括號中是對于publishMicEnable進行了取反的,原因可以根據變量的名字就能看出來,他**mute**Microphone我們是publishMic**Enable**,二者意義本身就相反,所以取反之后才能體現原本意義。
```java
//本地麥克風
public void enableLocalMic(View view) {
publishMicEnable = !publishMicEnable;//將bool變量先取反,即狀態改變
if (publishMicEnable) {//本地麥克風經取反后為真,那么就把圖標變為開啟狀態的圖標
ib_local_mic.setBackgroundDrawable(getResources().getDrawable(R.drawable.ic_bottom_microphone_on));
} else {//反之,則變為關閉狀態的圖標
ib_local_mic.setBackgroundDrawable(getResources().getDrawable(R.drawable.ic_bottom_microphone_off));
}
/* Enable Mic*/
engine.muteMicrophone(!publishMicEnable);//因為這個函數是mute,而我們是enable,所以取反才與本義相同
}
```
其次對于遠端拉流麥克風的控制,以拉流1所收畫面的麥克風為例。與本地麥克風相似,核心函數有所不同。此處的核心函數為engine.mutePlayStreamAudio(RemoteStreamID, playStreamMute),這里面的兩個參數也都是全局變量,playStreamMute也是一個bool類型的變量,初始值為true。而這個RemoteStreamID這個全局變量在之前的拉流時所進行賦值的。
```java
public void enableRemoteMic(View view) {
playStreamMute = !playStreamMute;//先將此bool變量取反,即狀態改變
if (playStreamMute) {//若此時該bool變量為真,則說明是靜音狀態,則圖標變為關閉狀態圖標
ib_remote_stream_audio.setBackgroundDrawable(getResources().getDrawable(R.drawable.ic_bottom_microphone_off));
} else {//反之則變為開啟狀態
ib_remote_stream_audio.setBackgroundDrawable(getResources().getDrawable(R.drawable.ic_bottom_microphone_on));
}
/* Enable Mic*/
engine.mutePlayStreamAudio(RemoteStreamID, playStreamMute);//此處因為bool變量實際意義與函數本義相同,故不用取反
}
```
**(3)**.與本地相機美顏、改變攝像頭前后置等本地擴展功能?
這部分功能就比較簡單了,實現的邏輯與麥克風相似,也是對于一個bool型全局變量進行判斷。
相機美顏實現如下,核心的接口就是engine.enableBeautify(WHITEN);代碼當中的isBeauty為一個全局變量的bool值。
這里我只使用了美白參數進行使用,還可以添加其他的參數,詳情見頂部連接中點開API文檔。
```java
public void enableBeauty(View view) {
isBeauty = !isBeauty;//取反
//更換圖標
if (isBeauty) {//若現在為真,則變為使用美顏對應圖標
ib_beauty.setBackgroundDrawable(getResources().getDrawable(R.drawable.beauty_ps));
} else {//若現在為假,則對應普通狀態圖標
ib_beauty.setBackgroundDrawable(getResources().getDrawable(R.drawable.normal));
}
if (isBeauty) {//如果處于美顏狀態
//這里只采用一個較為明顯的美白功能
engine.enableBeautify(WHITEN);
} else {//反之則關閉所有美顏設置
engine.enableBeautify(NONE);
}
}
```
改變攝像頭方向,因為不需要更換圖標所以更為簡單,核心接口是engine.useFrontCamera(isFrontCamera);其中isFront為bool類型的全局變量
```java
public void frontCamera(View view)
{
isFrontCamera = !isFrontCamera;//先去反
engine.useFrontCamera(isFrontCamera);//根據現有布爾值帶入是否使用前置攝像頭的函數中
}
```
**(4)**.退出按鈕
這部分要注意的是,退出按鈕要同時考慮到退出之后還要回到房間登錄界面,以及若當前是推流狀態要停止當前推流,以及退出用戶對于房間的登錄。實現起來還是比較簡單的代碼如下,其中使用了顯示intent來進行活動的啟動,roomID為一個全局變量。在初始化的主函數中就以及賦值為了從之前登錄界面所帶來的roomID.
```java
public void Logout(View view) {
Intent intent = new Intent(this, Login.class);//設置一個從當前活動到Login活動的intent
engine.stopPublishingStream();//停止推流
engine.logoutRoom(roomID);//退出該房間
startActivity(intent);//重新進入房間的登錄界面
finish();//結束當前活動
}
```
這樣就寫完了,怎么樣是不是非常簡單!真正要自己去想的也就是一些邏輯的處理,大大節省了開發的時間。
三.源代碼
**1.**兩組layout
登錄界面layout
```xml
android:layout_width="match_parent"
android:layout_height="match_parent"
android:orientation="vertical"
>
android:layout_width="match_parent"
android:layout_height="557dp"
android:gravity="center_vertical"
android:orientation="vertical">
android:layout_width="match_parent"
android:layout_height="wrap_content"
android:text="請輸入房間號"
android:textSize="22dp"
android:layout_gravity="center_horizontal"
android:textAlignment="center"
/>
android:id="@+id/room_login"
android:layout_width="match_parent"
android:layout_height="wrap_content"
android:layout_gravity="center_vertical" />
android:id="@+id/btn_login"
android:layout_width="match_parent"
android:layout_height="wrap_content"
android:layout_gravity="center_vertical"
android:text="登錄"
android:textSize="16dp"
/>
```
核心視頻UI的layout (有點長。。)
```xml
android:layout_width="match_parent"
android:layout_height="match_parent"
android:padding="1dp">
android:orientation="vertical"
android:layout_width="match_parent"
android:layout_height="wrap_content">
android:layout_width="match_parent"
android:layout_height="273dp"
android:background="#8D8B8B"
android:orientation="horizontal">
android:id="@+id/view"
android:layout_width="3dp"
android:layout_height="match_parent"
android:layout_centerHorizontal="true"
/>
android:id="@+id/local_view"
android:layout_width="wrap_content"
android:layout_height="match_parent"
android:layout_marginBottom="3dp"
android:layout_marginEnd="4dp"
android:layout_marginLeft="3dp"
android:layout_marginRight="4dp"
android:layout_marginStart="3dp"
android:layout_marginTop="3dp"
android:layout_toLeftOf="@id/view"
android:layout_toStartOf="@id/view" />
android:id="@+id/textView"
android:layout_width="match_parent"
android:layout_height="33dp"
android:layout_marginEnd="0dp"
android:layout_marginRight="0dp"
android:layout_toLeftOf="@id/view"
android:layout_toStartOf="@id/view"
android:gravity="center"
android:text="LOCAL"
android:textColor="#ffffff"
/>
android:id="@+id/ib_local_camera_change"
android:layout_width="33dp"
android:layout_height="33dp"
android:layout_alignParentBottom="true"
android:layout_marginRight="77dp"
android:layout_marginBottom="7dp"
android:layout_toStartOf="@id/view"
android:layout_toLeftOf="@id/view"
android:background="@drawable/arrow"
android:onClick="frontCamera" />
android:id="@+id/ib_local_beauti"
android:layout_width="33dp"
android:layout_height="33dp"
android:layout_alignParentBottom="true"
android:layout_marginRight="42dp"
android:layout_marginBottom="7dp"
android:layout_toStartOf="@id/view"
android:layout_toLeftOf="@id/view"
android:background="@drawable/normal"
android:onClick="enableBeauty" />
android:id="@+id/ib_local_mic"
android:layout_width="33dp"
android:layout_height="33dp"
android:layout_alignParentBottom="true"
android:layout_marginRight="7dp"
android:layout_marginBottom="7dp"
android:layout_toStartOf="@id/view"
android:layout_toLeftOf="@id/view"
android:background="@drawable/ic_bottom_microphone_on"
android:onClick="enableLocalMic" />
android:id="@+id/remote_view"
android:layout_width="wrap_content"
android:layout_height="match_parent"
android:layout_marginBottom="3dp"
android:layout_marginEnd="3dp"
android:layout_marginLeft="6dp"
android:layout_marginRight="3dp"
android:layout_marginStart="6dp"
android:layout_marginTop="3dp"
android:layout_toEndOf="@id/view"
android:layout_toRightOf="@id/view" />
android:id="@+id/textView2"
android:layout_width="match_parent"
android:layout_height="33dp"
android:layout_toEndOf="@id/view"
android:layout_toRightOf="@id/view"
android:gravity="center"
android:text="REMOTE"
android:textColor="#ffffff" />
android:id="@+id/ib_remote_mic"
android:layout_width="33dp"
android:layout_height="33dp"
android:layout_alignParentRight="true"
android:layout_alignParentBottom="true"
android:layout_marginEnd="7dp"
android:layout_marginRight="7dp"
android:layout_marginBottom="7dp"
android:background="@drawable/ic_bottom_microphone_off"
android:onClick="enableRemoteMic" />
android:layout_width="match_parent"
android:layout_height="273dp"
android:background="#8D8B8B"
android:orientation="horizontal">
android:id="@+id/view2"
android:layout_width="3dp"
android:layout_height="match_parent"
android:layout_centerHorizontal="true"
/>
android:id="@+id/remote_view2"
android:layout_width="wrap_content"
android:layout_height="match_parent"
android:layout_marginBottom="3dp"
android:layout_marginEnd="5dp"
android:layout_marginLeft="3dp"
android:layout_marginRight="5dp"
android:layout_marginStart="3dp"
android:layout_marginTop="3dp"
android:layout_toLeftOf="@id/view2"
android:layout_toStartOf="@id/view2" />
android:id="@+id/textView3"
android:layout_width="match_parent"
android:layout_height="33dp"
android:layout_marginEnd="0dp"
android:layout_marginRight="0dp"
android:layout_toLeftOf="@id/view2"
android:layout_toStartOf="@id/view2"
android:gravity="center"
android:text="REMOTE2"
android:textColor="#ffffff"
/>
android:id="@+id/ib_remote_mic2"
android:layout_width="33dp"
android:layout_height="33dp"
android:layout_alignParentBottom="true"
android:layout_marginRight="7dp"
android:layout_marginBottom="7dp"
android:layout_toStartOf="@id/view2"
android:layout_toLeftOf="@id/view2"
android:background="@drawable/ic_bottom_microphone_off"
android:onClick="enableRemoteMic2" />
android:id="@+id/remote_view3"
android:layout_width="wrap_content"
android:layout_height="match_parent"
android:layout_marginBottom="3dp"
android:layout_marginEnd="3dp"
android:layout_marginLeft="0dp"
android:layout_marginRight="3dp"
android:layout_marginStart="0dp"
android:layout_marginTop="3dp"
android:layout_toEndOf="@id/view2"
android:layout_toRightOf="@id/view2" />
android:id="@+id/textView4"
android:layout_width="match_parent"
android:layout_height="33dp"
android:layout_toEndOf="@id/view2"
android:layout_toRightOf="@id/view2"
android:gravity="center"
android:text="REMOTE3"
android:textColor="#ffffff" />
android:id="@+id/ib_remote_mic3"
android:layout_width="33dp"
android:layout_height="33dp"
android:layout_alignParentRight="true"
android:layout_alignParentBottom="true"
android:layout_marginEnd="7dp"
android:layout_marginRight="7dp"
android:layout_marginBottom="7dp"
android:background="@drawable/ic_bottom_microphone_off"
android:onClick="enableRemoteMic3" />
android:id="@+id/stream_id_list"
android:layout_width="match_parent"
android:layout_height="wrap_content"
android:text="當前房間內的推流有:"
android:textSize="15dp"
/>
android:layout_width="match_parent"
android:layout_height="wrap_content"
android:text="本地ID"
android:layout_gravity="center_horizontal"
android:textAlignment="center"
/>
android:layout_width="wrap_content"
android:layout_height="wrap_content">
android:id="@+id/btn_start_publish"
android:layout_width="152dp"
android:layout_height="wrap_content"
android:onClick="ClickPublish"
android:text="推流" />
android:id="@+id/ed_publish_stream_id"
android:layout_width="275dp"
android:layout_height="match_parent">
android:layout_width="match_parent"
android:layout_height="wrap_content"
android:text="一號遠端ID"
android:layout_gravity="center_horizontal"
android:textAlignment="center"
/>
android:layout_width="wrap_content"
android:layout_height="wrap_content">
android:id="@+id/btn_start_play"
android:layout_width="152dp"
android:layout_height="wrap_content"
android:text="拉流1"
android:onClick="ClickPlay"
/>
android:id="@+id/ed_play_stream_id"
android:layout_width="275dp"
android:layout_height="match_parent">
android:layout_width="match_parent"
android:layout_height="wrap_content"
android:text="二號遠端ID"
android:layout_gravity="center_horizontal"
android:textAlignment="center"
/>
android:layout_width="wrap_content"
android:layout_height="wrap_content">
android:id="@+id/btn_start_play2"
android:layout_width="152dp"
android:layout_height="wrap_content"
android:text="拉流2"
android:onClick="ClickPlay2"
/>
android:id="@+id/ed_play_stream_id2"
android:layout_width="275dp"
android:layout_height="match_parent">
android:layout_width="match_parent"
android:layout_height="wrap_content"
android:text="三號遠端ID"
android:layout_gravity="center_horizontal"
android:textAlignment="center"
/>
android:layout_width="wrap_content"
android:layout_height="wrap_content">
android:id="@+id/btn_start_play3"
android:layout_width="152dp"
android:layout_height="wrap_content"
android:text="拉流3"
android:onClick="ClickPlay3"
/>
android:id="@+id/ed_play_stream_id3"
android:layout_width="275dp"
android:layout_height="match_parent">
android:id="@+id/btn_logout"
android:layout_width="match_parent"
android:layout_height="wrap_content"
android:onClick="Logout"
android:text="退出房間" />
```
**2.**活動java源代碼
登錄界面.java
```java
import androidx.appcompat.app.AppCompatActivity;
import android.content.Intent;
import android.os.Bundle;
import android.view.View;
import android.widget.Button;
import android.widget.EditText;
import android.widget.Toast;
public class Login extends AppCompatActivity {
protected void onCreate(Bundle savedInstanceState) {
super.onCreate(savedInstanceState);
setContentView(R.layout.activity_login);//設置布局
Button login = findViewById(R.id.btn_login);//獲取登錄按鈕實例
login.setOnClickListener(new View.OnClickListener() {
@Override
public void onClick(View v) {//匿名類實現監聽功能
EditText roomIDx = findViewById(R.id.room_login);//獲取用于輸入的EditText的實例
String roomID = roomIDx.getText().toString().trim();//獲取其中的文字,也就是對應的roomID
if (roomID.equals("")) {//檢查此ID是否為空,為空則彈出,請輸入信息。
Toast.makeText(Login.this, "請輸入roomID", Toast.LENGTH_LONG).show();
}
else {//反之啟動活動UI
Intent intent =new Intent(Login.this, UI.class);//創建一個顯式intent
intent.putExtra("room_id", roomID);//并將房間號作為夸活動傳輸的數據傳輸到UI活動當中
startActivity(intent);//啟動Activity
finish();//結束活動
}
}
});
}
}
```
核心視頻UI.java
```java
import android.content.pm.PackageManager;
import android.os.Bundle;
import androidx.appcompat.app.AppCompatActivity;
import androidx.core.content.ContextCompat;
import im.zego.zegoexpress.ZegoExpressEngine;
import im.zego.zegoexpress.constants.ZegoRoomState;
import im.zego.zegoexpress.constants.ZegoUpdateType;
import im.zego.zegoexpress.entity.ZegoCanvas;
import im.zego.zegoexpress.entity.ZegoStream;
import im.zego.zegoexpress.entity.ZegoUser;
import im.zego.zegoexpress.callback.IZegoEventHandler;
import im.zego.zegoexpress.constants.ZegoScenario;
import android.content.Intent;
import android.os.Build;
import android.view.View;
import android.widget.Button;
import android.widget.EditText;
import android.widget.ImageButton;
import android.widget.TextView;
import android.widget.Toast;
// 導入對應美顏參數的常量值
import static im.zego.zegoexpress.constants.ZegoBeautifyFeature.*;
import org.json.JSONObject;
import java.util.ArrayList;
import java.util.Date;
public class UI extends AppCompatActivity {
public static ZegoExpressEngine engine = null;
boolean publishMicEnable = true; // 初始的自己麥克風為開著的
boolean playStreamMute = true; //其余屏幕人的初始狀態都為靜音
boolean playStreamMute2 = true;
boolean playStreamMute3 = true;
boolean isBeauty = false;//初始無美顏
boolean isFrontCamera = true; // 初始為前置攝像頭
ImageButton ib_local_mic; //本地麥克風
ImageButton ib_remote_stream_audio;//拉流1外部視角的音量
ImageButton ib_remote_stream_audio2;//拉流2外部視角的音量
ImageButton ib_remote_stream_audio3;//拉流3外部視角的音量
ImageButton ib_beauty; //美顏按鍵
String LocalStreamID; //本地推流ID
String RemoteStreamID; //拉流1 ID
String RemoteStreamID2; //拉流2 ID
String RemoteStreamID3;//拉流3 ID
ArrayList
private String userID;//用戶ID
String roomID;//房間ID
//寫好自己的ID和sign,以下為我所申請的ID,如果要自己使用或者商用請自行申請并修改
long appID = ;? // 請通過官網注冊獲取,格式為 123456789L
String appSign = ;? //64個字符,請通過官網注冊獲取,格式為"0123456789012345678901234567890123456789012345678901234567890123"
protected void onCreate(Bundle savedInstanceState) {
super.onCreate(savedInstanceState);
/* 填寫 appID 和 appSign */
/* 初始化SDK,使用測試環境,通用場景接入,此為自動初始化,無需點擊按鈕*/
engine = ZegoExpressEngine.createEngine(appID, appSign, true, ZegoScenario.GENERAL, getApplication(), null);
setContentView(R.layout.activity_main);
//登錄
/* 創建用戶 */
/* 生成隨機的用戶ID,避免不同手機使用時用戶ID沖突,相互影響 */
/* Generate random user ID to avoid user ID conflict and mutual influence when different mobile phones are used */
String randomSuffix = String.valueOf(new Date().getTime() % (new Date().getTime() / 1000));
userID = "user" + randomSuffix;
ZegoUser user = new ZegoUser(userID);
//初始化房間內流id數組
RoomStreamList = new ArrayList
RoomStreamList.add("當前房間內的推流有:");
/* 開始登陸房間 */
//房間狀態改變,時間處理
engine.setEventHandler(new IZegoEventHandler() {
/** 以下為常用的房間相關回調 */
public void onRoomStateUpdate(String roomID, ZegoRoomState state, int errorCode, JSONObject extendedData) {
//房間狀態改變,提示信息
Toast.makeText(getApplicationContext(), "room state changed", Toast.LENGTH_SHORT).show();
}
public void onRoomUserUpdate(String roomID, ZegoUpdateType updateType, ArrayList
/* 用戶狀態更新,登陸房間后,當房間內有用戶新增或刪除時,SDK會通過該回調通知 */
//....
//用戶加入提示信息
Toast.makeText(getApplicationContext(), userList.get(0) + "加入房間", Toast.LENGTH_LONG).show();
}
public void onRoomStreamUpdate(String roomID, ZegoUpdateType updateType, ArrayList
/* 流狀態更新,登陸房間后,當房間內有用戶新推送或刪除音視頻流時,SDK會通過該回調通知 */
//自己的推流不會被記入
for (int i = 0; i < streamList.size(); i++)//加入或退出房間流的所有推流id全都遍歷一遍
{
Toast.makeText(getApplicationContext(), streamList.get(i).streamID + " room stream changed", Toast.LENGTH_LONG).show();
if (RoomStreamList.contains(streamList.get(i).streamID)) {//如果現有列表中包含這個,就移除
RoomStreamList.remove(streamList.get(i).streamID);
} else {//如果現有列表中不包含這個就加入
RoomStreamList.add(streamList.get(i).streamID);
}
}
String SentenceId = "";// 用于記錄下當前房間內還有的流ID
for (int i = 0; i < RoomStreamList.size(); i++) {
SentenceId += RoomStreamList.get(i) + " ";//利用字符串拼接,將當前房間還在的所有流ID全部記下
}
TextView ViewIdlist = findViewById(R.id.stream_id_list);//找到用于顯示流ID的TextView
ViewIdlist.setText(SentenceId);//設置文字信息在TextView上體現出來
}
});
//房間ID為Login活動傳遞過來的
Intent intent = getIntent();
roomID = intent.getStringExtra("room_id");//getXxxExtra方法獲取Intent傳遞過來的roomID
engine.loginRoom(roomID, user);//有了房間號,將用戶登錄到該房間
// 麥克風
ib_local_mic = findViewById(R.id.ib_local_mic);//找到本地麥克風圖標
/* 音頻播放是否靜音的開關 */
/* Switch for mute audio output */
ib_remote_stream_audio = findViewById(R.id.ib_remote_mic);//找到拉流1麥克風圖標并賦值給之前定義的全局變量
ib_remote_stream_audio2 = findViewById(R.id.ib_remote_mic2);//找到拉流2麥克風圖標并賦值給之前定義的全局變量
ib_remote_stream_audio3 = findViewById(R.id.ib_remote_mic3);//找到拉流3麥克風圖標并賦值給之前定義的全局變量
ib_beauty = findViewById(R.id.ib_local_beauti);//找到美顏圖標
//動態申請權限
String[] permissionNeeded = {
"android.permission.CAMERA",
"android.permission.RECORD_AUDIO"};
if (Build.VERSION.SDK_INT >= Build.VERSION_CODES.M) {
if (ContextCompat.checkSelfPermission(this, "android.permission.CAMERA") != PackageManager.PERMISSION_GRANTED ||
ContextCompat.checkSelfPermission(this, "android.permission.RECORD_AUDIO") != PackageManager.PERMISSION_GRANTED) {
requestPermissions(permissionNeeded, 101);
}
}
}
// Part I 推拉流按鈕處理
/*點擊推流按鈕進行推流 */
/*
Click Publish Button
*/
public void ClickPublish(View view) {
if (engine == null) {//之前自動初始化的SDK若未初始化成功則會彈出以下內容
Toast.makeText(this, "please initiate your sdk first!", Toast.LENGTH_SHORT).show();
return;
}
Button button = (Button) view;//獲取推流這個按鈕的實例
if (button.getText().equals("推流")) {//若上面的文字是推流,則說明還未推流。
EditText et = findViewById(R.id.ed_publish_stream_id);//找到,旁邊的EditText的實例
LocalStreamID = et.getText().toString();//獲取其文字內容,并賦值給全局變量LocalStreamID
/* 開始推流 */
/* Begin to publish stream */
engine.startPublishingStream(LocalStreamID);//推流
Toast.makeText(this, "published", Toast.LENGTH_SHORT).show();//推流成功文字提示
/* 開始預覽并設置本地預覽視圖 */
/* Start preview and set the local preview view. */
View local_view = findViewById(R.id.local_view);//獲取預覽圖像的TextureView實例
engine.startPreview(new ZegoCanvas(local_view));//開始預覽
Toast.makeText(this, "preview is set", Toast.LENGTH_SHORT).show();//提示預覽設置成功
button.setText("停止推流");//文字從推流改變為停止推流
} else {//若上面文字不是推流
/* 停止推流 */
/* Begin to stop publish stream */
engine.stopPublishingStream();//停止推流
/* 停止本地預覽 */
/* Start stop preview */
engine.stopPreview();//停止預覽
Toast.makeText(this, "publishing has stopped", Toast.LENGTH_SHORT).show();//提示停止已成功
button.setText("推流");//文字變為推流
}
}
/* 點擊拉流1按鈕*/
/*
Click Play Button
*/
//由于如下三個按鈕,實現代碼大同小異所以就只 詳寫 此按鈕注釋,其他實現原理一致
public void ClickPlay(View view) {
if (engine == null) {//之前自動初始化的SDK若未初始化成功則會彈出以下內容
Toast.makeText(this, "please initiate your sdk first!", Toast.LENGTH_SHORT).show();
return;
}
Button button = (Button) view;//獲取按鈕實例
if (button.getText().equals("拉流1")) {//若文字為拉流1
EditText et = findViewById(R.id.ed_play_stream_id);//獲取拉流旁的EditText實例
RemoteStreamID = et.getText().toString();//獲取其字符串,作為1號拉流ID
/* 開始拉流 */
/* Begin to play stream */
View play_view = findViewById(R.id.remote_view);//獲取播放實例
engine.startPlayingStream(RemoteStreamID, new ZegoCanvas(play_view));//開始拉流
engine.mutePlayStreamAudio(RemoteStreamID, playStreamMute);//首先對各用戶采取靜音
Toast.makeText(this, "Remote1 played successfully", Toast.LENGTH_SHORT).show();//提示拉流畫面播放成功
button.setText("停止拉流");//文字變為停止拉流
} else {
/* 停止拉流 */
/* Begin to stop play stream */
engine.stopPlayingStream(RemoteStreamID);//停止拉流
Toast.makeText(this, "Remote1 stopped successfully", Toast.LENGTH_SHORT).show();//提示停止拉流成功
button.setText("拉流1");//文字轉變為拉流1
}
}
/* 點擊拉流2按鈕 */
/*
Click Play Button
*/
//與拉流1按鈕相似
public void ClickPlay2(View view) {
if (engine == null) {//之前自動初始化的SDK若未初始化成功則會彈出以下內容
Toast.makeText(this, "please initiate your sdk first!", Toast.LENGTH_SHORT).show();
return;
}
Button button = (Button) view;
if (button.getText().equals("拉流2")) {
EditText et = findViewById(R.id.ed_play_stream_id2);
RemoteStreamID2 = et.getText().toString();
/* 開始拉流 */
/* Begin to play stream */
View play_view = findViewById(R.id.remote_view2);
engine.startPlayingStream(RemoteStreamID2, new ZegoCanvas(play_view));
engine.mutePlayStreamAudio(RemoteStreamID2, playStreamMute2);
Toast.makeText(this, "Remote2 played successfully", Toast.LENGTH_SHORT).show();
button.setText("停止拉流");
} else {
/* 停止拉流 */
/* Begin to stop play stream */
engine.stopPlayingStream(RemoteStreamID2);
Toast.makeText(this, "Remote2 stopped successfully", Toast.LENGTH_SHORT).show();
button.setText("拉流2");
}
}
/* 點擊拉流按鈕3 */
/*
Click Play Button
*/
//與拉流1按鈕相似
public void ClickPlay3(View view) {
if (engine == null) {//之前自動初始化的SDK若未初始化成功則會彈出以下內容
Toast.makeText(this, "please initiate your sdk first!", Toast.LENGTH_SHORT).show();
return;
}
Button button = (Button) view;
if (button.getText().equals("拉流3")) {
EditText et = findViewById(R.id.ed_play_stream_id3);
RemoteStreamID3 = et.getText().toString();
View play_view = findViewById(R.id.remote_view3);
/* 開始拉流 */
/* Begin to play stream */
engine.startPlayingStream(RemoteStreamID3, new ZegoCanvas(play_view));
engine.mutePlayStreamAudio(RemoteStreamID3, playStreamMute3);
Toast.makeText(this, "Remote3 played successfully", Toast.LENGTH_SHORT).show();
button.setText("停止拉流");
} else {
/* 停止拉流 */
/* Begin to stop play stream */
EditText et = findViewById(R.id.ed_play_stream_id3);
engine.stopPlayingStream(RemoteStreamID3);
Toast.makeText(this, "Remote3 stopped successfully", Toast.LENGTH_SHORT).show();
button.setText("拉流3");
}
}
// Part II 麥克風按鈕處理
//本地麥克風
public void enableLocalMic(View view) {
if (engine == null) {//之前自動初始化的SDK若未初始化成功則會彈出以下內容
Toast.makeText(this, "please initiate your sdk first!", Toast.LENGTH_SHORT).show();
return;
}
publishMicEnable = !publishMicEnable;//將bool變量先取反,即狀態改變
if (publishMicEnable) {//本地麥克風經取反后為真,那么就把圖標變為開啟狀態的圖標
ib_local_mic.setBackgroundDrawable(getResources().getDrawable(R.drawable.ic_bottom_microphone_on));
} else {//反之,則變為關閉狀態的圖標
ib_local_mic.setBackgroundDrawable(getResources().getDrawable(R.drawable.ic_bottom_microphone_off));
}
/* Enable Mic*/
engine.muteMicrophone(!publishMicEnable);//因為這個函數是mute,而我們是enable,所以取反才與本義相同
}
//一號拉流麥克風處理,二三號也大同小異
public void enableRemoteMic(View view) {
if (engine == null) {//之前自動初始化的SDK若未初始化成功則會彈出以下內容
Toast.makeText(this, "please initiate your sdk first!", Toast.LENGTH_SHORT).show();
return;
}
playStreamMute = !playStreamMute;//先將此bool變量取反,即狀態改變
if (playStreamMute) {//若此時該bool變量為真,則說明是靜音狀態,則圖標變為關閉狀態圖標
ib_remote_stream_audio.setBackgroundDrawable(getResources().getDrawable(R.drawable.ic_bottom_microphone_off));
} else {//反之則變為開啟狀態
ib_remote_stream_audio.setBackgroundDrawable(getResources().getDrawable(R.drawable.ic_bottom_microphone_on));
}
/* Enable Mic*/
engine.mutePlayStreamAudio(RemoteStreamID, playStreamMute);//此處因為bool變量實際意義與函數本義相同,故不用取反
}
//二號拉流麥克風處理,與一號類似
public void enableRemoteMic2(View view) {
if (engine == null) {//之前自動初始化的SDK若未初始化成功則會彈出以下內容
Toast.makeText(this, "please initiate your sdk first!", Toast.LENGTH_SHORT).show();
return;
}
playStreamMute2 = !playStreamMute2;
if (playStreamMute2) {
ib_remote_stream_audio2.setBackgroundDrawable(getResources().getDrawable(R.drawable.ic_bottom_microphone_off));
} else {
ib_remote_stream_audio2.setBackgroundDrawable(getResources().getDrawable(R.drawable.ic_bottom_microphone_on));
}
/* Enable Mic*/
engine.mutePlayStreamAudio(RemoteStreamID2, playStreamMute2);
}
//三號拉流麥克風處理,與一號類似
public void enableRemoteMic3(View view) {
if (engine == null) {//之前自動初始化的SDK若未初始化成功則會彈出以下內容
Toast.makeText(this, "please initiate your sdk first!", Toast.LENGTH_SHORT).show();
return;
}
playStreamMute3 = !playStreamMute3;
if (playStreamMute3) {
ib_remote_stream_audio3.setBackgroundDrawable(getResources().getDrawable(R.drawable.ic_bottom_microphone_off));
} else {
ib_remote_stream_audio3.setBackgroundDrawable(getResources().getDrawable(R.drawable.ic_bottom_microphone_on));
}
/* Enable Mic*/
engine.mutePlayStreamAudio(RemoteStreamID3, playStreamMute3);
}
// Part III 本地相機美顏、改變攝像頭前后置等擴展功能
//美顏功能
public void enableBeauty(View view) {
if (engine == null) {//之前自動初始化的SDK若未初始化成功則會彈出以下內容
Toast.makeText(this, "please initiate your sdk first!", Toast.LENGTH_SHORT).show();
return;
}
isBeauty = !isBeauty;//取反
//更換圖標
if (isBeauty) {//若現在為真,則變為使用美顏對應圖標
ib_beauty.setBackgroundDrawable(getResources().getDrawable(R.drawable.beauty_ps));
} else {//若現在為假,則對應普通狀態圖標
ib_beauty.setBackgroundDrawable(getResources().getDrawable(R.drawable.normal));
}
if (isBeauty) {//如果處于美顏狀態
//這里只采用一個較為明顯的美白功能
engine.enableBeautify(WHITEN);
} else {//反之則關閉所有美顏設置
engine.enableBeautify(NONE);
}
}
//調用后置攝像頭
public void frontCamera(View view)
{
if (engine == null) {//之前自動初始化的SDK若未初始化成功則會彈出以下內容
Toast.makeText(this, "please initiate your sdk first!", Toast.LENGTH_SHORT).show();
return;
}
isFrontCamera = !isFrontCamera;//先去反
engine.useFrontCamera(isFrontCamera);//根據現有布爾值帶入是否使用前置攝像頭的函數中
}
// Part IV 退出按鈕
public void Logout(View view) {
Intent intent = new Intent(this, Login.class);//設置一個從當前活動到Login活動的intent
engine.stopPublishingStream();//停止推流
engine.logoutRoom(roomID);//退出該房間
startActivity(intent);//重新進入房間的登錄界面
finish();//結束當前活動
}
}
```
四.功能上的不足以及可以繼續開發的地方
1.為了更加方便人的使用,可以將對應房間的推流id自動進行拉流。
2.擴展功能可以增加一些其他其他的,類似像是只聽見其他用戶的聲音關閉其畫面
3.利用其他技術,實現手機端的屏幕共享。
4.可以通過RecyclerView等或其他方式,從而實現房間內一個用戶界面能顯示更多畫面,使得最多拉的流數>3
5.當前拉的某個流停止時,畫面靜止,可以考慮讓其轉換為黑屏。
 電子發燒友App













評論