簡單時鐘
介紹
本示例通過使用[@ohos.display]接口以及Canvas組件來實現(xiàn)一個簡單的時鐘應用。
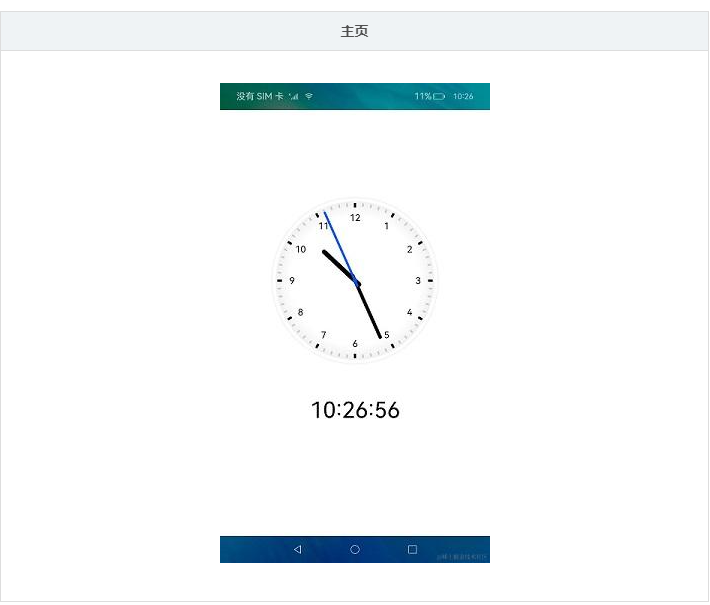
效果預覽

使用說明
1.界面通過setInterval實現(xiàn)周期性實時刷新時間,使用Canvas繪制時鐘,指針旋轉角度通過計算得出。
例如:"2 * Math.PI / 60 * second"是秒針旋轉的角度。
鴻蒙開發(fā)應用知識已更新[gitee.com/li-shizhen-skin/harmony-os/blob/master/README.md]參考前往。

具體實現(xiàn)
鴻蒙學習文檔前往mau123789是v添加即可
- 本示例展示簡單時鐘的方法主要封裝在Index中,源碼參考:[Index.ets] 。
/*

 * Copyright (c) 2022 Huawei Device Co., Ltd.

 * Licensed under the Apache License, Version 2.0 (the "License");

 * you may not use this file except in compliance with the License.

 * You may obtain a copy of the License at

 *

 *     http://www.apache.org/licenses/LICENSE-2.0

 *

 * Unless required by applicable law or agreed to in writing, software

 * distributed under the License is distributed on an "AS IS" BASIS,

 * WITHOUT WARRANTIES OR CONDITIONS OF ANY KIND, either express or implied.

 * See the License for the specific language governing permissions and

 * limitations under the License.

 */

import display from '@ohos.display'

import Logger from '../model/Logger'


const HOURS: Array< string > = ['3', '4', '5', '6', '7', '8', '9', '10', '11', '12', '1', '2']

const HEIGHT_ADD: number = 150 // 表盤下面需要繪制時間,canvas高度是寬度加150

const TAG: string = 'Index'


@Entry

@Component

struct Clock {

  private settings: RenderingContextSettings = new RenderingContextSettings(true)

  private context: CanvasRenderingContext2D = new CanvasRenderingContext2D(this.settings)

  @State canvasWidth: number = 300 // 300是表盤默認大小

  private radius: number = 150 // 默認表盤半徑

  private intervalId: number = 0

  updateTime = () = > {

    this.context.clearRect(0, 0, this.canvasWidth, this.canvasWidth + HEIGHT_ADD)

    let nowTime = new Date()

    let hour = nowTime.getHours()

    let minute = nowTime.getMinutes()

    let second = nowTime.getSeconds()

    let time = `${this.fillTime(hour)}:${this.fillTime(minute)}:${this.fillTime(second)}`

    this.drawBackGround()

    this.drawHour(hour, minute)

    this.drawMinute(minute)

    this.drawSecond(second)

    this.drawDot()

    this.drawTime(time)

    this.context.translate(-this.radius, -this.radius)

  }


  fillTime(time: number) {

    return time < 10 ? `0${time}` : `${time}`

  }


  aboutToAppear() {

    this.getSize()

  }


  // 獲取設備寬高計算表盤大小

  async getSize() {

    let mDisplay = await display.getDefaultDisplay()

    Logger.info(TAG, `getDefaultDisplay mDisplay = ${JSON.stringify(mDisplay)}`)

    this.canvasWidth = px2vp(mDisplay.width > mDisplay.height ? mDisplay.height * 0.6 : mDisplay.width * 0.6)

    this.radius = this.canvasWidth / 2

  }


  drawBackGround() {


    // 繪制背景

    let grad = this.context.createRadialGradient(this.radius, this.radius, this.radius - 32, this.radius,

      this.radius, this.radius)

    grad.addColorStop(0.0, 'white')

    grad.addColorStop(0.9, '#eee')

    grad.addColorStop(1.0, 'white')

    this.context.fillStyle = grad

    this.context.fillRect(0, 0, this.canvasWidth, this.canvasWidth)


    // 繪制外圈圓

    this.context.translate(this.radius, this.radius)

    this.context.lineWidth = 6

    this.context.beginPath()

    this.context.strokeStyle = '#fff'

    this.context.arc(0, 0, this.radius - 5, 0, 2 * Math.PI, false)

    this.context.stroke()


    // 繪制時間文字

    this.context.font = '30px'

    this.context.textAlign = "center"

    this.context.textBaseline = "middle"

    this.context.fillStyle = '#000'

    this.context.save()

    HOURS.forEach((num, index) = > {

      let rad = 2 * Math.PI / 12 * index

      let x = Math.cos(rad) * (this.radius - 38)

      let y = Math.sin(rad) * (this.radius - 38)

      this.context.fillText(num, x, y)

    })

    this.context.restore()


    // 繪制刻度

    for (let i = 0; i < 60; i++) {

      let rad = 2 * Math.PI / 60 * i

      let x = Math.cos(rad) * (this.radius - 12)

      let y = Math.sin(rad) * (this.radius - 12)

      this.context.beginPath()

      this.context.moveTo(x, y)

      if (i % 5 == 0) {

        let x1 = Math.cos(rad) * (this.radius - 20)

        let y1 = Math.sin(rad) * (this.radius - 20)

        this.context.strokeStyle = '#000'

        this.context.lineWidth = 2

        this.context.lineTo(x1, y1)

      } else {

        let x1 = Math.cos(rad) * (this.radius - 18)

        let y1 = Math.sin(rad) * (this.radius - 18)

        this.context.strokeStyle = '#ccc'

        this.context.lineWidth = 1

        this.context.lineTo(x1, y1)

      }

      this.context.stroke()

    }

    this.context.restore()

  }


  // 繪制時針

  drawHour(hour: number, minute: number) {

    this.context.save()

    this.context.beginPath()

    this.context.lineWidth = 8

    this.context.lineCap = 'round'

    let rad = 2 * Math.PI / 12 * hour

    let mrad = 2 * Math.PI / 12 / 60 * minute

    this.context.rotate(rad + mrad)

    this.context.moveTo(0, 10)

    this.context.strokeStyle = '#000'

    this.context.lineTo(0, -this.radius / 2)

    this.context.stroke()

    this.context.restore()

  }


  // 繪制分針

  drawMinute(minute: number) {

    this.context.save()

    this.context.beginPath()

    this.context.lineWidth = 5

    this.context.lineCap = 'round'

    let rad = 2 * Math.PI / 60 * minute

    this.context.rotate(rad)

    this.context.moveTo(0, 10)

    this.context.strokeStyle = '#000'

    this.context.lineTo(0, -this.radius + 40)

    this.context.stroke()

    this.context.restore()

  }


  // 繪制秒針

  drawSecond(second: number) {

    this.context.save()

    this.context.beginPath()

    this.context.lineWidth = 2

    this.context.lineCap = 'round'

    let rad = 2 * Math.PI / 60 * second

    this.context.rotate(rad)

    this.context.moveTo(0, 10)

    this.context.strokeStyle = '#05f'

    this.context.lineTo(0, -this.radius + 21)

    this.context.stroke()

    this.context.restore()

  }


  // 繪制中心點

  drawDot() {

    this.context.save()

    this.context.beginPath()

    this.context.fillStyle = '#05f'

    this.context.arc(0, 0, 4, 0, 2 * Math.PI, false)

    this.context.fill()

    this.context.restore()

  }


  // 繪制表盤下面時間文本

  drawTime(time: string) {

    this.context.save()

    this.context.beginPath()

    this.context.font = '90px'

    this.context.textAlign = "center"

    this.context.textBaseline = "middle"

    this.context.fillStyle = '#000'

    this.context.fillText(time, 0, this.radius + 80)

    this.context.restore()

  }


  build() {

    Stack({ alignContent: Alignment.Center }) {

      Canvas(this.context)

        .padding({ top: 76 })

        .width(this.canvasWidth)

        .height(this.canvasWidth + HEIGHT_ADD)

        .onReady(() = > {

          this.updateTime()

          this.intervalId = setInterval(this.updateTime, 1000)

        })

    }

    .width('100%')

    .height('100%')

  }


  onPageHide() {

    clearInterval(this.intervalId)

  }


  aboutToDisappear(){

    clearInterval(this.intervalId)

  }

}
- 設置表盤大小:通過Index中的display.getDefaultDisplay()方法來獲取設備寬高計算表盤大小;
- 獲取當前時間:調用updateTime函數(shù),執(zhí)行new Date().getHours()、new Date().getMinutes()、new Date().getSeconds()獲取當前時間。
- 繪制表盤內容:通過[CanvasRenderingContext2D] 來畫表盤背景、時針、分針、秒針、圓心以及表盤下方文本;
- 啟動時鐘:添加setInterval定時器,每隔1s執(zhí)行一次updateTime函數(shù)。
審核編輯 黃宇
聲明:本文內容及配圖由入駐作者撰寫或者入駐合作網(wǎng)站授權轉載。文章觀點僅代表作者本人,不代表電子發(fā)燒友網(wǎng)立場。文章及其配圖僅供工程師學習之用,如有內容侵權或者其他違規(guī)問題,請聯(lián)系本站處理。
舉報投訴
-
時鐘
+關注
關注
11文章
1745瀏覽量
131663 -
鴻蒙
+關注
關注
57文章
2386瀏覽量
42961 -
HarmonyOS
+關注
關注
79文章
1980瀏覽量
30395
發(fā)布評論請先 登錄
相關推薦
免費學習鴻蒙(HarmonyOS)開發(fā),一些地址分享
國內一流高校。通過鴻蒙班的設立,高校可以為學生提供專業(yè)的鴻蒙OS學習環(huán)境和豐富的實踐機會,培養(yǎng)出更多的鴻蒙開發(fā)人才,為鴻蒙OS系統(tǒng)的生態(tài)建設
發(fā)表于 01-12 20:48
HarmonyOS SDK,助力開發(fā)者打造煥然一新的鴻蒙原生應用
的操作整合在一起,用戶一處會用,處處會用。
作為支撐鴻蒙原生應用開發(fā)的核心,HarmonyOS SDK 發(fā)揮著至關重要的作用。通過關鍵能力底層化,通用能力全局化,HarmonyOS S
發(fā)表于 01-19 10:31
【書籍評測活動NO.56】極速探索HarmonyOS NEXT:純血鴻蒙應用開發(fā)實踐
了解并掌握鴻蒙開發(fā)的核心技術,以及鴻蒙應用在實際開發(fā)中的應用方法。
本書共分為四篇,共計16章,分別為鴻蒙
發(fā)表于 01-20 16:53
如何獲取HarmonyOS開發(fā)板 ?鴻蒙開發(fā)板全匯總
:http://t.elecfans.com/product/116.html潤和HarmonyOS鴻蒙開發(fā)板 HiSpark IPC DIY開發(fā)套件購買地址:http://t.ele
發(fā)表于 09-10 17:16
首批HarmonyOS系統(tǒng)課程開發(fā)者為您詳解鴻蒙系統(tǒng)開發(fā)與應用
首批HarmonyOS系統(tǒng)課程開發(fā)者。簡介:在這里不僅有大神教你如何安裝應用,更有實力派講師帶領大家進行u-boot、內核、跟文件系統(tǒng)的移植。鴻蒙開發(fā)課程介紹:第一節(jié)
發(fā)表于 09-14 14:26
鴻蒙系統(tǒng)(HarmonyOS)精華問答集錦
對于鴻蒙系統(tǒng),各位小伙伴是不是和小編一樣,還是有很多問題不解。本期小編就整理了鴻蒙系統(tǒng)首批體驗者精選問答。他們從開發(fā)者的角度出發(fā),首先介紹了HarmonyOS的體系、內核、系統(tǒng)特色,以
發(fā)表于 10-10 15:13
【每日精選】鴻蒙大咖HarmonyOS開發(fā)資料合集
的各種開發(fā)資料,內容包括:設計參考、程序源碼、開發(fā)實例、教程筆記等等,為大家節(jié)省了大量的資料搜索時間,方便大家輕松下載HarmonyOS相關資料!H
發(fā)表于 10-28 18:43
鴻蒙HarmonyOS開發(fā)學習資料匯總推薦
`一、鴻蒙IDE下載地址IDE下載 : https://developer.harmonyos.com/cn/develop/deveco-studio?&ha_source=d
發(fā)表于 04-20 11:33
HarmonyOS資料下載專題
HarmonyOS資料下載專題:從鴻蒙出世到現(xiàn)在,對于鴻蒙資料查詢下載,大家是否有點迷茫-不知去何處查找。為此,本專題匯集了HarmonyOS從入門到精通的各種
發(fā)表于 10-08 14:23

華為鴻蒙系統(tǒng)HarmonyOS如何解決音畫不同步?
華為鴻蒙系統(tǒng)HarmonyOS解決音畫同步問題,采用了軟時鐘同步和抗干擾算法以保證生態(tài)系統(tǒng)多設備音畫流暢。
鴻蒙系統(tǒng)是基于什么開發(fā)的
2021年6月2日晚,華為正式發(fā)布HarmonyOS 2及多款搭載HarmonyOS 2的新產(chǎn)品。鴻蒙系統(tǒng)是一款全新的面向全場景的分布式操作系統(tǒng),鴻蒙系統(tǒng)一發(fā)布,網(wǎng)絡上就
淘寶與華為合作將基于HarmonyOS NEXT啟動鴻蒙原生應用開發(fā)
1月25日,淘寶與華為舉辦鴻蒙合作簽約儀式,宣布將基于HarmonyOS NEXT啟動鴻蒙原生應用開發(fā)。
華為宣布HarmonyOS NEXT鴻蒙星河版開發(fā)者預覽面向開發(fā)者開放申請
華為宣布HarmonyOS NEXT鴻蒙星河版開發(fā)者預覽面向開發(fā)者開放申請,這意味著鴻蒙生態(tài)進入第二階段,將加速千行百業(yè)的應用

慶科信息獲HarmonyOS高級應用開發(fā)能力認證!助力品牌快速打造鴻蒙原生應用
近日,上海慶科信息技術有限公司榮獲HarmonyOS應用開發(fā)者高級認證,公司在華為鴻蒙生態(tài)的開發(fā)能力得到進一步拓展,能夠幫助客戶快速開發(fā)基于


 鴻蒙HarmonyOS開發(fā)實例:【簡單時鐘】


評論