本篇文章讓我帶你認識一下什么是oauth協議
什么是 oauth協議 ?
百度百科上解釋:允許用戶提供一個令牌,而不是用戶名和密碼來訪問他們存放在特定服務提供者的數據。每一個令牌授權一個特定的網站(例如,視頻編輯網站)在特定的時段(例如,接下來的2小時內)內訪問特定的資源(例如僅僅是某一相冊中的視頻)。這樣,OAuth允許用戶授權第三方網站訪問他們存儲在另外的服務提供者上的信息,而不需要分享他們的訪問許可或他們數據的所有內容。
簡單的來講就是一個令牌,這個令牌可以有一定的權限,在不知道用戶密碼的情況下也可以進行部分的功功能操作。用一個例子幫助理解:一個甲方公司,公司里面使用一卡通,這張卡可以門禁,食堂,等等,公司招了外包進來,外包只能開通門禁就行,其他的權限是沒有的。這時候公司就不會給一張正式員工的卡,而是外包的卡,正編員工卡就是用戶的賬號密碼,這個外包卡就相當于是一個令牌,并且可能公司會給你的外包卡設置一個有效期,等有效期快到的時候有需要申請延期。這個就相當于是oauth協議模式。用戶不會給你用戶名和密碼,那樣相當于放開了所有的權限,而會給你提供一個令牌,在有效期類可以訪問特定的功能服務 使用令牌的優點:
- 令牌是短期的,到期會自動失效,用戶自己無法修改。密碼一般長期有效,用戶不修改,就不會發生變化。
- 令牌可以被數據所有者撤銷,會立即失效。
- 令牌有權限范圍(scope),對于網絡服務來說,只讀令牌就比讀寫令牌更安全。密碼一般是完整權限
oauth協議有四種模式;
1、授權碼模式 2、隱藏式 3、密碼式 4、客戶端憑證 其中授權碼方式是最常用的流程,安全性也最高,今天我們就來著重講一下授權碼模式。 授權碼模式: 指的是第三方應用先申請一個授權碼,然后再用該碼獲取令牌,授權碼通過前端傳送,令牌則是儲存在后端,而且所有與資源服務器的通信都在后端完成。這樣的前后端分離,可以避免令牌泄漏。
授權碼模式主要分為幾個步驟
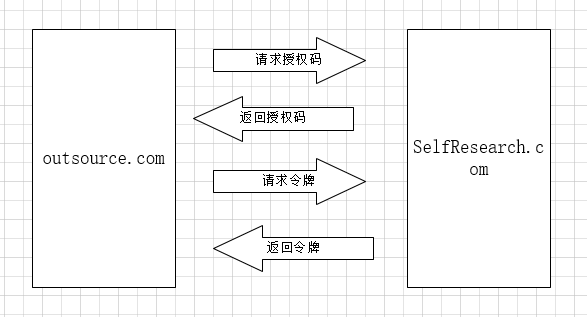
以甲方公司員工卡系統(SelfResearch.com)和外包公司員工卡系統(outsource.com)為例,下面是授權碼模式的流程
請求授權碼
首先,甲方公司給外包員工方提供一個授權鏈接,外包員工點擊連接,申請授權碼,連接參數如下所示
https://SelfResearch.com/oauth/authorize?response_type=code&client_id=CLIENT_ID&redirect_uri=CALLBACK_URL&scope=read
response_type參數表示要求返回授權碼(code), client_id參數讓 甲方 知道是誰在請求, redirect_uri參數是 甲方系統 接受或拒絕請求后的跳轉網址, scope參數表示要求的授權范圍(這里是只讀)。
返回授權碼
用戶跳轉到這個之后,甲方公司會先要求用戶登錄,然后請求授權,如果同意就跳轉到redirect_uri這個參數的地址,并返回授權碼
https://SelfResearch.com/callback?code=AUTHORIZATION_CODE
code就是表示授權碼
請求令牌
外包員工拿著授權碼去請求令牌
https://SelfResearch.com/oauth/token?client_id=CLIENT_ID&client_secret=CLIENT_SECRET&grant_type=authorization_code&code=AUTHORIZATION_CODE&redirect_uri=CALLBACK_URL
- client_id參數和client_secret參數用來讓 甲方公司 確認 外包員工 的身份(client_secret參數是保密的,因此只能在后端發請求)。
- grant_type參數的值是AUTHORIZATION_CODE,表示采用的授權方式是授權碼。
- code參數是上一步拿到的授權碼。
- redirect_uri參數是令牌頒發后的回調網址。
返回令牌 外包員工訪問redirect_uri會得到一串json數據:
{
    "access_token": "67c4051b-36c8-11ec-af33-00163e0808bf",
    "token_type": "bearer",
    "refresh_token": "71975ccc-36c8-11ec-af33-cfd2826915e5",
    "expires_in": 3249,
    "scope": "read"
}
access_token就是令牌了,用戶需要訪問其他接口就需要帶上這個token去訪問了 refresh_token這個是刷新令牌,如果需要使用新的token,就需要通過這個刷新令牌來獲取最新的access_token。
實現 oauth2,可以分為三個步驟
- 認證服務
- 資源服務
- 第三方服務
現在第三方用戶(test9527)想去訪問資源中的部分功能(接口),但是改功能只有User角色才能訪問,需要先通過認證服務器獲取user的授權碼,然后拿著這個code和自己賬號信息去獲取token,并校驗通過之后才能訪問到資源服務器,也就是第三方用戶通過 test9527 可以訪問本來需要user權限才能訪問的資源功能(接口)
實現步驟:
創建三個服務oauth-server(認證服務)、resource-server(資源服務)、third-server(第三方服務

maven依賴
< !--    oauth2    -- >
< dependency >
    < groupId >org.springframework.security.oauth< /groupId >
    < artifactId >spring-security-oauth2< /artifactId >
    < version >2.1.3.RELEASE< /version >
< /dependency >
< !--    spring security-- >
< dependency >
    < groupId >org.springframework.boot< /groupId >
    < artifactId >spring-boot-starter-security< /artifactId >
< /dependency >
oauth-server 服務配置文件
/**
 * 模擬第三方授權配置
 */
@EnableAuthorizationServer
@Configuration
public class AuthConfig extends AuthorizationServerConfigurerAdapter {

    @Resource
    ClientDetailsService clientDetailsService;

    /**
     * 資源服務器校驗Token
     */
    @Override
    public void configure(AuthorizationServerSecurityConfigurer security) {
        security.checkTokenAccess("permitAll()").allowFormAuthenticationForClients();
    }
    /**
     * 第三方客戶端請求配置,和資源服務訪問的配置,不設置默認都可以訪問,提供默認回調地址
     */
    @Override
    public void configure(ClientDetailsServiceConfigurer clients) throws Exception {
        clients.inMemory()
                //第三方用戶
                .withClient("test9527")
                .secret(new BCryptPasswordEncoder().encode("test9527"))
                .resourceIds("resource")
                //認證模式
                .authorizedGrantTypes("authorization_code","refresh_token")
                .scopes("all")
                //回調地址
                .redirectUris("http://localhost:8082/notify.html");
    }
    /**
     * 配置訪問端點
     */
    @Override
    public void configure(AuthorizationServerEndpointsConfigurer endpoints) {
        endpoints.authorizationCodeServices(authorizationCodeServices()).tokenServices(tokenServices());
    }
    /**
     * 內存管理
     */
    @Bean
    AuthorizationCodeServices authorizationCodeServices() {
        return new InMemoryAuthorizationCodeServices();
    }
    /**
     * Token管理規則
     */
    @Bean
    AuthorizationServerTokenServices tokenServices() {
        DefaultTokenServices services = new DefaultTokenServices();
        services.setClientDetailsService(clientDetailsService);
        services.setSupportRefreshToken(true);
        services.setTokenStore(tokenStore());
        services.setAccessTokenValiditySeconds(3600);
        services.setRefreshTokenValiditySeconds(3600*7);
        return services;
    }
    @Bean
    TokenStore tokenStore() {
        return new InMemoryTokenStore();
    }
配置spring security
/**
 * 模擬本地用戶配置
 */
@Configuration
public class SecurityConfig extends WebSecurityConfigurerAdapter {
    /**
     * 密碼加密方式
     */
    @Bean
    public PasswordEncoder passwordEncoder(){
        return new BCryptPasswordEncoder();
    }
    /**
     * 內存中虛擬用戶和角色
     */
    @Override
    protected void configure(AuthenticationManagerBuilder auth) throws Exception {
        auth.inMemoryAuthentication()
                .withUser("user")
                .password(new BCryptPasswordEncoder().encode("123456"))
                .roles("user");
    }
    /**
     * 表單登錄
     */
    @Override
    protected void configure(HttpSecurity http) throws Exception {
        http.csrf().disable().formLogin();
    }
}
resource-server配置
/**
 * 資源服務管理配置
 */
@Configuration
@EnableResourceServer
public class ResourceServerConfig extends ResourceServerConfigurerAdapter {
    /**
     * Token令牌校驗
     */
    @Bean
    RemoteTokenServices tokenServices() {
        RemoteTokenServices services = new RemoteTokenServices();
        services.setCheckTokenEndpointUrl("http://localhost:8080/oauth/check_token");
        services.setClientId("test9527");
        services.setClientSecret("test9527");
        return services;
    }
    /**
     * 服務資源ID配置
     */
    @Override
    public void configure(ResourceServerSecurityConfigurer resources) throws Exception {
        resources.resourceId("resource").tokenServices(tokenServices());
    }
    /**
     * 模擬用戶權限規則
     */
    @Override
    public void configure(HttpSecurity http) throws Exception {
        http.authorizeRequests()
                           //訪問user下的路徑需要user角色
                .antMatchers("/user/**").hasRole("user")
                .anyRequest().authenticated();
    }
resource下的功能(接口)

第三方服務首先認證,獲取授權碼code http://localhost:8080/oauth/authorize?client_id=test9527&response_type=code&scope=all&redirect_uri=http://localhost:8082/notify.html
此時會到認證服務器中的user認證

此時需要user用戶同意授權,當認證服務中的user用戶同意之后,到如下頁面,此時看接口可以知道已經拿到code授權碼,并跳轉到我們需要跳轉的地址
redirect_uri=http://localhost:8082/notify.html

拿到授權碼之后訪問回調地址 http://localhost:8082/notify.html?code=Rs067L 然后通過code,client_id,client_secret 等參數訪問獲取令牌地址 https://SelfResearch.com/oauth/token?client_id=CLIENT_ID&client_secret=CLIENT_SECRET&grant_type=authorization_code&code=SMD5nj&redirect_uri=redirect_uri=http://localhost:8082/notify.html 成功之后會返回token,刷新token,以及token有效時間,如下
拿到token之后,我們再去訪問資源服務器,此時就能順利訪問到功能(接口)了

最終效果,最終第三方用戶test9527訪問當了資源服務器功

-
數據
+關注
關注
8文章
7134瀏覽量
89393 -
參數
+關注
關注
11文章
1859瀏覽量
32383
發布評論請先 登錄
相關推薦

跟著小狂玩天貓精靈智能設備對接--服務器篇(二)
K8s 從懵圈到熟練 – 鏡像拉取這件小事
協議是什么 協議棧又是什么
如何使用ESP8266作為簡單頁面的網絡服務器來生成OAuth代碼以批準設備并生成刷新令牌和訪問令牌?
OSPF協議,OSPF協議是什么意思
SIP協議,什么是SIP協議
V-CHARGE的V2I通訊系統由德國TU Braunschweig大學完成設計

六款開源項目推薦
SSO單點登錄和OAuth2.0的區別和理解
什么是單點登錄?解讀單點登錄兩個協議:SAML、OAuth2
Spring Boot 3.1 中如何整合Spring Security和Keycloak


 什么是oauth協議


評論