MediaPipe介紹
這個是真的,首先需要從Google在2020年發布的mediapipe開發包說起,這個開發包集成了人臉、眼睛、虹膜、手勢、姿態等各種landmark檢測與跟蹤算法。
https://google.github.io/mediapipe/
請看下圖比較詳細
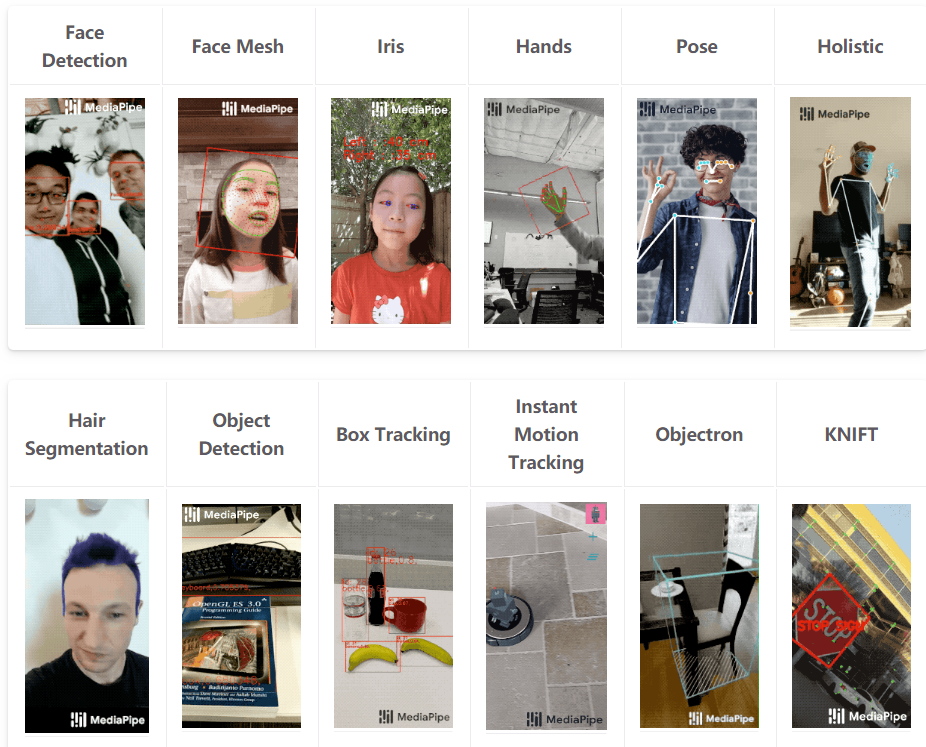
是個不折不扣的現實增強的寶藏工具包,特別實用!支持的平臺跟語言也非常的豐富,圖示如下:
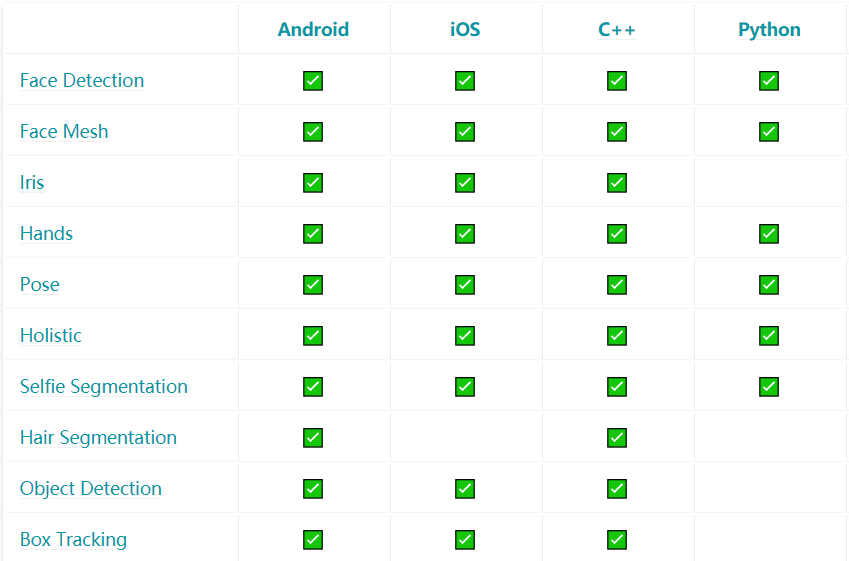
只說一遍,感覺要逆天了,依賴庫只有一個就是opencv,python版本的安裝特別簡單,直接運行下面的命令行:
pip install mediapipe
手勢landmark檢測
直接運行官方提供的Python演示程序,需要稍微修改一下,因為版本更新了,演示程序有點問題,改完之后執行運行視頻測試,完美get到手勢landmark關鍵點:
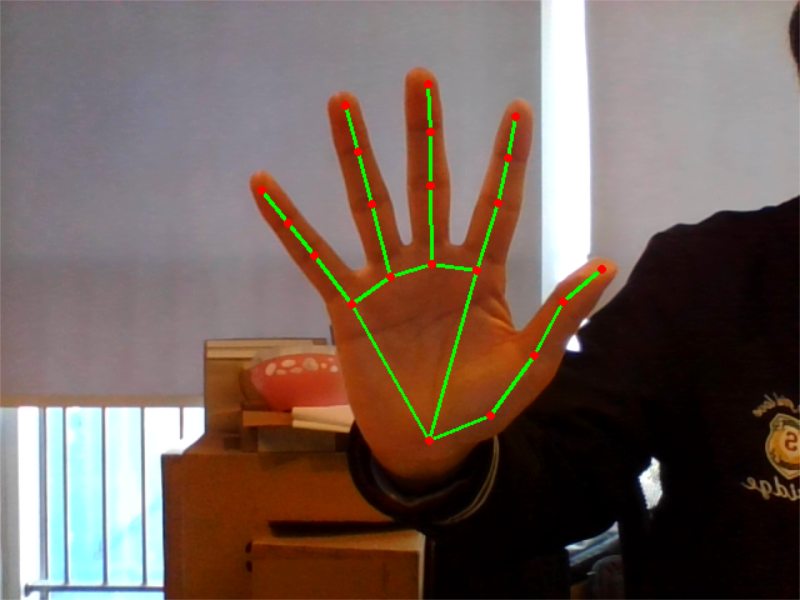
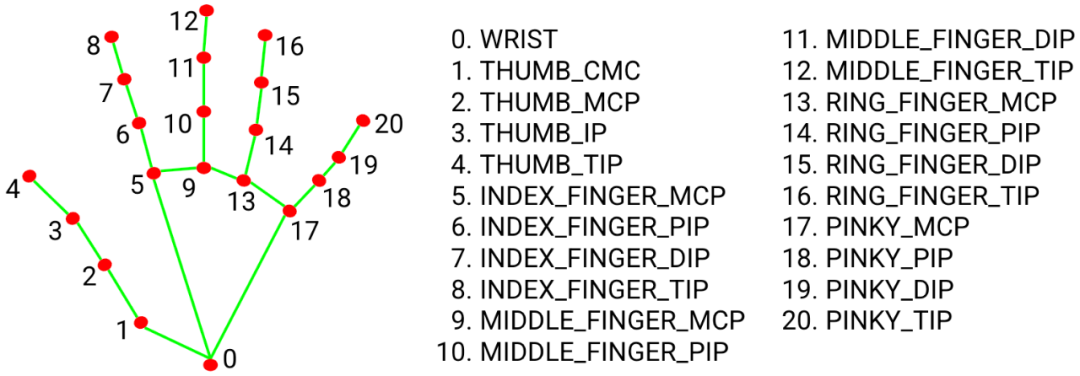
手勢landmark的關鍵點編號與解釋如下:
修改后的代碼如下:
importcv2
importmediapipeasmp
mp_drawing=mp.solutions.drawing_utils
mp_hands=mp.solutions.hands

#Forwebcaminput:
cap=cv2.VideoCapture(0)
withmp_hands.Hands(
min_detection_confidence=0.5,
min_tracking_confidence=0.5)ashands:
whilecap.isOpened():
success,image=cap.read()
ifnotsuccess:
print("Ignoringemptycameraframe.")
#Ifloadingavideo,use'break'insteadof'continue'.
continue

#Toimproveperformance,optionallymarktheimageasnotwriteableto
#passbyreference.
image.flags.writeable=False
image=cv2.cvtColor(image,cv2.COLOR_BGR2RGB)
results=hands.process(image)

#Drawthehandannotationsontheimage.
image.flags.writeable=True
image=cv2.cvtColor(image,cv2.COLOR_RGB2BGR)
ifresults.multi_hand_landmarks:
forhand_landmarksinresults.multi_hand_landmarks:
mp_drawing.draw_landmarks(
image,
hand_landmarks,
mp_hands.HAND_CONNECTIONS)
cv2.imwrite('D:/result.png',cv2.flip(image,1))
#Fliptheimagehorizontallyforaselfie-viewdisplay.
cv2.imshow('MediaPipeHands',cv2.flip(image,1))
ifcv2.waitKey(5)&0xFF==27:
break
cap.release()
手勢識別
基于最簡單的圖象分類,收集了幾百張圖象,做了一個簡單的遷移學習,實現了三種手勢分類,運行請看視頻:
-
手勢識別
+關注
關注
8文章
225瀏覽量
47823 -
跟蹤算法
+關注
關注
0文章
41瀏覽量
13026 -
OpenCV
+關注
關注
31文章
635瀏覽量
41455
原文標題:MediaPipe + OpenCV五分鐘搞定手勢識別
文章出處:【微信號:CVSCHOOL,微信公眾號:OpenCV學堂】歡迎添加關注!文章轉載請注明出處。
發布評論請先 登錄
相關推薦
如何用OpenCV進行手勢識別--基于米爾全志T527開發板

基于毫米波雷達的手勢識別算法
紅外手勢識別方案 紅外手勢感應模塊 紅外識別紅外手勢識別
【UT4418申請】手勢識別系統
【NanoPi Duo開發板試用申請】基于nanopi的手勢識別
手勢識別控制器制作
五分鐘讀懂WiFi基礎知識
手勢識別系統的程序和資料說明
opencv 輪廓放大_OpenCV開發筆記(六十六):紅胖子8分鐘帶你總結形態學操作-膨脹、腐蝕、開運算、閉運算、梯


 MediaPipe + OpenCV五分鐘搞定手勢識別


評論