") 私有鏡像倉(cāng)庫(kù)Harbor極簡(jiǎn)搭建指南(HTTP版)
私有鏡像倉(cāng)庫(kù)Harbor極簡(jiǎn)搭建指南(HTTP版)
本文簡(jiǎn)要介紹私有鏡像倉(cāng)庫(kù) Harbor 的搭建指南(HTTP 版),以及使用方法。搭建部分主要參考官網(wǎng)。本文基于以下版本:
 Docker: 20.10.12
 Docker-compose: 1.29.2
 Harbor: 2.4.1
1.準(zhǔn)備工作
1.1 安裝 Docker 與 Docker Compose
請(qǐng)直接參考官網(wǎng)。這里僅給出在 CentOS 上的例子:
sudo yum install -y yum-utils
sudo yum-config-manager
  --add-repo
  https://download.docker.com/linux/centos/docker-ce.repo
sudo yum install docker-ce docker-ce-cli containerd.io
sudo systemctl start docker
sudo systemctl enable docker


sudo curl -L "https://github.com/docker/compose/releases/download/1.29.2/docker-compose-$(uname -s)-$(uname -m)" -o /usr/local/bin/docker-compose
sudo chmod +x /usr/local/bin/docker-compose
1.2 安裝 OpenSSL
這里僅給出 CentOS 的例子:
yum install -y openssl
2.安裝 Harbor
官網(wǎng)給出了兩種安裝模式,在線安裝包或離線安裝包。其區(qū)別是離線安裝包里面含有鏡像,在線版本在安裝時(shí)則去Docker Hub拉取鏡像。我們這里使用離線安裝包。
wget https://github.com/goharbor/harbor/releases/download/v2.4.1/harbor-offline-installer-v2.4.1.tgz
tar zxvf harbor-offline-installer-v2.4.1.tgz
cd harbor
在harbor文件夾里可以看到有一份文件harbor.yml.tmpl,這是 Harbor 的配置信息,我們復(fù)制一份并進(jìn)行修改(以下僅顯示修改部分):
cp harbor.yml.tmpl harbor.yml
harbor.yml
# Configuration file of Harbor


# The IP address or hostname to access admin UI and registry service.
# DO NOT use localhost or 127.0.0.1, because Harbor needs to be accessed by external clients.
- hostname: reg.mydomain.com
+ hostname: your.domain.com (自行指定)


# http related config
http:
 # port for http, default is 80. If https enabled, this port will redirect to https port
 port: 80


# https related config
# 直接禁用 HTTPS
- https:
+ # https:
 # https port for harbor, default is 443
- port: 443
+ # port: 443
 # The path of cert and key files for nginx
- certificate: /your/certificate/path
- private_key: /your/private/key/path
+ # certificate: /your/certificate/path
+ # private_key: /your/private/key/path


# # Uncomment following will enable tls communication between all harbor components
# internal_tls:
#  # set enabled to true means internal tls is enabled
#  enabled: true
#  # put your cert and key files on dir
#  dir: /etc/harbor/tls/internal


# Uncomment external_url if you want to enable external proxy
# And when it enabled the hostname will no longer used
# external_url: https://reg.mydomain.com:8433


# The initial password of Harbor admin
# It only works in first time to install harbor
# Remember Change the admin password from UI after launching Harbor.
- harbor_admin_password: Harbor12345
+ harbor_admin_password: yourPassword (自行指定)
修改完畢后,直接運(yùn)行 ./install.sh,并等待 Docker Compose 執(zhí)行完畢。部署完畢后,你就可以使用這臺(tái)機(jī)器的 80 端口看到 Harbor 界面了。如果需要啟動(dòng) Helm Chart 的管理功能,請(qǐng)使用 ./install.sh --with-chartmuseum。
3.登錄與使用方法
在安裝 Harbor 的本機(jī),可以直接在/etc/hosts 里配置,在 127.0.0.1 后面加上你在配置文件里定義的 hostname,隨后可以使用如下命令直接登錄:
docker login -u admin -p yourPassword http://your.domain.com
上面的密碼與 hostname 需要自行替換。
如果在其他機(jī)器登錄,首先還是需要配/etc/hosts,將 hostname 指向安裝 Harbor 的機(jī)器 IP。登錄時(shí),可能會(huì)遇到如下情況:
$ docker login -u admin -p yourPassword http://your.domain.com


Error response from daemon: Get https://your.domain.com/v2/: dial tcp xxx.xxx.xxx.xxx connect: connection refused
這個(gè)原因是訪問(wèn) HTTPS 被拒絕(我們只配置了 HTTP),需要關(guān)閉安全驗(yàn)證。修改/etc/docker/daemon.json 并加入如下內(nèi)容:
/etc/docker/daemon.json
+ "insecure-registries": ["your.domain.com:port", "0.0.0.0"]
如果是 80 端口號(hào)則可以忽略端口部分。修改完畢后,重啟 Docker:
sudo systemctl restart docker
必要時(shí),可以在安裝 Harbor 的機(jī)器上重啟 Harbor:
cd harbor
docker-compose down -v
docker-compose up -d
再次登錄即可正常使用。需要注意,使用 Harbor 時(shí),鏡像需要遵循以下格式:
# Docker
docker tag SOURCE_IMAGE[:TAG] your.domain.com/PROJECT_NAME/REPOSITORY[:TAG]
docker push your.domain.com/PROJECT_NAME/REPOSITORY[:TAG]
docker pull your.domain.com/PROJECT_NAME/REPOSITORY[:TAG]


# Helm
helm repo add --username admin --password ADMIN_PASSWORD harbor http://your.domain.com/chartrepo/
helm plugin install https://github.com/chartmuseum/helm-push
helm cm-push CHART_PATH --version="CHART_VERSION" harbor
helm repo update
helm search repo CHART_PATH
helm install RELEASE_NAME CHART_NAME
其中 PROJECT_NAME 是你在 Harbor UI 新建的項(xiàng)目名,CHART_PATH 是存儲(chǔ) Helm Chart 的路徑,CHART_NAME 是使用 helm search 后搜索到的 Chart 名稱,RELEASE_NAME 是 Helm 部署后的自定義名稱。
-
存儲(chǔ)
+關(guān)注
關(guān)注
13文章
4347瀏覽量
86058 -
HTTP
+關(guān)注
關(guān)注
0文章
511瀏覽量
31412 -
鏡像
+關(guān)注
關(guān)注
0文章
170瀏覽量
10775 -
CentOS
+關(guān)注
關(guān)注
0文章
79瀏覽量
13784 -
Docker
+關(guān)注
關(guān)注
0文章
492瀏覽量
11916
原文標(biāo)題:私有鏡像倉(cāng)庫(kù) Harbor 極簡(jiǎn)搭建指南(HTTP 版)
文章出處:【微信號(hào):magedu-Linux,微信公眾號(hào):馬哥Linux運(yùn)維】歡迎添加關(guān)注!文章轉(zhuǎn)載請(qǐng)注明出處。
發(fā)布評(píng)論請(qǐng)先 登錄
相關(guān)推薦
【新功能】企業(yè)級(jí)Maven私有倉(cāng)庫(kù)服務(wù)結(jié)束公測(cè),全面開(kāi)放使用
怎么構(gòu)建docker鏡像倉(cāng)庫(kù)軟件
基于Linux系統(tǒng)的私有鏡像倉(cāng)庫(kù)搭建
Harbor源代碼結(jié)構(gòu)解析

關(guān)于Gitlab私有倉(cāng)庫(kù)建設(shè)的實(shí)踐
想擁有屬于自己的私有云?超簡(jiǎn)單的個(gè)人私有云存儲(chǔ)搭建方案

使用Nexus在本地搭建npm、yum和maven私有倉(cāng)庫(kù)
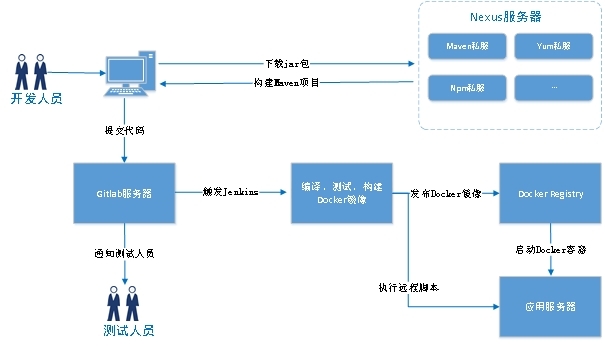
云服務(wù)器Flexus X實(shí)例,Docker集成搭建Gitea私有倉(cāng)庫(kù)
Flexusx 實(shí)例與 Harbor 私有鏡像倉(cāng)庫(kù)的完美結(jié)合
用普通電腦搭建私有云,用普通電腦搭建私有云教程

蘋果電腦搭建私有云,蘋果電腦搭建私有云的詳細(xì)操作步驟


 工商網(wǎng)監(jiān)
評(píng)論