Linux PWM 開發指南
1 概述
1.1 編寫目的
介紹 PWM 模塊的詳細設計方便相關人員進行 PWM 模塊的代碼設計開發。
1.2 使用范圍
適用于 Linux-3.10,linux-4.4 和 Linux-4.9 內核,Linux-5.4 內核。
1.3 相關人員
PWM 驅動的開發人員/維護人員等
2 術語及概念
2.1 術語定義及縮略語
| 術語 | 解釋說明 |
|---|---|
| Sunxi | 指 Allwinner 的一系列 SOC 硬件平臺 |
| 頻率 | PWM 的頻率決定了所模擬電平的平滑度(逼真度),人耳感知的頻率范圍為 20Hz-16Khz,注意 PWM 的頻率不要落在這個區間 |
| 占空比 | 決定了一個周期內 PWM 信號高低的比例,進而決定了一個周期內的平均電壓,也就是所模擬的電平的電壓 |
| 極性 | 決定了是高占空比的信號輸出電平高,還是低占空比信號輸出電平高。假設一個信號 的占空比為 100%,如果為正常極性,則輸出電平最大,如果為翻轉的極性,則輸出 電平為 0 |
| 開關 | 控制 PWM 信號是否輸出 |
| PWM對 | 電機等硬件需要兩路脈沖信號來控制其正常運轉,一般兩路極性相關,頻率,占空比 參數相同的 PWM 構成一個 PWM 對 |
| PWM死區控制時間 | 大功率電機,變頻器等由大功率管,IGBT 等元件組成 H 橋或 3 相橋,每個橋的上 半橋和下半橋是絕對不能導通的,在 PWM 信號驅動這些元件時,往往會由于沒有延 遲而造成未關斷某路半橋,這樣會造成功率元件的損壞,在 PWM 中加入死區時間的 控制即是讓上半橋關斷后,自動插入一個事件,延遲后再打開下半橋 |
2.2 概念闡述
脈沖寬度調制(PWM)是一種對模擬信號電平進行數字編碼的方法。通過高分辨率計數器的 使用,方波的占空比被調制用來對一個具體模擬信號的電平進行編碼。
PWM 模塊屬于 PWM 子系統,會調用 PWM 子系統的相關接口(詳情可以查看 PWM 子系 統知識)
3 模塊描述
3.1 模塊功能
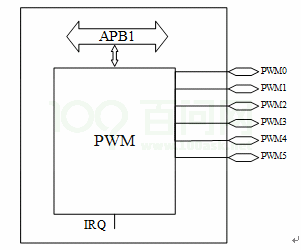
?
圖 3-1: 模塊功能
?
不同平臺上擁有不同個數的 PWM 通道,其中兩個為一個 PWM 對(平臺通道數不相同,PWM 對也就不相同,具體細節可以查看對應方案的 spec)。其中 PWM 具有以下特點:
? 支持脈沖,周期和互補對輸出 ? 支出捕捉輸入
? 帶可編程死區發生器,死區時間可控
? 0-24M/100M 輸出頻率范圍。0%-100% 占空比可調,最小分辨率 1/65536
? 支持 PWM 輸出和捕捉輸入產生中斷
3.2 模塊位置
PWM 模塊屬于硬件驅動層,直接與硬件通信
3.3 模塊配置
3.3.1 linux-4.9
在 linux-4.9 中, 在命令行中進入內核根目錄,執行 make ARCH=arm(arm64) menuconfig 進入配置主界面,并按以下步驟操作:
首先,選擇 Device Drivers 選項進入下一級配置,如下圖所示:
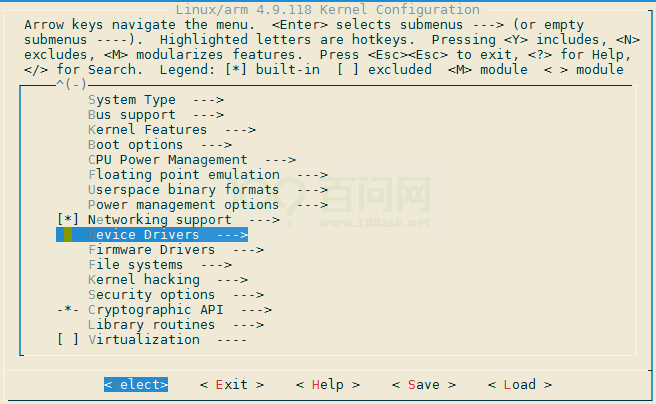
?
圖 3-2: Device Drivers
?
選擇 Pulse-Width Modulation (PWM) Support 進入下一步配置,如下圖所示:
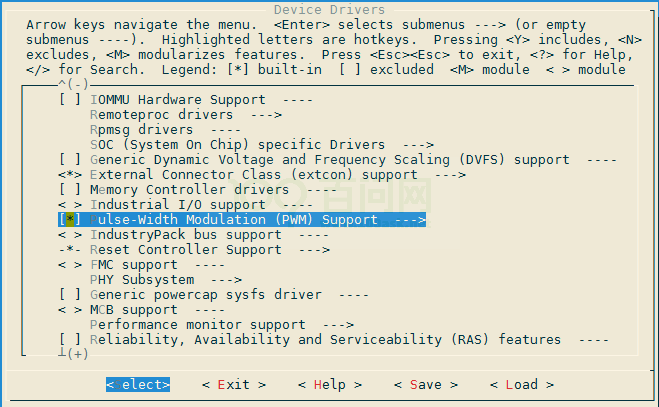
?
圖3-3: Pulse-Width Modulation (PWM) Support
?
3.選擇 SUNXI PWM SELECT 進入下一步配置,如下圖所示:
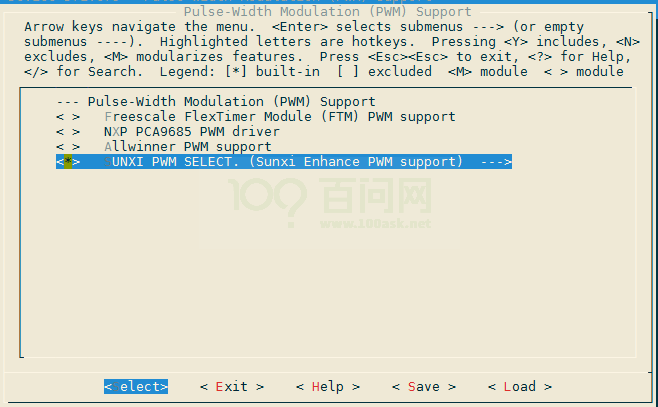
?
圖3-4: SUNXI PWM SELECT
?
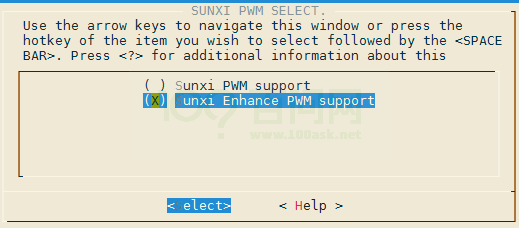
4.選擇 Sunxi Enhance PWM support 配置
?
圖 3-5: Sunxi Enhance PWM support
?
在 4.9 內核選擇該配置,選擇的是對應目錄中的 pwm-sunxi-new.c 文件。也可以有以下配置; 在第 3 步中直接選擇 Allwinner PWM support 選項,選擇的是對應目錄中的 pwm-sun4i.c 文件
在第 4 步中選擇 Sunxi PWM Support 選項,選擇的是對應目錄中的 pwm-sunxi.c 文件
3.3.2 linux-5.4
linux5.4 平臺中, 在命令行中進入內核根目錄,執行./build.sh menuconfig 進入配置主界面, 并按以下步驟操作:
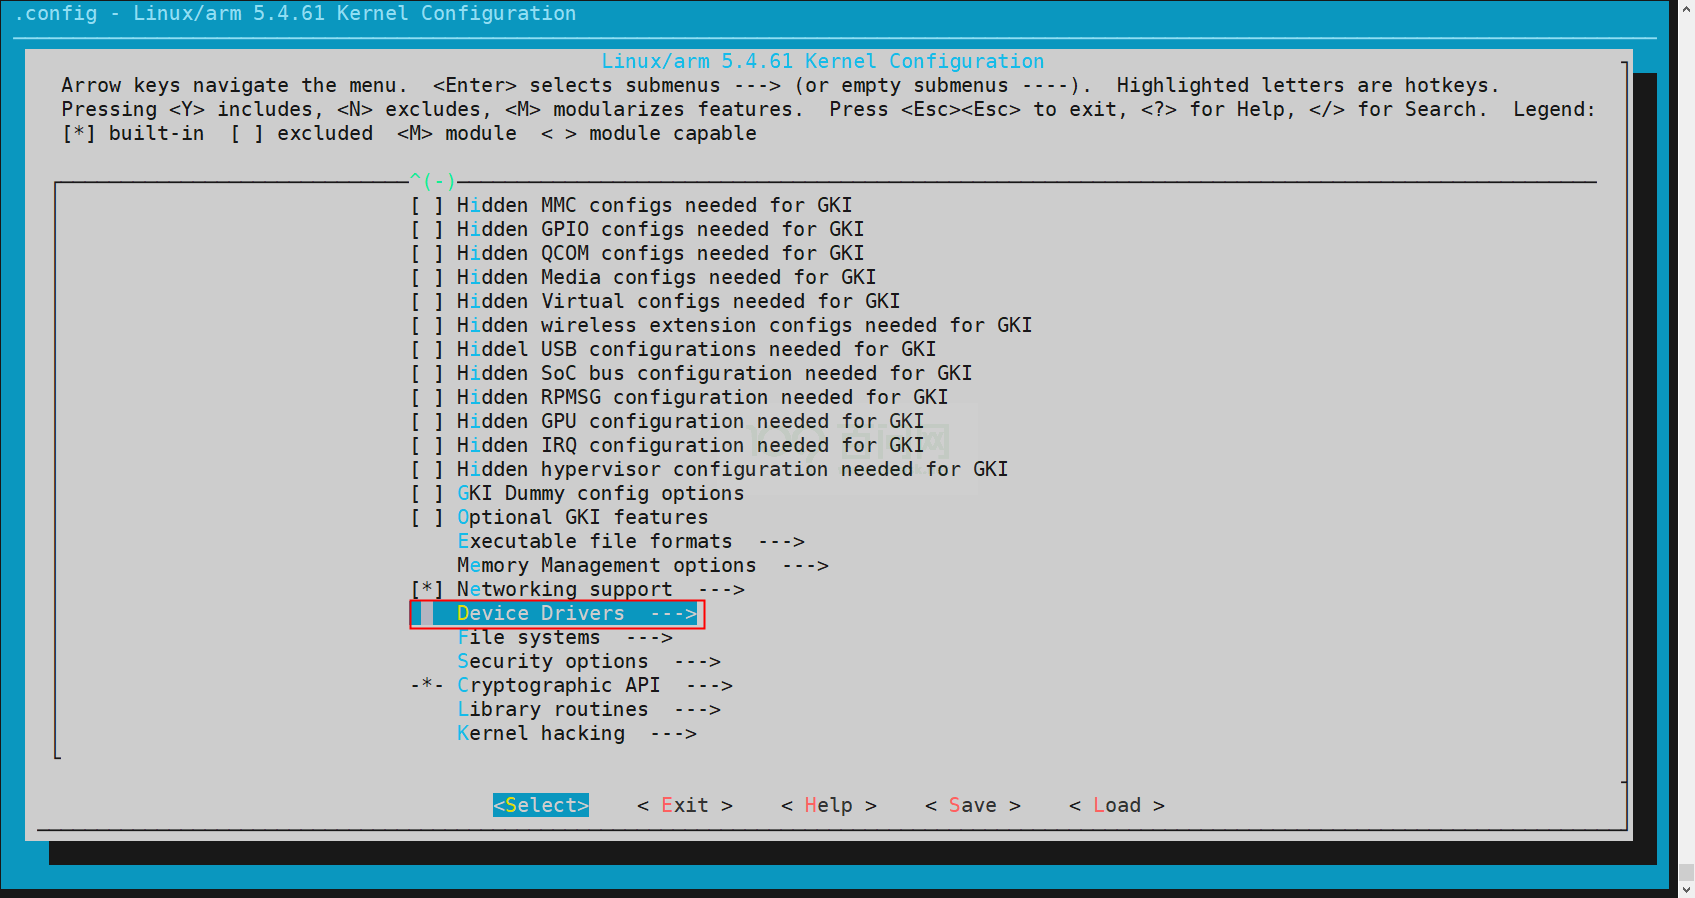
首先,選擇 Device Drivers 選項進入下一級配置,如下圖所示:
?
圖 3-6: Device
?
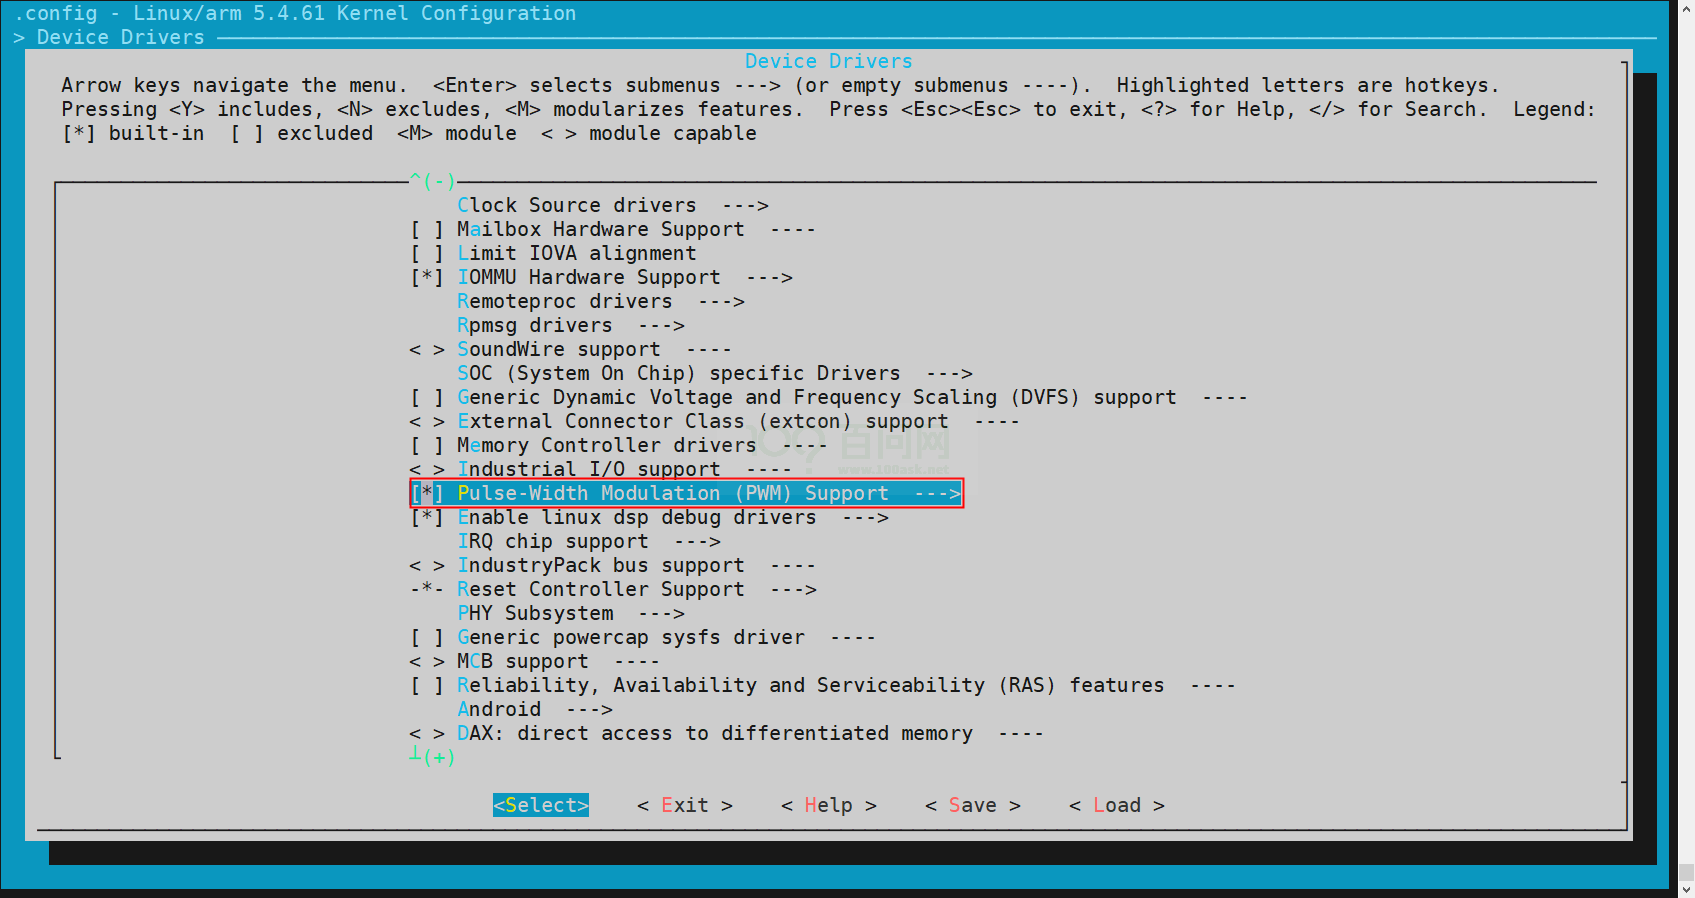
選擇 Pulse-Width Modulation (PWM) Support 進入下一步配置,如下圖所示
?
圖 3-7: Pulse-Width Modulation (PWM) Suppor
?
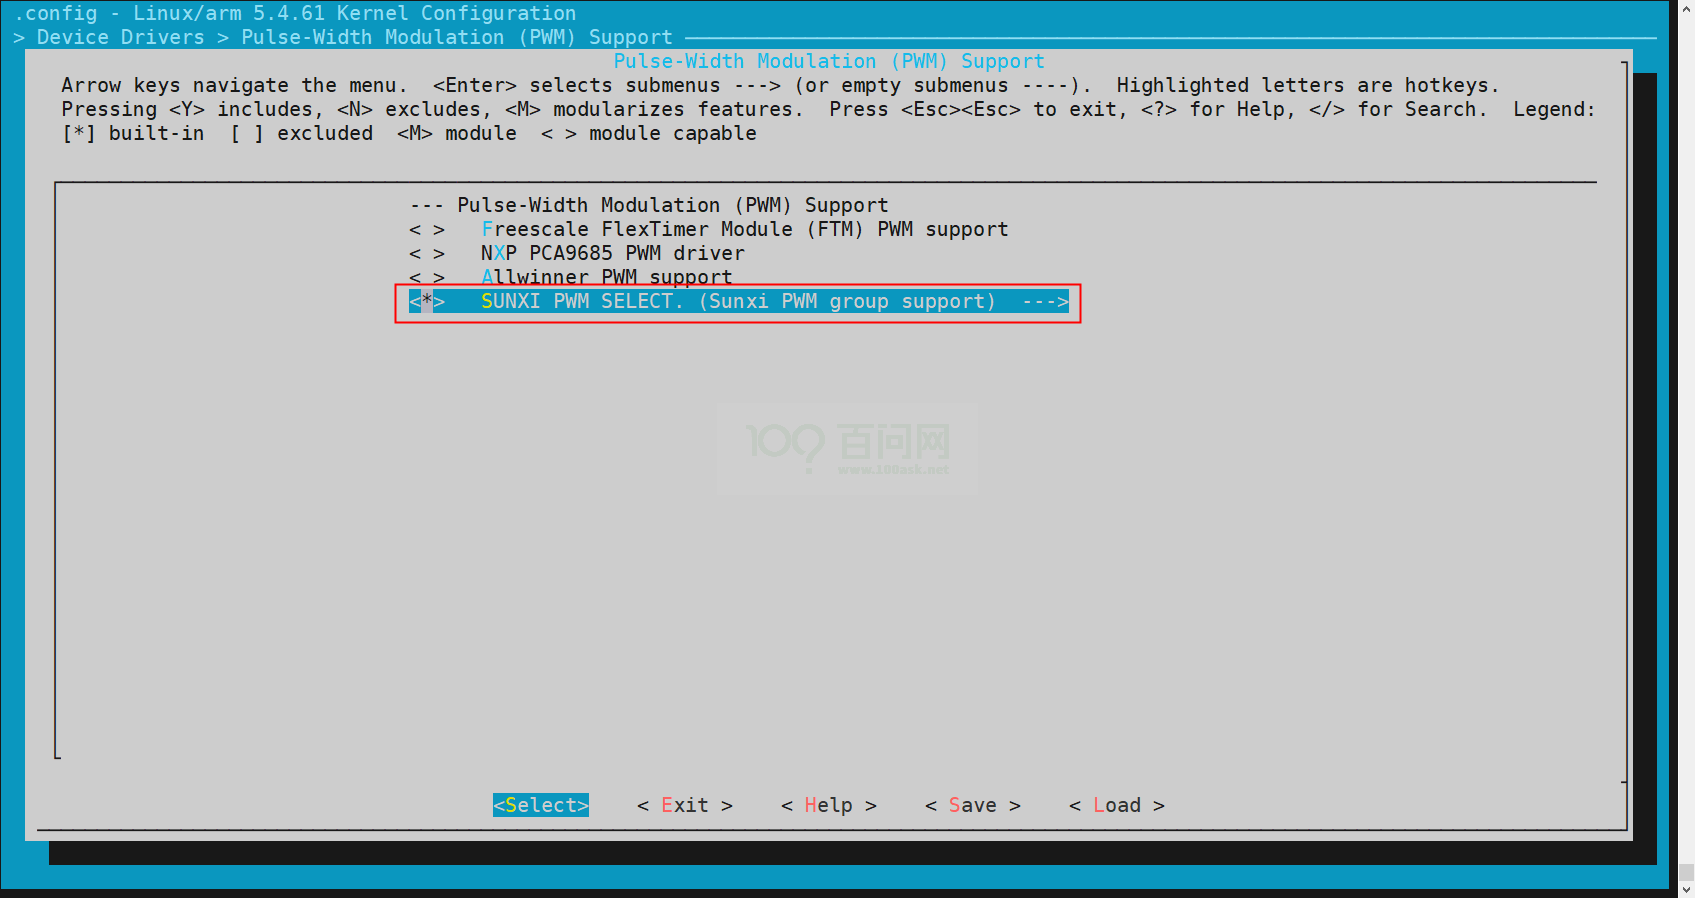
選擇 SUNXI PWM SELECT 進入下一步配置,如下圖所示:
?
圖3-8: SUNXI PWM SELECT
?
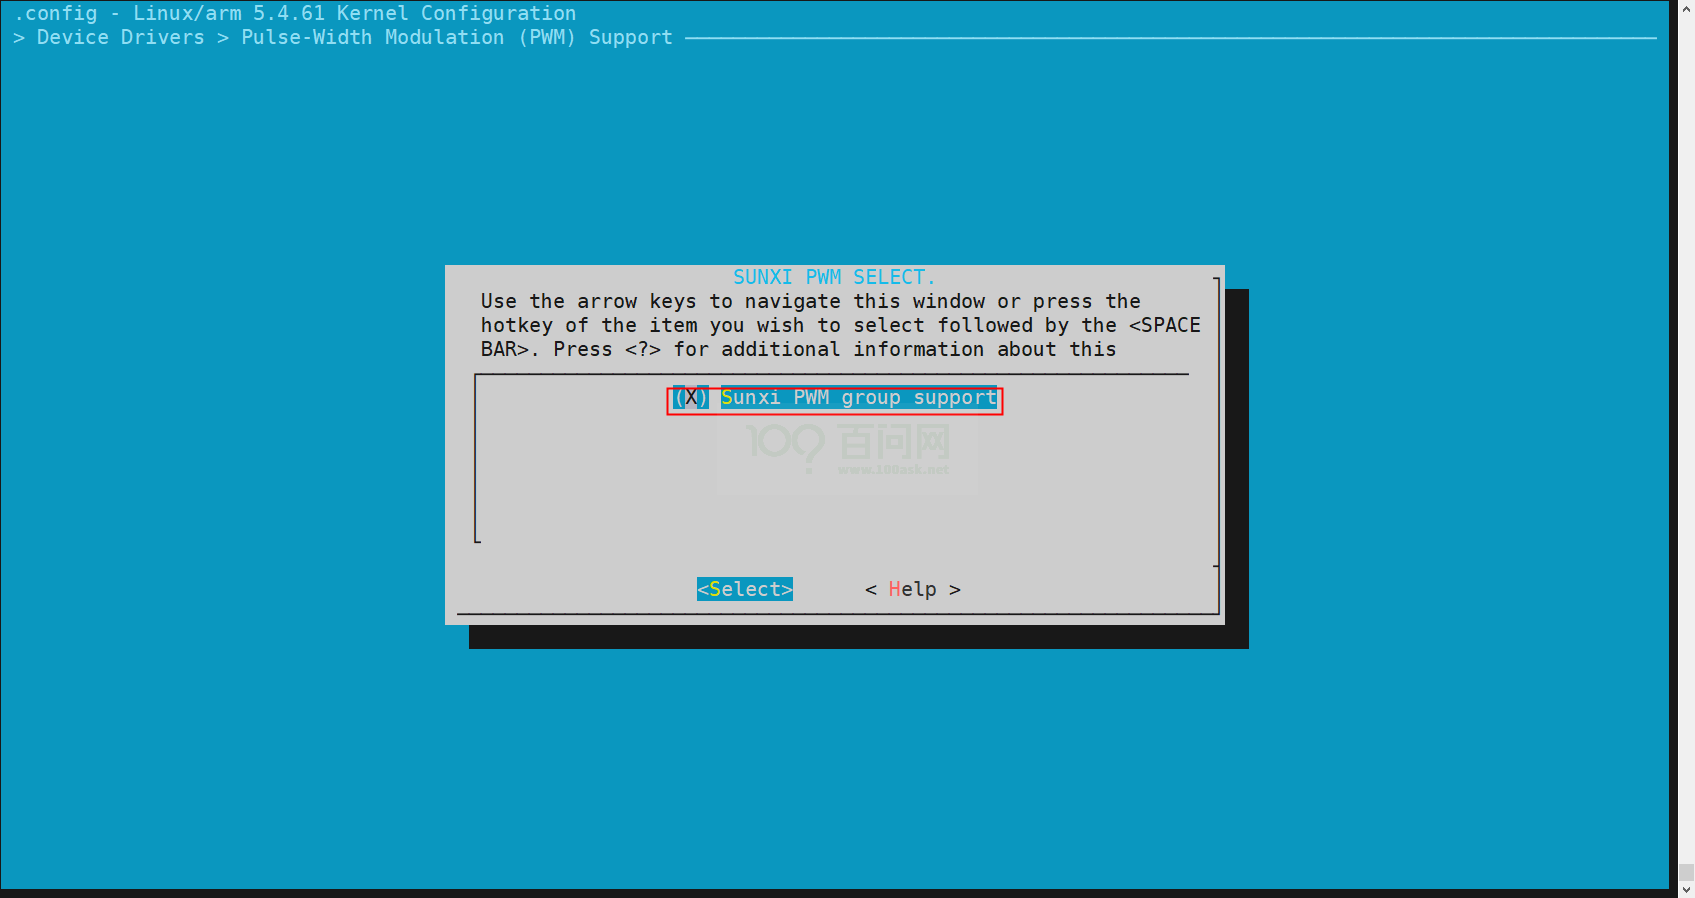
選擇 Sunxi PWM group support 配置
?
圖3-9: Sunxi PWM group support
?
3.4 設備樹配置
3.4.1 linux-4.9
PWM 模塊在設備樹中的配置如下所示:
pwm: pwm@0300a000 {
ompatible = "allwinner,sunxi-pwm";
reg = <0x0 0x0300a000 0x0 0x3c>; //寄存器地址配置
pwm-number = <1>; //pwm的個數
pwm-base = <0x0>; //pwm的起始序號
pwms = <&pwm0>, <&pwm1>;
};
s_pwm: s_pwm@0300a000 {
compatible = "allwinner,sunxi-s_pwm";
reg = <0x0 0x0300a000 0x0 0x3c>;
pwm-number = <1>;
pwm-base = <0x10>;
pwms = <&spwm0>;
};
注意,如果在模塊配置中選擇了 Sunxi PWM support 選項 (具體參數可以查看相關源文件),則 需要配置以下設備樹:
pwm0: pwm0@01c23400 {
?
compatible = "allwinner,sunxi-pwm0";
pinctrl-names = "active", "sleep";
reg_base = <0x01c23400>;
reg_peci_offset = <0x00>;
reg_peci_shift = <0x00>;
reg_peci_width = <0x01>;
reg_pis_offset = <0x04>;
reg_pis_shift = <0x00>;
reg_pis_width = <0x01>;
reg_crie_offset = <0x10>;
reg_crie_shift = <0x00>;
reg_crie_width = <0x01>;
reg_cfie_offset = <0x10>;
reg_cfie_shift = <0x01>;
reg_cfie_width = <0x01>;
reg_cris_offset = <0x14>;
reg_cris_shift = <0x00>;
reg_cris_width = <0x01>;
reg_cfis_offset = <0x14>;
reg_cfis_shift = <0x01>;
reg_cfis_width = <0x01>;
reg_clk_src_offset = <0x20>;
reg_clk_src_shift = <0x07>;
reg_clk_src_width = <0x02>;
reg_bypass_offset = <0x20>;
reg_bypass_shift = <0x05>;
reg_bypass_width = <0x01>;
reg_clk_gating_offset = <0x20>;
reg_clk_gating_shift = <0x04>;
reg_clk_gating_width = <0x01>;
reg_clk_div_m_offset = <0x20>;
reg_clk_div_m_shift = <0x00>;
reg_clk_div_m_width = <0x04>;
reg_pdzintv_offset = <0x30>;
reg_pdzintv_shift = <0x08>;
reg_pdzintv_width = <0x08>;
reg_dz_en_offset = <0x30>;
reg_dz_en_shift = <0x00>;
reg_dz_en_width = <0x01>;
reg_enable_offset = <0x40>;
reg_enable_shift = <0x00>;
reg_enable_width = <0x01>;
reg_cap_en_offset = <0x44>;
reg_cap_en_shift = <0x00>;
reg_cap_en_width = <0x01>;
reg_period_rdy_offset = <0x60>;
reg_period_rdy_shift = <0x0b>;
reg_period_rdy_width = <0x01>;
reg_pul_start_offset = <0x60>;
reg_pul_start_shift = <0x0a>;
reg_pul_start_width = <0x01>;
reg_mode_offset = <0x60>;
reg_mode_shift = <0x09>;
reg_mode_width = <0x01>;
reg_act_sta_offset = <0x60>;
reg_act_sta_shift = <0x08>;
reg_act_sta_width = <0x01>;
reg_prescal_offset = <0x60>;
reg_prescal_shift = <0x00>;
reg_prescal_width = <0x08>;
reg_entire_offset = <0x64>;
reg_entire_shift = <0x10>;
reg_entire_width = <0x10>;
reg_active_offset = <0x64>;
reg_active_shift = <0x00>;
reg_active_width = <0x10>;
};
PWM 模塊在 sys_config.fex 的配置如下所示:
[pwm0]
pwm_used = 1
pwm_positive = port:PB2<3><0>
[pwm0_suspend]
pwm_positive = port:PB2<7><0>
3.4.2 linux-5.4
PWM 模塊在設備樹中的配置如下所示:
pwm: pwm@2000c00 {
#pwm-cells = <0x3>;
compatible = "allwinner,sunxi-pwm";
reg = <0x0 0x02000c00 0x0 0x400>;
clocks = <&ccu CLK_BUS_PWM>;
resets = <&ccu RST_BUS_PWM>;
pwm-number = <8>;
pwm-base = <0x0>;
sunxi-pwms = <&pwm0>, <&pwm1>, <&pwm2>, <&pwm3>, <&pwm4>,
<&pwm5>, <&pwm6>, <&pwm7>;
};
pwm0: pwm0@2000c10 {
compatible = "allwinner,sunxi-pwm0";
pinctrl-names = "active", "sleep";
reg = <0x0 0x02000c10 0x0 0x4>;
reg_base = <0x02000c00>;
};
pwm1: pwm1@2000c11 {
compatible = "allwinner,sunxi-pwm1";
pinctrl-names = "active", "sleep";
reg = <0x0 0x02000c11 0x0 0x4>;
reg_base = <0x02000c00>;
};
pwm2: pwm2@2000c12 {
compatible = "allwinner,sunxi-pwm2";
pinctrl-names = "active", "sleep";
reg = <0x0 0x02000c12 0x0 0x4>;
reg_base = <0x02000c00>;
};
pwm3: pwm3@2000c13 {
compatible = "allwinner,sunxi-pwm3";
pinctrl-names = "active", "sleep";
reg = <0x0 0x02000c13 0x0 0x4>;
reg_base = <0x02000c00>;
};
pwm4: pwm4@2000c14 {
compatible = "allwinner,sunxi-pwm4";
pinctrl-names = "active", "sleep";
reg = <0x0 0x02000c14 0x0 0x4>;
reg_base = <0x02000c00>;
};
pwm5: pwm5@2000c15 {
compatible = "allwinner,sunxi-pwm5";
pinctrl-names = "active", "sleep";
reg = <0x0 0x02000c15 0x0 0x4>;
reg_base = <0x02000c00>;
};
pwm6: pwm6@2000c16 {
compatible = "allwinner,sunxi-pwm6";
pinctrl-names = "active", "sleep";
reg = <0x0 0x02000c16 0x0 0x4>;
reg_base = <0x02000c00>;
};
pwm7: pwm7@2000c17 {
compatible = "allwinner,sunxi-pwm7";
pinctrl-names = "active", "sleep";
reg = <0x0 0x02000c17 0x0 0x4>;
reg_base = <0x02000c00>;
};
在板級目錄下的配置:
pwm3_pin_a: pwm3@0 {
pins = "PB0";
function = "pwm3";
drive-strength = <10>;
bias-pull-up;
};
pwm3_pin_b: pwm3@1 {
pins = "PB0";
function = "gpio_in";
bias-disable;
};
pwm7_pin_a: pwm7@0 {
pins = "PD22";
function = "pwm7";
drive-strength = <10>;
bias-pull-up;
};
pwm7_pin_b: pwm7@1 {
pins = "PD22";
function = "gpio_out";
};
&pwm3 {
pinctrl-names = "active", "sleep";
pinctrl-0 = <&pwm3_pin_a>;
pinctrl-1 = <&pwm3_pin_b>;
status = "okay";
};
&pwm7 {
pinctrl-names = "active", "sleep";
pinctrl-0 = <&pwm7_pin_a>;
pinctrl-1 = <&pwm7_pin_b>;
status = "okay";
};
具體通道配置按照需求進行配置.
3.5 源碼結構
PWM 驅動的源代碼位于內核的 drivers/pwm 目錄下,具體的路徑如下所示:
3.5.1 linux-4.9
drivers/pwm/
├── pwm-sunxi-new.c // Sunxi Enhance PWM support對應的PWM驅動
├── pwm-sunxi.c // Sunxi PWM support對應的PWM驅動
├── pwm-sun4i.c // Allwiner PWM support對應的PWM驅動
├── sysfs.c //PWM子系統的文件系統相關文件
├── core.c //PWM子系統的核心文件
3.5.2 linux-5.4
drivers/pwm/
├── pwm-sunxi-group.c // Sunxi GROUP PWM support對應的PWM驅動
├── sysfs.c //PWM子系統的文件系統相關文件
├── core.c //PWM子系統的核心文件
3.6 調試接口
可以直接在 linux 內核中調試 pwm 模塊,具體如下: 進入/sys/class/pwm 目錄,該目錄是 linux 內核為 pwm 子系統提供的類目錄,遍歷該目錄:
/sys/class/pwm # ls
pwmchip0
可以看到,上述 pwmchip0 就是我們注冊的 pwm 控制器,進入該目錄,然后遍歷該目錄:
/sys/class/pwm # cd pwmchip0/ /sys/devices/platform/soc/1c23400.pwm/pwm/pwmchip0 # ls device export npwm subsystem uevent unexport
其中 npwm 文件儲存了該 pwm 控制器的 pwm 個數,而 export 和 unexport 是導出和刪除某 個 pwm 設備的文件,下面演示導出 pwm1。
/sys/devices/platform/soc/1c23400.pwm/pwm/pwmchip0 # cat npwm 2 /sys/devices/platform/soc/1c23400.pwm/pwm/pwmchip0 # echo 1 > export /sys/devices/platform/soc/1c23400.pwm/pwm/pwmchip0 # ls device export npwm pwm1 subsystem uevent unexport
可以看到目錄中多出 pwm1 目錄,進入該目錄,遍歷:
/sys/devices/platform/soc/1c23400.pwm/pwm/pwmchip0 # cd pwm1/ /sys/devices/platform/soc/1c23400.pwm/pwm/pwmchip0/pwm1 # ls capture duty_cycle enable period polarity uevent
該目錄中,enable 是使能 pwm,duty_cycle 是占空比,period 是周期,polarity 是極性,可 以配置相關的 pwm 并且使能:
/sys/devices/platform/soc/1c23400.pwm/pwm/pwmchip0/pwm1 # echo 1000000000 > period /sys/devices/platform/soc/1c23400.pwm/pwm/pwmchip0/pwm1 # echo 500000000 > duty_cycle /sys/devices/platform/soc/1c23400.pwm/pwm/pwmchip0/pwm1 # echo normal > polarity /sys/devices/platform/soc/1c23400.pwm/pwm/pwmchip0/pwm1 # echo 1 > enable
如果相關引腳接上了示波器等,可以看到波形。最后返回上層目錄,刪除該 pwm 設備:
/sys/devices/platform/soc/1c23400.pwm/pwm/pwmchip0/pwm1 # cd .. /sys/devices/platform/soc/1c23400.pwm/pwm/pwmchip0 # ls device export npwm pwm1 subsystem uevent unexport /sys/devices/platform/soc/1c23400.pwm/pwm/pwmchip0 # echo 1 > unexport /sys/devices/platform/soc/1c23400.pwm/pwm/pwmchip0 # ls device export npwm subsystem uevent unexport
-
內核
+關注
關注
3文章
1382瀏覽量
40369 -
PWM
+關注
關注
114文章
5197瀏覽量
214537 -
Linux
+關注
關注
87文章
11339瀏覽量
210110 -
開發
+關注
關注
0文章
370瀏覽量
40886
發布評論請先 登錄
相關推薦


 Linux PWM開發指南





評論