前言
上一節(jié)我們簡單的介紹了一下 axios 的整體加載流程和使用過程。可以清楚的了解到當(dāng) import axios from 'axios' 之后 這背后到底做了什么。并且我們也簡單介紹了一個(gè) axios 到底是一個(gè)什么類型的數(shù)據(jù)。以及為什么可以即可以當(dāng)成方法調(diào)用還可以通過對象的調(diào)用方式調(diào)用某些屬性方法
如果沒有了解的同學(xué)可以先去看一下上一篇文章的介紹,再來繼續(xù)往下看。
這篇我們主要講解一下 axios 中的 配置、攔截器和執(zhí)行鏈等一些核心的功能到底是怎么運(yùn)行的。
02
配置過程
要了解這個(gè)之前,我們先來看一下 axios 在使用的時(shí)候一種方式:
axios.create({ ...配置項(xiàng) })
不知道大家有沒有使用過種方式,這種方式可以讓我們傳遞一些配置到 axios 的內(nèi)部,具體實(shí)現(xiàn)如下:
axios.create = function create(instanceConfig) {
  return createInstance(mergeConfig(axios.defaults, instanceConfig));
};
沒錯(cuò),最終又調(diào)用了 createInstance 函數(shù),再來看一下函數(shù)體吧:
function createInstance(defaultConfig) {
  var context = new Axios(defaultConfig);
  var instance = bind(Axios.prototype.request, context);

  // Copy axios.prototype to instance
  utils.extend(instance, Axios.prototype, context);

  // Copy context to instance
  utils.extend(instance, context);

  return instance;
}
有一個(gè)函數(shù)需要關(guān)注一下就是 mergeConfig, 這個(gè)函數(shù)會(huì)把 axios 自帶的配置和我們傳入的配置進(jìn)行合并,我們傳入的配置會(huì)覆蓋 axios 自帶的配置,也就是說我們傳入的配置優(yōu)先級會(huì)更高。
由于這個(gè) mergeConfig 函數(shù)體太大,我們就不細(xì)說了,大家有興趣可以看一下源碼。
這里要繼續(xù)說一下,我們在發(fā)送某個(gè)具體的請求的時(shí)候也可以進(jìn)行配置,這樣就有三個(gè)配置。
優(yōu)先級依次是:某個(gè)具體請求配置 > 創(chuàng)建實(shí)例對象配置 > axios 默認(rèn)配置
03
求
上節(jié)說過,axios可以像對象那樣調(diào)用屬性方法,如 get、post等,其實(shí)最終都會(huì)調(diào)用 request 方法,代碼如下:
utils.forEach(['delete', 'get', 'head', 'options'], function forEachMethodNoData(method) {
  /*eslint func-names:0*/
  Axios.prototype[method] = function(url, config) {
    return this.request(mergeConfig(config || {}, {
      method: method,
      url: url,
      data: (config || {}).data
    }));
  };
});

utils.forEach(['post', 'put', 'patch'], function forEachMethodWithData(method) {
  /*eslint func-names:0*/
  Axios.prototype[method] = function(url, data, config) {
    return this.request(mergeConfig(config || {}, {
      method: method,
      url: url,
      data: data
    }));
  };
});
可以看出最終都會(huì)調(diào)用到 this.request 方法。那我們來重點(diǎn)看一下 request方法具體做了什么。
先看一下函數(shù)體吧,代碼也不是很多:
Axios.prototype.request = function request(config) {
  /*eslint no-param-reassign:0*/
  // Allow for axios('example/url'[, config]) a la fetch API
  if (typeof config === 'string') {
    config = arguments[1] || {};
    config.url = arguments[0];
  } else {
    config = config || {};
  }

  config = mergeConfig(this.defaults, config);

  // Set config.method
  if (config.method) {
    config.method = config.method.toLowerCase();
  } else if (this.defaults.method) {
    config.method = this.defaults.method.toLowerCase();
  } else {
    config.method = 'get';
  }

  // Hook up interceptors middleware
  var chain = [dispatchRequest, undefined];
  var promise = Promise.resolve(config);

  this.interceptors.request.forEach(function unshiftRequestInterceptors(interceptor) {
    chain.unshift(interceptor.fulfilled, interceptor.rejected);
  });

  this.interceptors.response.forEach(function pushResponseInterceptors(interceptor) {
    chain.push(interceptor.fulfilled, interceptor.rejected);
  });

  while (chain.length) {
    promise = promise.then(chain.shift(), chain.shift());
  }

  return promise;
};
主要有三點(diǎn):
1、生成配置項(xiàng)
2、生成攔截器、執(zhí)行鏈
3、返回執(zhí)行鏈的結(jié)果
下面我們重點(diǎn)介紹一下 2 是如何生成攔截器和執(zhí)行鏈的
每個(gè)axios實(shí)例都會(huì)有一個(gè) interceptors 屬性,如下:
function Axios(instanceConfig) {
  this.defaults = instanceConfig;
  this.interceptors = {
    request: new InterceptorManager(),
    response: new InterceptorManager()
  };
}
interceptors里面存放著 request 攔截器和response攔截器。InterceptorManager 中有一個(gè) handlers 屬性,是一個(gè)數(shù)組存放著具體的攔截器,再來看一個(gè)比較熟悉的方法:
InterceptorManager.prototype.use = function use(fulfilled, rejected) {
  this.handlers.push({
    fulfilled: fulfilled,
    rejected: rejected
  });
  return this.handlers.length - 1;
};
相信大家肯定用過這個(gè) use 方法,這個(gè)方法接收兩個(gè)函數(shù)類型的參數(shù),再封裝成一個(gè)對象放到 handlers中。
再回到 request 函數(shù)體中,看一下
  this.interceptors.request.forEach(function unshiftRequestInterceptors(interceptor) {
      chain.unshift(interceptor.fulfilled, interceptor.rejected);
  });

  this.interceptors.response.forEach(function pushResponseInterceptors(interceptor) {
    chain.push(interceptor.fulfilled, interceptor.rejected);
  });
通過遍歷把 handlers 的攔截器都放到一個(gè) chain 中,尤其要注意:this.interceptors.request 這個(gè)操作,是把最后的攔截器放到 chain的最前面。最終形成以下鏈接:
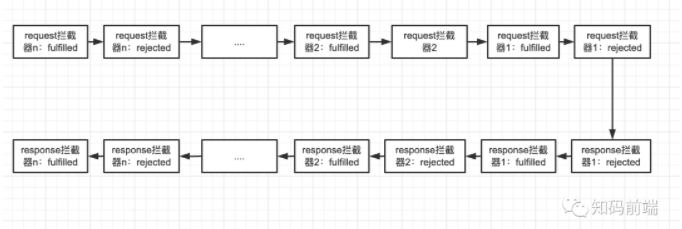
當(dāng)然這還不是最終的 chain,因?yàn)榍懊?/span>
var chain = [dispatchRequest, undefined];
有這樣行代碼,所以最終的 chain 應(yīng)該是下面的:
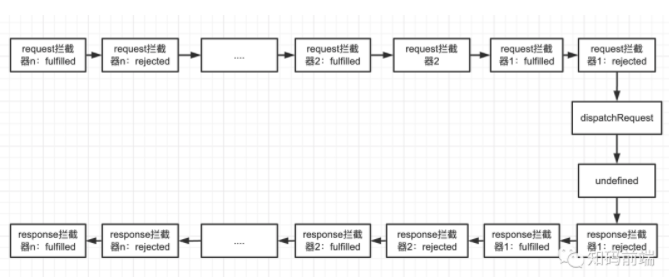
這才是一個(gè)最終的 chain 。也就是說我們執(zhí)行的每個(gè)請求都是執(zhí)行了一個(gè)鏈,最終返回了一個(gè) promise對象,是不是感覺也沒有那么神秘,看一下執(zhí)行代碼,很簡單
varpromise=Promise.resolve(config);
while (chain.length) {
    promise = promise.then(chain.shift(), chain.shift());
  }
return promise;
以上便是 axios 發(fā)送某個(gè)請求的全過程,那么接下來我們繼續(xù)看一下到底是怎么發(fā)送的請求。
04
具體請求
從上面我們可以看到axios發(fā)送的請求就是一個(gè)鏈的執(zhí)行過程,除去 request 和 response的攔截器不說,我們重點(diǎn)說一下:dispatchRequest 這個(gè)方法的執(zhí)行過程,因?yàn)榫唧w的請求就是在這個(gè)方法中執(zhí)行的。先來看一下源碼:
module.exports = function dispatchRequest(config) {
  throwIfCancellationRequested(config);

  // Ensure headers exist
  config.headers = config.headers || {};

  // Transform request data
  config.data = transformData(
    config.data,
    config.headers,
    config.transformRequest
  );

  // Flatten headers
  config.headers = utils.merge(
    config.headers.common || {},
    config.headers[config.method] || {},
    config.headers
  );

  utils.forEach(
    ['delete', 'get', 'head', 'post', 'put', 'patch', 'common'],
    function cleanHeaderConfig(method) {
      delete config.headers[method];
    }
  );

  var adapter = config.adapter || defaults.adapter;

  return adapter(config).then(function onAdapterResolution(response) {
    throwIfCancellationRequested(config);

    // Transform response data
    response.data = transformData(
      response.data,
      response.headers,
      config.transformResponse
    );

    return response;
  }, function onAdapterRejection(reason) {
    if (!isCancel(reason)) {
      throwIfCancellationRequested(config);

      // Transform response data
      if (reason && reason.response) {
        reason.response.data = transformData(
          reason.response.data,
          reason.response.headers,
          config.transformResponse
        );
      }
    }

    return Promise.reject(reason);
  });
};
方法本身并不難理解,處理一下請求頭然后再通過轉(zhuǎn)換器轉(zhuǎn)一下請求數(shù)據(jù),最后通過一個(gè)適配器執(zhí)行請求。下面我們再看一下適配器是什么,看一下下面的代碼
var adapter = config.adapter || defaults.adapter;
適配器是通過配置獲取的,平時(shí)的開發(fā)中我們幾乎不需要自己定義適配器,一般都是用系統(tǒng)默認(rèn)的,所以我們看一下默認(rèn)的適配器是怎么樣的。下面是默認(rèn)配置的代碼:
adapter: getDefaultAdapter(),
繼續(xù)看:
function getDefaultAdapter() {  var adapter;
  if (typeof XMLHttpRequest !== 'undefined') {
    // For browsers use XHR adapter
    adapter = require('./adapters/xhr');
  } else if (typeof process !== 'undefined' && Object.prototype.toString.call(process) === '[object process]') {
    // For node use HTTP adapter
    adapter = require('./adapters/http');
  }
  return adapter;
}
看到這里應(yīng)該大體的有點(diǎn)明白了吧,其實(shí)就是我們平時(shí)用的 XMLHttpRequest 對象,那為什么還要做一個(gè)適配器呢,主要是因?yàn)?axios 不僅僅是一款可以用在 瀏覽器的庫,在 node 開發(fā)中也可以使用,但node中沒有 XMLHttpRequest對象,就得通過其它的方式實(shí)現(xiàn)。本文不涉及 node,所以我們主要看以下代碼
adapter=require('./adapters/xhr');
因?yàn)榇a比較多,所以這里我用圖片的形式展示一下:
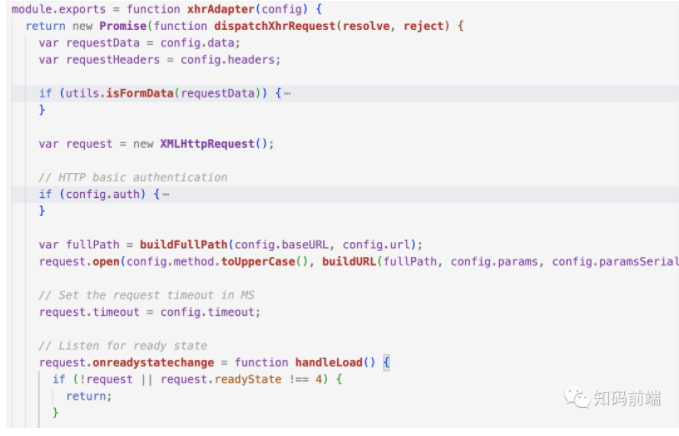
到這里,我們才真正看到了熟悉的 XMLHttpRequest對象。其實(shí)axios底層也就是用的 XMLHttpRequest對象而已,沒有什么神秘的。只不過人家封裝的很好用起來方便。
其實(shí)到這里我們就已經(jīng)把 axios的整體源碼分析了一次,當(dāng)然還有很多細(xì)節(jié)沒有說到,比如:錯(cuò)誤處理,狀態(tài)碼處理等,大家有興趣的可以自己去細(xì)讀源碼。只有自己閱讀一次才能更好的理解 axios的優(yōu)雅之處。
-
核心
+關(guān)注
關(guān)注
0文章
44瀏覽量
15033 -
執(zhí)行
+關(guān)注
關(guān)注
0文章
16瀏覽量
12627 -
配置
+關(guān)注
關(guān)注
1文章
189瀏覽量
18432
發(fā)布評論請先 登錄
相關(guān)推薦
5G電視或成下代5G無線通信服務(wù)核心功能
阿里云數(shù)據(jù)庫POLARDB核心功能物理復(fù)制技術(shù)解讀
智能數(shù)字鐘的核心功能定位
F103的功能分類核心功能是什么
Bifrost GPU可編程核心的頂級布局、優(yōu)勢和著色器核心功能
江智機(jī)器人人機(jī)語音交互技術(shù)核心功能點(diǎn)探索

機(jī)器視覺的四大核心功能
智慧灌區(qū)平臺(tái)功能全面解析(智慧灌區(qū)場景和核心功能)
[天拓四方]工業(yè)邊緣網(wǎng)關(guān)的核心功能、應(yīng)用場景和實(shí)施策略
深度解析:藍(lán)牙網(wǎng)關(guān)核心功能以及應(yīng)用場景

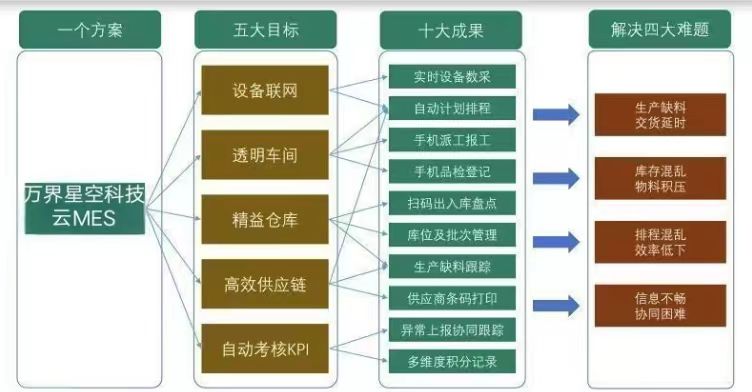
萬界星空科技低代碼云mes核心功能詳解!建議收藏!
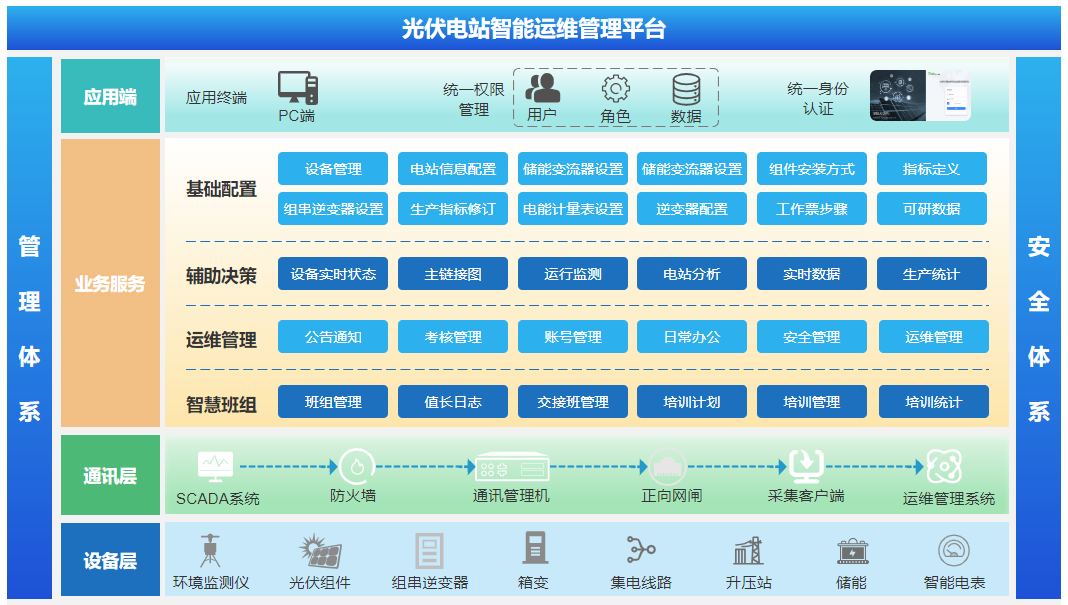
光伏電站智能運(yùn)維管理系統(tǒng)三大核心功能


 核心功能具體的執(zhí)行過程-2


評論