前言
相信絕大多數的業務開發同學,日常的工作都離不開寫 getter、setter 方法。要么是將下游的 RPC 結果通過getter、setter 方法進行獲取組裝。要么就是將自己系統內部的處理結果通過 getter、setter 方法處理成前端所需要的 VO 對象。
publicUserInfoVOoriginalCopyItem(UserDTOuserDTO){
UserInfoVOuserInfoVO=newUserInfoVO();
userInfoVO.setUserName(userDTO.getName());
userInfoVO.setAge(userDTO.getAge());
userInfoVO.setBirthday(userDTO.getBirthday());
userInfoVO.setIdCard(userDTO.getIdCard());
userInfoVO.setGender(userDTO.getGender());
userInfoVO.setIsMarried(userDTO.getIsMarried());
userInfoVO.setPhoneNumber(userDTO.getPhoneNumber());
userInfoVO.setAddress(userDTO.getAddress());
returnuserInfoVO;
}
傳統的方法一般是采用硬編碼,將每個對象的值都逐一設值。當然為了偷懶也會有采用一些 BeanUtil 簡約代碼的方式:
publicUserInfoVOutilCopyItem(UserDTOuserDTO){
UserInfoVOuserInfoVO=newUserInfoVO();
//采用反射、內省機制實現拷貝
BeanUtils.copyProperties(userDTO,userInfoVO);
returnuserInfoVO;
}
但是,像 BeanUtils 這類通過反射、內省等實現的框架,在速度上會帶來比較嚴重的影響。尤其是對于一些大字段、大對象而言,這個速度的缺陷就會越明顯。針對速度這塊我還專門進行了測試,對普通的 setter 方法、BeanUtils 的拷貝以及本次需要介紹的 mapperStruct 進行了一次對比。得到的耗時結果如下所示:(具體的運行代碼請見附錄)
| 運行次數 | setter方法耗時 | BeanUtils拷貝耗時 | MapperStruct拷貝耗時 |
|---|---|---|---|
| 1 | 2921528(1) | 3973292(1.36) | 2989942(1.023) |
| 10 | 2362724(1) | 66402953(28.10) | 3348099(1.417) |
| 100 | 2500452(1) | 71741323(28.69) | 2120820(0.848) |
| 1000 | 3187151(1) | 157925125(49.55) | 5456290(1.711) |
| 10000 | 5722147(1) | 300814054(52.57) | 5229080(0.913) |
| 100000 | 19324227(1) | 244625923(12.65) | 12932441(0.669) |
以上單位均為毫微秒。括號內的為當前組件同 Setter 比較的比值。可以看到 BeanUtils 的拷貝耗時基本為 setter 方法的十倍、二十倍以上。而 MapperStruct 方法拷貝的耗時,則與 setter 方法相近。由此可見,簡單的 BeanUtils 確實會給服務的性能帶來很大的壓力。而 MapperStruct 拷貝則可以很好的解決這個問題。
下面我們就來介紹一下 MapperStruct 這個能夠很好提升我們代碼效率的工具。
使用教程
maven依賴
首先要導入 mapStruct 的 maven 依賴,這里我們選擇最新的版本 1.5.0.RC1。
...... //mapStructmaven依賴 1.5.0.RC1 ... //編譯的組件需要配置 org.mapstruct mapstruct ${org.mapstruct.version} org.apache.maven.plugins maven-compiler-plugin 3.8.1 1.8 1.8 org.mapstruct mapstruct-processor ${org.mapstruct.version}
在引入 maven 依賴后,我們首先來定義需要轉換的 DTO 及 VO 信息,主要包含的信息是名字、年齡、生日、性別等信息。
@Data
publicclassUserDTO{
privateStringname;

privateintage;

privateDatebirthday;

//1-男0-女
privateintgender;

privateStringidCard;

privateStringphoneNumber;

privateStringaddress;

privateBooleanisMarried;
}
@Data
publicclassUserInfoVO{
privateStringuserName;

privateintage;

privateDatebirthday;

//1-男0-女
privateintgender;

privateStringidCard;

privateStringphoneNumber;

privateStringaddress;

privateBooleanisMarried;
}
緊接著需要編寫相應的mapper類,以便生成相應的編譯類。
@Mapper
publicinterfaceInfoConverter{

InfoConverterINSTANT=Mappers.getMapper(InfoConverter.class);

@Mappings({
@Mapping(source="name",target="userName")
})
UserInfoVOconvert(UserDTOuserDto);
}
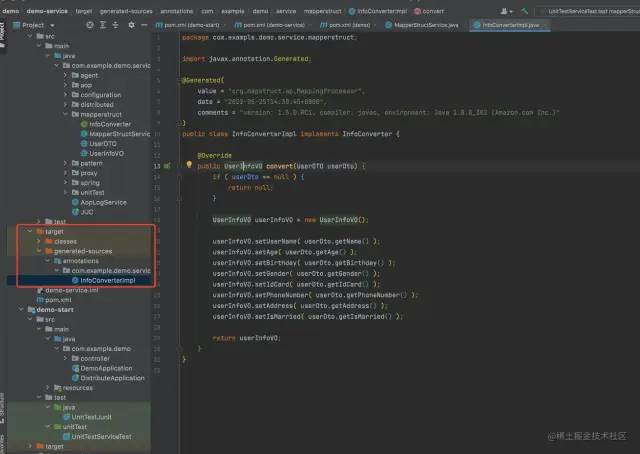
需要注意的是,因為 DTO 中的 name 對應的其實是 VO 中的 userName。因此需要在 converter 中顯式聲明。在編寫完對應的文件之后,需要執行 maven 的 complie 命令使得 IDE 編譯生成對應的 Impl 對象。(自動生成)

到此,mapperStruct 的接入就算是完成了~。我們就可以在我們的代碼中使用這個拷貝類了。
publicUserInfoVOnewCopyItem(UserDTOuserDTO,inttimes){
UserInfoVOuserInfoVO=newUserInfoVO();
userInfoVO=InfoConverter.INSTANT.convert(userDTO);
returnuserInfoVO;
}
怎么樣,接入是不是很簡單~
FAQ
1、接入項目時,發現并沒有生成對應的編譯對象class,這個是什么原因?
答:可能的原因有如下幾個:
忘記編寫對應的 @Mapper 注解,因而沒有生成
沒有配置上述提及的插件 maven-compiler-plugin
沒有執行 maven 的 Compile,IDE 沒有進行相應編譯
2、接入項目后發現,我項目內的 Lombok、@Data 注解不好使了,這怎么辦呢?
由于 Lombok 本身是對 AST 進行修改實現的,但是 mapStruct 在執行的時候并不能檢測到 Lombok 所做的修改,因此需要額外的引入 maven 依賴lombok-mapstruct-binding。
......1.5.0.RC1 0.2.0 1.18.20 ...... ......org.mapstruct mapstruct ${org.mapstruct.version} org.projectlombok lombok-mapstruct-binding ${lombok-mapstruct-binding.version} org.projectlombok lombok ${lombok.version}
更詳細的,mapperStruct 在官網中還提供了一個實現 Lombok 及 mapStruct 同時并存的案例
「3、更多問題:」
歡迎查看MapStruct官網文檔,里面對各種問題都有更詳細的解釋及解答。
實現原理
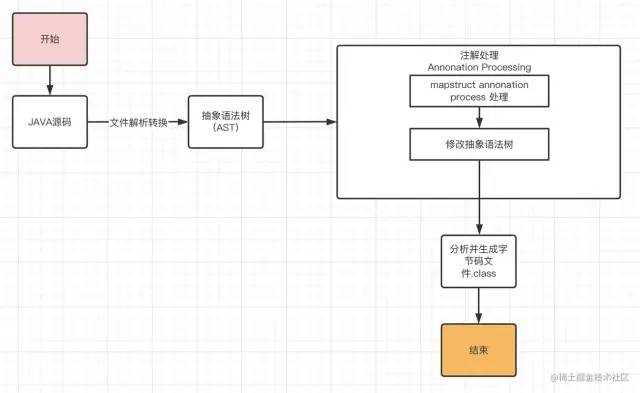
在聊到 mapstruct 的實現原理之前,我們就需要先回憶一下 JAVA 代碼運行的過程。大致的執行生成的流程如下所示:

可以直觀的看到,如果我們想不通過編碼的方式對程序進行修改增強,可以考慮對抽象語法樹進行相應的修改。而mapstruct 也正是如此做的。具體的執行邏輯如下所示:

為了實現該方法,mapstruct 基于JSR 269 實現了代碼。JSR 269 是 JDK 引進的一種規范。有了它,能夠在編譯期處理注解,并且讀取、修改和添加抽象語法樹中的內容。JSR 269 使用 Annotation Processor 在編譯期間處理注解,Annotation Processor 相當于編譯器的一種插件,因此又稱為插入式注解處理。想要實現 JSR 269,主要有以下幾個步驟:
繼承 AbstractProcessor 類,并且重寫 process 方法,在 process 方法中實現自己的注解處理邏輯。
在 META-INF/services 目錄下創建 javax.annotation.processing.Processor 文件注冊自己實現的 Annotation Processor。
通過實現AbstractProcessor,在程序進行 compile 的時候,會對相應的 AST 進行修改。從而達到目的。
publicvoidcompile(ListsourceFileObjects, List classnames, Iterableprocessors) { if(processors!=null&&processors.iterator().hasNext()) explicitAnnotationProcessingRequested=true; //asaJavaCompilercanonlybeusedonce,throwanexceptionif //ithasbeenusedbefore. if(hasBeenUsed) thrownewAssertionError("attempttoreuseJavaCompiler"); hasBeenUsed=true; //forciblysettheequivalentof-Xlint:-options,sothatnofurther //warningsaboutcommandlineoptionsaregeneratedfromthispointon options.put(XLINT_CUSTOM.text+"-"+LintCategory.OPTIONS.option,"true"); options.remove(XLINT_CUSTOM.text+LintCategory.OPTIONS.option); start_msec=now(); try{ initProcessAnnotations(processors); //此處會調用到mapStruct中的processor類的方法. delegateCompiler= processAnnotations( enterTrees(stopIfError(CompileState.PARSE,parseFiles(sourceFileObjects))), classnames); delegateCompiler.compile2(); delegateCompiler.close(); elapsed_msec=delegateCompiler.elapsed_msec; }catch(Abortex){ if(devVerbose) ex.printStackTrace(System.err); }finally{ if(procEnvImpl!=null) procEnvImpl.close(); } }
關鍵代碼,在mapstruct-processor包中,有個對應的類MappingProcessor繼承了 AbstractProcessor,并實現其 process 方法。通過對 AST 進行相應的代碼增強,從而實現對最終編譯的對象進行修改的方法。
@SupportedAnnotationTypes({"org.mapstruct.Mapper"})
@SupportedOptions({"mapstruct.suppressGeneratorTimestamp","mapstruct.suppressGeneratorVersionInfoComment","mapstruct.unmappedTargetPolicy","mapstruct.unmappedSourcePolicy","mapstruct.defaultComponentModel","mapstruct.defaultInjectionStrategy","mapstruct.disableBuilders","mapstruct.verbose"})
publicclassMappingProcessorextendsAbstractProcessor{
publicbooleanprocess(Setannotations,RoundEnvironmentroundEnvironment){
if(!roundEnvironment.processingOver()){
RoundContextroundContext=newRoundContext(this.annotationProcessorContext);
SetdeferredMappers=this.getAndResetDeferredMappers();
this.processMapperElements(deferredMappers,roundContext);
Setmappers=this.getMappers(annotations,roundEnvironment);
this.processMapperElements(mappers,roundContext);
}elseif(!this.deferredMappers.isEmpty()){
Iteratorvar8=this.deferredMappers.iterator();

while(var8.hasNext()){
MappingProcessor.DeferredMapperdeferredMapper=(MappingProcessor.DeferredMapper)var8.next();
TypeElementdeferredMapperElement=deferredMapper.deferredMapperElement;
ElementerroneousElement=deferredMapper.erroneousElement;
StringerroneousElementName;
if(erroneousElementinstanceofQualifiedNameable){
erroneousElementName=((QualifiedNameable)erroneousElement).getQualifiedName().toString();
}else{
erroneousElementName=erroneousElement!=null?erroneousElement.getSimpleName().toString():null;
}

deferredMapperElement=this.annotationProcessorContext.getElementUtils().getTypeElement(deferredMapperElement.getQualifiedName());
this.processingEnv.getMessager().printMessage(Kind.ERROR,"Noimplementationwascreatedfor"+deferredMapperElement.getSimpleName()+"duetohavingaproblemintheerroneouselement"+erroneousElementName+".Hint:thisoftenmeansthatsomeotherannotationprocessorwassupposedtoprocesstheerroneouselement.YoucanalsoenableMapStructverbosemodebysetting-Amapstruct.verbose=trueasacompilationargument.",deferredMapperElement);
}
}

returnfalse;
}
}
「如何斷點調試:」
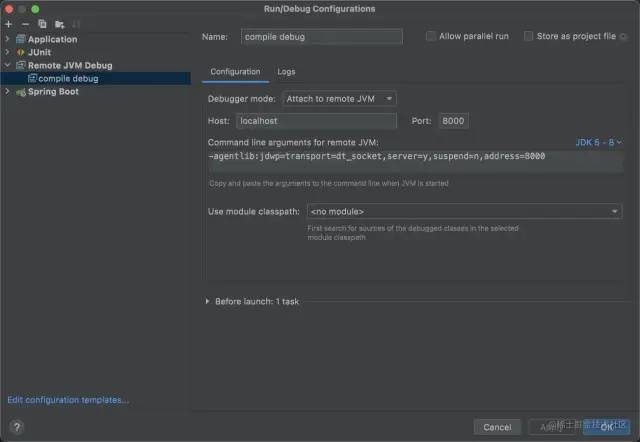
因為這個注解處理器是在解析->編譯的過程完成,跟普通的 jar 包調試不太一樣,maven 框架為我們提供了調試入口,需要借助 maven 才能實現 debug。所以需要在編譯過程打開 debug 才可調試。
在項目的 pom 文件所在目錄執行 mvnDebug compile
接著用 idea 打開項目,添加一個 remote,端口為 8000
打上斷點,debug 運行 remote 即可調試。

附錄
測試代碼如下,采用Spock框架 + JAVA代碼 實現。Spock框架作為當前最火熱的測試框架,你值得學習一下。Spock框架初體驗:更優雅地寫好你的單元測試
//@Resource
@Shared
MapperStructServicemapperStructService

defsetupSpec(){
mapperStructService=newMapperStructService()
}

@Unroll
def"testmapperStructTesttimes=#times"(){
given:"初始化數據"
UserDTOdto=newUserDTO(name:"笑傲菌",age:20,idCard:"1234",
phoneNumber:"18211932334",address:"北京天安門",gender:1,
birthday:newDate(),isMarried:false)

when:"調用方法"
//傳統的getter、setter拷貝
longstartTime=System.nanoTime();
UserInfoVOoldRes=mapperStructService.originalCopyItem(dto,times)
DurationoriginalWasteTime=Duration.ofNanos(System.nanoTime()-startTime);

//采用工具實現反射類的拷貝
longstartTime1=System.nanoTime();
UserInfoVOutilRes=mapperStructService.utilCopyItem(dto,times)
DurationutilWasteTime=Duration.ofNanos(System.nanoTime()-startTime1);

longstartTime2=System.nanoTime();
UserInfoVOmapStructRes=mapperStructService.newCopyItem(dto,times)
DurationmapStructWasteTime=Duration.ofNanos(System.nanoTime()-startTime2);

then:"校驗數據"
println("times="+times)
println("原始拷貝的消耗時間為:"+originalWasteTime.getNano())
println("BeanUtils拷貝的消耗時間為:"+utilWasteTime.getNano())
println("mapStruct拷貝的消耗時間為:"+mapStructWasteTime.getNano())
println()

where:"比較不同次數調用的耗時"
times||ignore
1||null
10||null
100||null
1000||null
}
測試的Service如下所示:
publicclassMapperStructService{

publicUserInfoVOnewCopyItem(UserDTOuserDTO,inttimes){
UserInfoVOuserInfoVO=newUserInfoVO();
for(inti=0;i


	審核編輯:湯梓紅
-
RPC
+關注
關注
0文章
111瀏覽量
11554 -
代碼
+關注
關注
30文章
4823瀏覽量
68922
原文標題:用了這個工具后,再也不寫 getter、setter 了!
文章出處:【微信號:AndroidPush,微信公眾號:Android編程精選】歡迎添加關注!文章轉載請注明出處。
發布評論請先 登錄


 MapperStruct的使用教程


評論