一、UI組件概述
UI組件(以下簡稱“組件”),是構建界面的核心。
應用中所有的界面元素都是由組件(Component)和組件容器(ComponentContainer)對象構成。UI界面的構成如下圖所示:
Component是繪制在屏幕上的一個對象,用戶能與之交互。Java UI框架提供了創建UI界面的各類組件,比如:文本、按鈕、圖片、列表等。每個組件通過對數據和方法的簡單封裝,實現獨立的可視、可交互功能單元。
ComponentContainer是一個用于容納其他Component和ComponentContainer對象的容器。Java UI框架提供了一些標準布局功能的容器,它們繼承自ComponentContainer,一般以“Layout”結尾,如DirectionalLayout、DependentLayout等(由此可以看出,其實布局就是ComponentContainer,同時布局也是一種組件)。
二、基礎UI組件
Java UI框架提供了一部分Component和ComponentContainer的具體子類,即用于創建用戶界面的各類組件,用戶可通過組件進行交互操作,并獲得響應。根據組件的功能,可以將組件分為布局類、顯示類、交互類三類:
1. 布局類組件
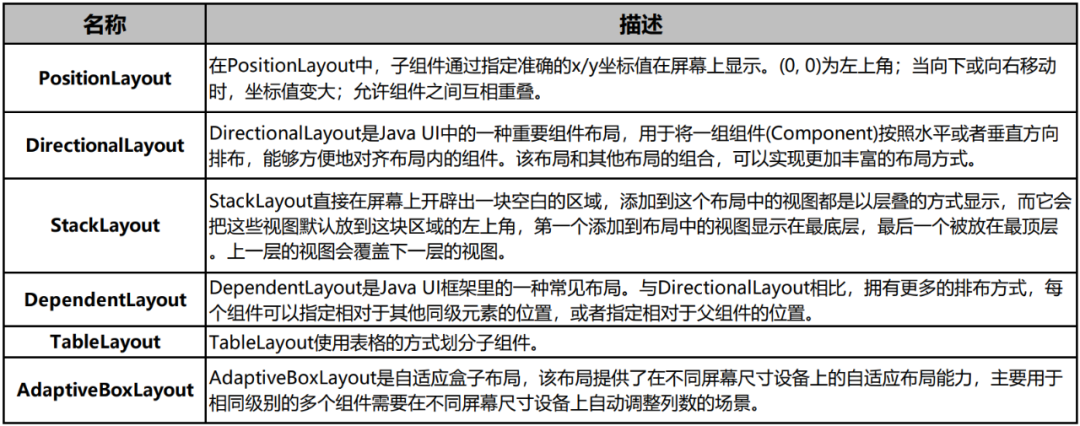
布局類組件是提供了不同布局規范的組件容器,例如以單一方向排列的DirectionalLayout、以相對位置排列的DependentLayout、以確切位置排列的PositionLayout等。
常見的布局類組件如表1所示:
表1 常見的布局類組件
2. 顯示類組件
顯示類組件提供了單純的內容顯示,例如用于文本顯示的Text,用于圖像顯示的Image等。
常見的顯示類組件如表2所示:
表2 常見的顯示類組件

3. 交互類組件
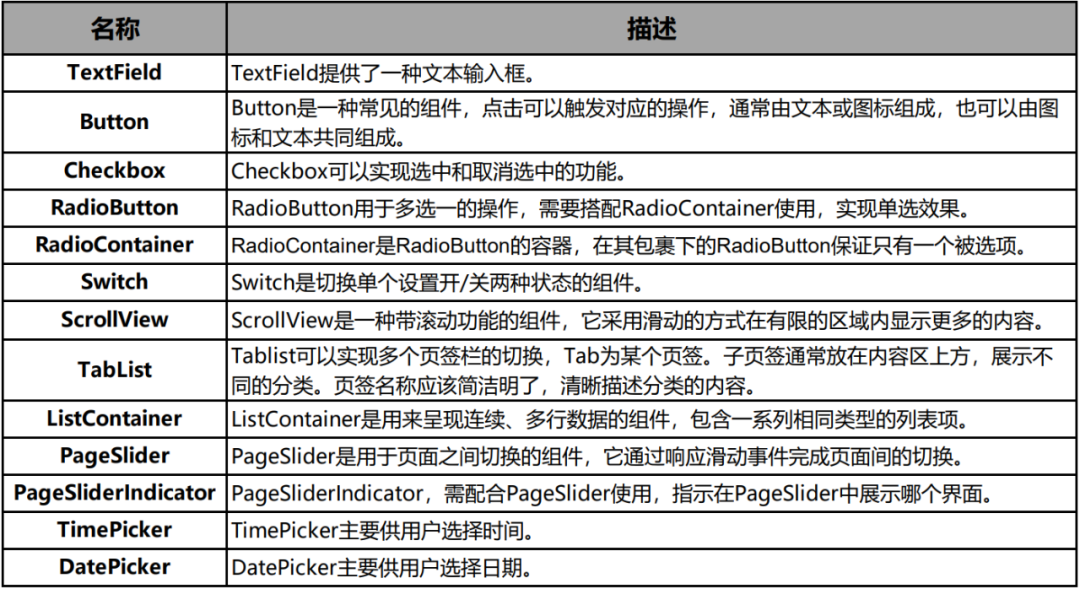
交互類組件提供了具體場景下與用戶交互響應的功能,例如Button提供了點擊響應功能,Slider提供了進度選擇功能等。
常見的交互類組件如表3所示:
表3 常見的交互類組件
關于基礎UI組件的開發,開發者可點擊下方官網鏈接進行學習
官網鏈接:
https://developer.harmonyos.com/cn/docs/documentation/doc-guides/ui-java-overview-0000000000500404
三、自定義UI組件
當Java UI框架提供的組件無法滿足設計需求時,開發者就可以創建自定義組件,根據設計需求添加繪制任務,并定義組件的屬性及事件響應,完成組件的自定義。目前,已有300+的自定義UI組件在碼云社區開源,開發者可根據自己的需求,點擊下方鏈接下載使用:
下載鏈接:
https://gitee.com/openharmony-tpc/tpc_resource
同基礎UI組件一樣,本文將自定義UI組件分為布局類、顯示類、交互類三類。下面的章節將著重介紹自定義UI組件的使用。
1. 自定義布局類UI組件
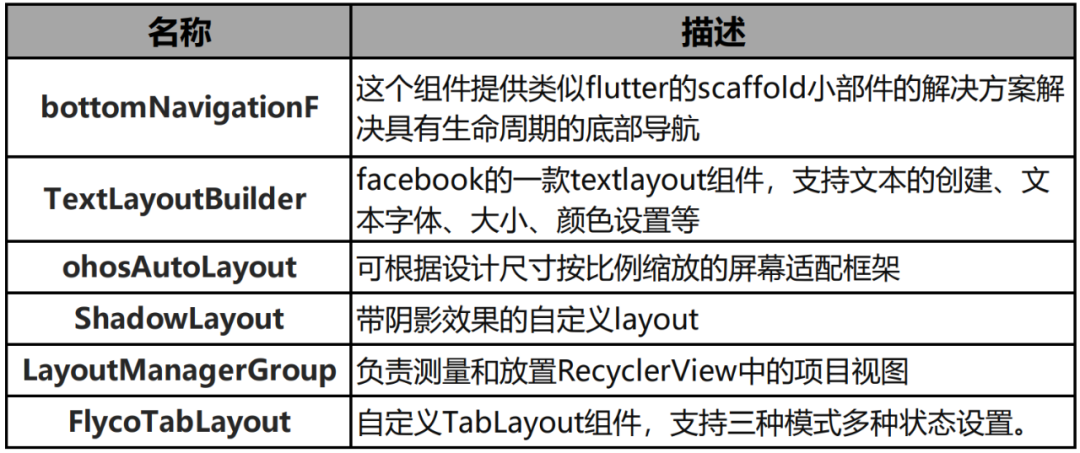
自定義布局類組件是由開發者定義的具有特定布局規則的容器類組件,通過擴展ComponentContainer或其子類實現,將各子組件擺放到指定的位置,響應用戶的滑動、拖拽等事件。
小編在碼云社區找了一些較為常見的自定義布局類組件供大家參考,如表4所示:
表4 常見的自定義布局類組件
本文將例舉ShadowLayout布局,闡述自定義布局類組件的使用。
ShadowLayout是一個可以控制界面元素的陰影顏色、范圍及顯示邊界的布局。效果展示如下:
依賴
開發者需在build.gradle中配置如下信息,引入組件庫
1.在項目根目錄下的build.gradle文件中,需進行如下配置:
allprojects { repositories { maven { url ‘https://s01.oss.sonatype.org/content/repositories/releases/’ } }}
2.在entry模塊的build.gradle文件中,需進行如下配置:
dependencies { implementation(‘com.gitee.chinasoft_ohos1.0.0’)}
使用步驟
1.對布局的基礎屬性進行初始化,比如設置陰影半徑范圍、陰影顏色,及陰影大小等。
《com.lijiankun24.shadowlayout.v2.ShadowLayout ohos:height=“match_content” ohos:width=“match_content” ohos:layout_alignment=“center” ohos:shadowColor=“#660000” ohos:shadowDx=“0” ohos:shadowDy=“0” ohos:shadowRadius=“50” ohos:shadowSide=“0x1111” 》 《Image ohos:id=“$+id:image” ohos:height=“50vp” ohos:width=“50vp” ohos:layout_alignment=“center” ohos:background_element=“$graphic:background_ability_show” ohos:image_src=“$media:icon” ohos:scale_mode=“zoom_center” /》《/com.lijiankun24.shadowlayout.v2.ShadowLayout》
ShadowLayout屬性說明如表5所示:
表5 ShadowLayout自定義屬性
2.通過initComponent()方法初始化組件界面,并設置點擊事件監聽器,監聽界面點擊事件。
private void initComponent() { ShadowLayout slOval = (ShadowLayout) findComponentById(ResourceTable.Id_sl_oval); ShadowLayout slRectangle = (ShadowLayout) findComponentById(ResourceTable.Id_sl_rectangle); ShadowLayout slRadius = (ShadowLayout) findComponentById(ResourceTable.Id_sl_radius); slOval.setShadowColor(Color.getIntColor(“#FE3311F3”)); slRectangle.setShadowColor(Color.getIntColor(“#EE000000”)); slRadius.setShadowRadius(DEFAULT_RADIUS); Text textOval = (Text) findComponentById(ResourceTable.Id_text_oval); Text textRectangle = (Text) findComponentById(ResourceTable.Id_text_rectangle); Text textRadius = (Text) findComponentById(ResourceTable.Id_text_radius);
textOval.setClickedListener(new Component.ClickedListener() { @Override public void onClick(Component component) { slOval.setShadowColor(Color.getIntColor(“#FEFFD700”)); } }); textRectangle.setClickedListener(new Component.ClickedListener() { @Override public void onClick(Component component) { slRectangle.setShadowColor(Color.getIntColor(“#EE00FF7F”)); } });
textRadius.setClickedListener(new Component.ClickedListener() { @Override public void onClick(Component component) { slRadius.setShadowRadius(RADIUS); } });}
photoView組件完整代碼下載鏈接:
https://gitee.com/openharmony-tpc/PhotoView
2. 自定義顯示類UI組件
自定義顯示類UI組件是開發者定義的具有內容顯示特性的組件,通過擴展Component或其子類實現。可將富文本、圖片、進度條等內容,通過自定義的方式直觀地顯示給用戶。較為常見的自定義顯示類組件,如表6所示:
表6 常見的自定義顯示類組件
本文通過例舉PhotoView組件來闡述自定義顯示類組件的使用方法。
PhotoView組件是一個帶圖片縮放的功能的圖片播放器,效果展示如下,通過雙擊屏幕實現圖片的縮放功能。
依賴
開發者需在build.gradle中配置如下信息,引入組件庫
dependencies { implementation ‘io.openharmony.tpc.thirdlib1.1.1’}
使用步驟
1.在xml文件中創建布局,對組件的基礎屬性進行初始化。
《?xml version=“1.0” encoding=“utf-8”?》《DirectionalLayoutxmlns:ohos=“http://schemas.huawei.com/res/ohos”xmlns:photo=“http://schemas.huawei.com/res/photo”ohos:height=“match_parent”ohos:width=“match_parent”ohos:id=“$+id:container”ohos:orientation=“vertical”》
《com.github.chrisbanes.photoview.PhotoView ohos:id=“$+id:photo_v” ohos:height=“match_parent” ohos:width=“match_parent” photo:image=“$media:wallpaper” /》《/DirectionalLayout》
2.初始化photoView
PhotoView photoView = (PhotoView) findComponentById (ResourceTable.Id_photo_v);photoView.setPixelMap(ResourceTable.Media_wallpaper);
3.創建photoView容器
/**創建頁面容器 * */@Overridepublic Object createPageInContainer(ComponentContainer componentContainer, int i) { final int data = list.get(i); PhotoView view = new PhotoView(context); view.setPixelMap(data); // 設置組件的布局參數 view.setLayoutConfig(new ComponentContainer.LayoutConfig( ComponentContainer.LayoutConfig.MATCH_PARENT, ComponentContainer.LayoutConfig.MATCH_PARENT )); view.setPageSlider(slider); // 將組件添加到指定位置。 componentContainer.addComponent(view); return view;}
photoView組件完整代碼下載鏈接:
https://gitee.com/openharmony-tpc/PhotoView
3. 自定義交互類UI組件
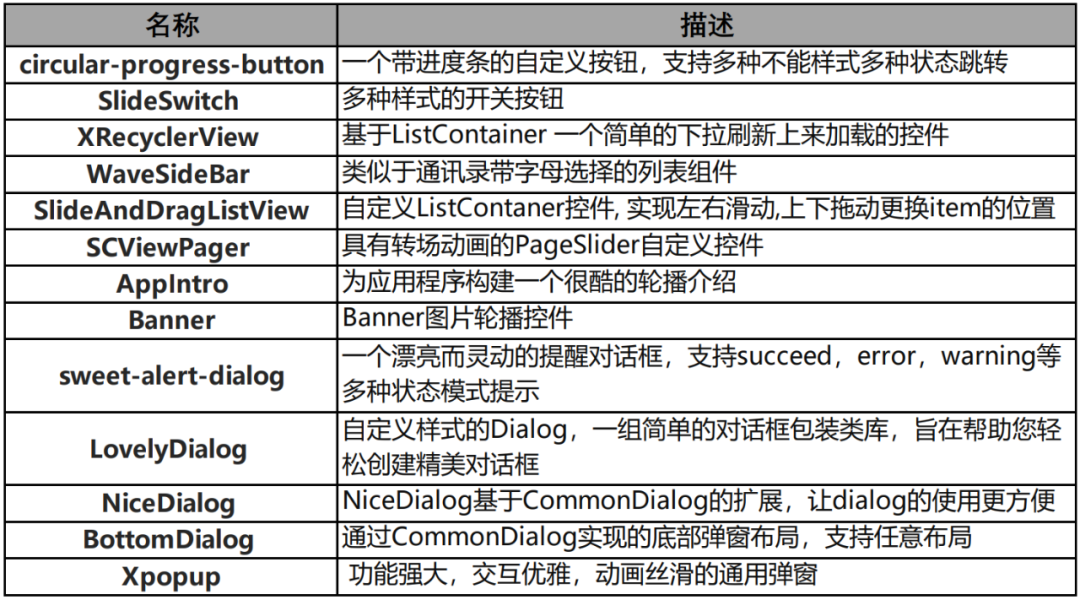
自定義交互類UI組件是開發者定義具有交互特性的組件,通過擴展Component或其子類實現,可以響應用戶的點擊、觸摸、長按等操作,實現與用戶的交互。較為常見的自定義交互類組件,如表7所示:
表7 常見的自定義交互類組件
本文通過SlideSwitch組件,來闡述自定義交互類組件的使用方法。
SlideSwitch在功能上屬于交互類組件。展示了不同樣式的開關按鈕,可以滑動它來打開或關閉按鈕開關。
依賴
開發者需在build.gradle中配置如下信息,引入組件庫:
allprojects{ repositories{ mavenCentral() }}implementation ‘io.openharmony.tpc.thirdlib1.0.3’
使用步驟
1.在xml文件中創建布局,對組件的基礎屬性進行設置。
《com.leaking.slideswitch.SlideSwitchohos:id=“$+id:swit2”ohos:width=“190vp”ohos:height=“100vp”ohos:top_margin=“30vp”slideswitch:is_open=“true”slideswitch:shape=“2”slideswitch:theme_color=“#0a5a00”/》
2.監聽滑動開關的變化,并通過setState()方法設置開關的默認狀態。
@Overridepublic void onStart(Intent intent) { super.onStart(intent); setUIContent(ResourceTable.Layout_ability_main); mSlideSwitch = (SlideSwitch) findComponentById(ResourceTable.Id_swit1); mSlideSwitch2 = (SlideSwitch) findComponentById(ResourceTable.Id_swit2); mText = (Text) findComponentById(ResourceTable.Id_text); mSlideSwitch.setSlideListener(this); // 控制開關按鈕的默認狀態 mSlideSwitch.setState(false);}
@Overridepublic void open(SlideSwitch slideSwitch) { if (slideSwitch.getId() == ResourceTable.Id_swit1) { mText.setText(“first switch is opend,and set the second one is ‘slideable’”); mSlideSwitch2.setSlideable(true); }}
@Overridepublic void close(SlideSwitch slideSwitch) { if (slideSwitch.getId() == ResourceTable.Id_swit1) { mText.setText(“first switch is closed,and set the second one is ‘unslideable’”); mSlideSwitch2.setSlideable(false); }}
SlideSwitch組件完整代碼下載鏈接:
https://gitee.com/openharmony-tpc/slideview
至此,就完成了自定義UI組件的使用。是不是超級方便呀!趕快到碼云社區下載源碼學習吧~
責任編輯:haq
-
操作系統
+關注
關注
37文章
6889瀏覽量
123620 -
ui
+關注
關注
0文章
204瀏覽量
21401 -
HarmonyOS
+關注
關注
79文章
1982瀏覽量
30437
原文標題:一文帶你看懂HarmonyOS UI組件的使用
文章出處:【微信號:HarmonyOS_Dev,微信公眾號:HarmonyOS開發者】歡迎添加關注!文章轉載請注明出處。
發布評論請先 登錄
相關推薦
HarmonyOS開發指導類文檔更新速遞(上)

計算機系統中的關鍵組件有哪些
HarmonyOS NEXT Developer Beta1最新術語表
HarmonyOS NEXT Developer Beta1中的Kit
HarmonyOS開發案例:【基礎組件Slider的使用】
HarmonyOS實戰開發-深度探索與打造個性化自定義組件
HarmonyOS開發技術全面分析
深入理解HarmonyOS UIAbility:生命周期、WindowStage與啟動模式探析
鴻蒙開發-HarmonyOS UI架構
HT UI 5.0,前端組件圖撲是認真的!


 HarmonyOS系統中基礎UI組件



評論