在前面的章節(jié)中我們介紹了MM32 USB各種功能類型,也介紹了如何通過串口或者J-Link RTT方式實現(xiàn)shell輔助調(diào)試方式,但是其都需要依賴額外的工具,比如串口方式就需要USB轉(zhuǎn)TTL,J-Link RTT需要使用J-Link下載器,所以希望有新的方法實現(xiàn)shell,本次我們介紹USB CDC的方式來實現(xiàn)shell功能。
本次我們采用MM32L373 MiniBoard作為測試開發(fā)板,驗證USB CDC的方式來實現(xiàn)shell功能。
前面已經(jīng)為大家講解了shell的串口方法,其實原理一樣,只是用MM32 USB枚舉成串口設(shè)備替代USB轉(zhuǎn)TTL,直接從USB獲取數(shù)據(jù)到MCU,也不需要額外占用MCU的串口,節(jié)省資源和硬件,相關(guān)的代碼都可以從之前的文章獲取,本次只是融合兩者,改變實現(xiàn)接口,具體代碼參考如下:
對于CDC部分,其函數(shù)初始化配置及相關(guān)全局變量定義內(nèi)容,代碼如下:
#define USBD_POWER 0
#define USBD_MAX_PACKET0 64
#define USBD_DEVDESC_IDVENDOR 0x2F81 //0x0D28
#define USBD_DEVDESC_IDPRODUCT 0x0001 //0x0204
以上是定義的MM32 MCU CDC設(shè)備VID和PID,靈動微電子已經(jīng)獲得USB組織授權(quán)的VID和PID。當(dāng)設(shè)備插入電腦上,可以查看到如上標(biāo)識的CDC設(shè)備,如圖1所示:
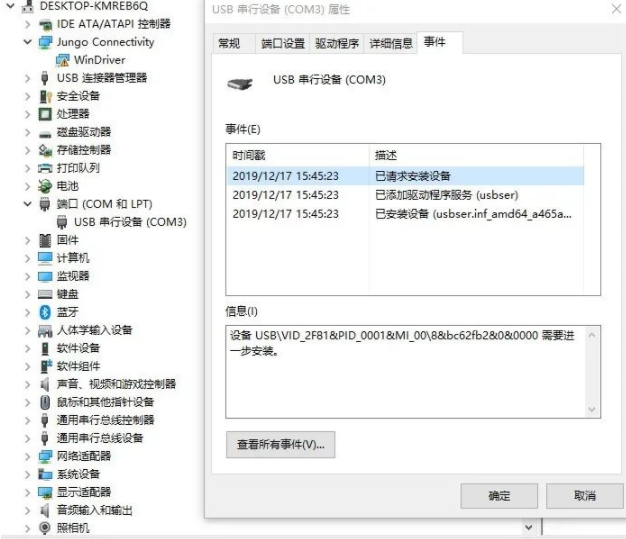
圖1 PC設(shè)備管理器列表
對于MM32 MCU的CDC功能來說,
在使用CDC功能之前先調(diào)用USB初始化函數(shù)來初始化USB協(xié)議棧。
int main(void)
{
// USB Device Initialization and connect
usbd_init();
usbd_connect(__TRUE);
while (!usbd_configured()) // Wait for USB Device to configure
{
}
while (1)
{
}
}
對于shell部分其函數(shù)初始化配置及相關(guān)全局變量定義內(nèi)容,代碼如下:
typedef struct
{
char *command; // shell命令提示符
char buffer[SHELL_COMMAND_MAX_LENGTH]; // shell命令緩沖buffer
unsigned short length; // shell命令長度大小
unsigned short cursor; // shell光標(biāo)位置偏移
char *param[SHELL_PARAMETER_MAX_NUMBER]; // shell參數(shù)變量
char history[SHELL_HISTORY_MAX_NUMBER][SHELL_COMMAND_MAX_LENGTH]; // 歷史記錄區(qū)域
unsigned short historyCount; // 歷史記錄數(shù)量
short historyFlag; // 當(dāng)前記錄偏移位置
short historyOffset; // 歷史記錄偏移大小
SHELL_CommandTypeDef *commandBase; // 命令表基地址
unsigned short commandNumber; // 命令數(shù)量
int keyFuncBase; // 按鍵響應(yīng)表基地址
unsigned short keyFuncNumber; // 按鍵響應(yīng)數(shù)量
SHELL_InputMode status; // shell輸入狀態(tài)
unsigned char isActive; //是不是當(dāng)前激活的shell
shellRead read; // shell讀函數(shù)接口
shellWrite write; // shell寫函數(shù)接口
}SHELL_TypeDef;
如上所示,為對象的定義接口,移植的步驟先定義一個shell對象,即:SHELL_TypeDef cdc_shell,然后實例化對象的操作接口,具體說明看注釋,對于其中我們需要關(guān)注的是shell的讀寫接口。由于本次我們使用USB CDC接收和發(fā)送數(shù)據(jù),所以我們只需要在USB CDC的函數(shù)中處理接收到的數(shù)據(jù)即可,我們使用shellHandler(&cdc_shell, EP2RXBuff[i]);來處理數(shù)據(jù)的交互,具體函數(shù)代碼參考串口shell代碼。
shell的發(fā)送接口,只需要把數(shù)據(jù)拷貝到buffer即可。
shell的讀寫接口移植到CDC上,代碼如下:
void USBD_CDC_TASK(void)
{
uint8_t i, count;
NotifyOnStatusChange();
if (CDC_UART ->ISR & 0x08)
{
CDC_UART ->GCR &= ~(3 << 3);
CDC_UART ->GCR = 3 << 3;
UART_ClearITPendingBit(CDC_UART, UART_OVER_ERR);
}
// USB -> UART
if (EP2ReceiveFlag == 1)
{
EP2ReceiveFlag = 0;
for (i = 0; i < RxBufLen; i++)
shellHandler(&cdc_shell, EP2RXBuff[i]);
}
// UART -> USB
if (EP2TransferFlag == 1)
{
if (TxBufLen > 0)
{
while (USB->rEP2_CTRL & 0x80);
if (TxBufLen > 64)
{
UART_ReadData(EP2TXBuff, 64);
count = 64;
TxBufLen -= 64;
}
else
{
UART_ReadData(EP2TXBuff, TxBufLen);
count = TxBufLen;
TxBufLen = 0;
}
usb_buf_busy_flag = 1;
for (i = 0; i < count; i++)
{
USB->rEP2_FIFO = *(EP2TXBuff + i);
}
if ((USB ->rEP2_AVIL & 0x3f) == count)
{
USB->rEP2_CTRL = 0x80 | count;
}
else
{
USB->rTOP |= 1 << 3;
USB->rTOP &= ~(1 << 3);
}
USB->rEP2_CTRL = 0x80 | count;
if (0 == TxBufLen)
EP2TransferFlag = 0;
}
}
}
如上,我們就完成通過MM32 MCU的CDC實現(xiàn)shell調(diào)試功能,用串口助手打開虛擬串口,用CDC shell測試發(fā)送數(shù)據(jù),結(jié)果如下:
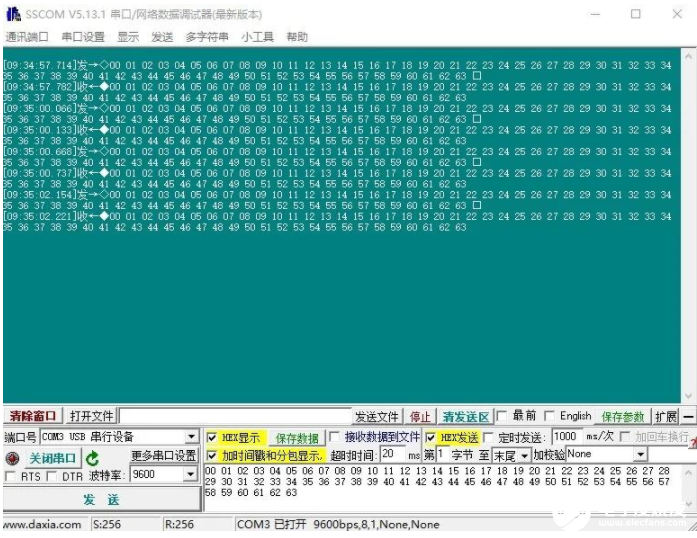
圖2 功能演示
以上就是MM32 MCU USB的CDC shell功能。
編輯:hfy
-
mcu
+關(guān)注
關(guān)注
146文章
17316瀏覽量
352265 -
usb
+關(guān)注
關(guān)注
60文章
7979瀏覽量
265620 -
Shell
+關(guān)注
關(guān)注
1文章
366瀏覽量
23432
發(fā)布評論請先 登錄
相關(guān)推薦
利用FPGA實現(xiàn)USB 2.0通信接口

快速入門!RNDIS網(wǎng)卡實現(xiàn)USB上網(wǎng)~

Linux從零到精通:最簡單的Shell腳本入門教程

樂鑫USB方案設(shè)備互聯(lián)傳輸,豐富的外設(shè)支持應(yīng)用

什么是EPS?通過馬達來輔助轉(zhuǎn)向操作的系統(tǒng)
TCSH shell 編程入門
求助,請問PCM2904能實現(xiàn)耳機輸入,USB輸出的功能嗎?
shell具有的功能和特點
shell基本介紹及常用命令之shell介紹
丟掉數(shù)據(jù)線,你還會調(diào)試Android設(shè)備嗎?

靈動微電子MM32系列MCU SPI LCD彩屏參考方案
用USB調(diào)試助手來調(diào)試USB所遇到的困惑求解
CW-DAPLINK調(diào)試工具


 如何通過MM32 USB實現(xiàn)shell輔助調(diào)試方案


評論