今天,我將嘗試教您一些有關移位寄存器的知識。這些是Arduino編程中相當重要的部分,基本上是因為它們擴展了您可以使用的輸出數量,以換取3個控制引腳。您還可以將菊花鏈移位寄存器在一起以獲取更多的輸出。
這與以前的教程相比有很大的困難,我強烈建議您對以前的材料有個很好的了解。 (本文末尾的鏈接),以及了解我上次編寫的二進制的基本知識。
什么是移位寄存器?
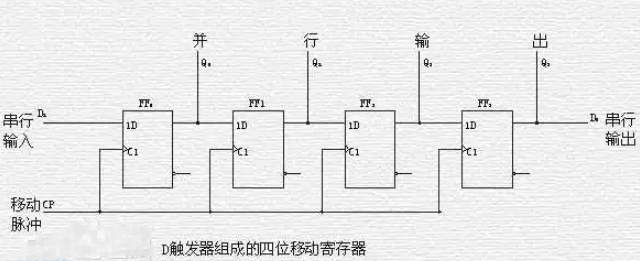
技術上是輸出移位寄存器換句話說,串行接收數據并并行輸出。實際上,這意味著我們可以快速向芯片發送一堆輸出命令,告訴它激活,然后將輸出發送到相關的引腳。無需遍歷每個引腳,我們只需一次將所需的輸出作為單個字節或更多信息發送到所有引腳。
如果可以幫助您理解,您可以考慮一下移位寄存器作為數字輸出的“數組”,但是我們可以跳過常規的digitalWrite命令,而只需發送一系列位以將其打開或關閉即可。
它如何工作?
我們將使用的移位寄存器-Oomlout入門套件中包含的74HC595N-僅需要3個控制引腳。第一個是時鐘-您無需擔心太多,因為Arduino串行庫對其進行了控制-但時鐘基本上只是一個開/關電脈沖,用于設置數據信號的速度。
鎖存器引腳用于告知移位寄存器何時應根據我們剛發送的位打開或關閉輸出,即將它們鎖存到位。
最后,數據引腳位于此處我們用位發送了實際的串行數據,以確定移位寄存器輸出的開/關狀態。
整個過程可以用4個步驟來描述:
設置移位寄存器上第一個輸出引腳的數據引腳為高電平或低電平。
脈沖時鐘以將數據“移位”到寄存器。
繼續設置數據并向脈沖輸出脈沖。時鐘,直到為所有輸出引腳設置了所需的狀態為止。
對閂鎖引腳進行脈沖以激活輸出序列。
實現
您需要此產品的以下組件oject:
7HC595N移位寄存器芯片
通常的面包板,連接器和基本的Arduino
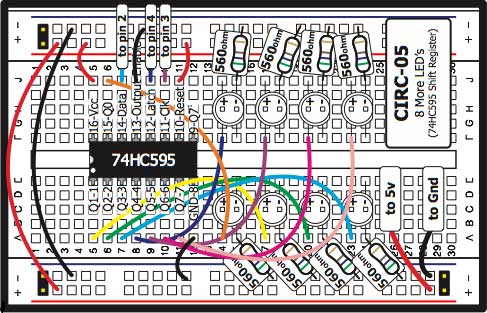
如果您有Oomlout入門套件,則可以從此處下載面包板布局。
電路板布局:

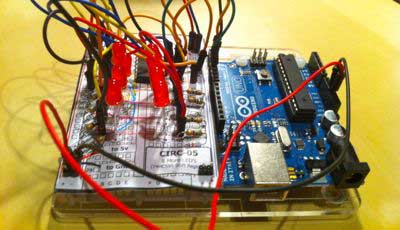
和我的組裝版本:

I已修改了Ooolmout提供的原始代碼,但如果您想嘗試使用該代碼,則可以在此處完整下載。包括了代碼的說明,因此,請從下面復制或粘貼整個內容,或使用pastebin讀取代碼的說明。
/* ---------------------------------------------------------
* | Shift Register Tutorial, based on |
* | Arduino Experimentation Kit CIRC-05 |
* | 。: 8 More LEDs :。 (74HC595 Shift Register) |
* ---------------------------------------------------------
* | Modified by James @ MakeUseOf.com |
* ---------------------------------------------------------
*/
// 7HC595N has three pins
int data = 2; // where we send the bits to control outputs
int clock = 3; // keeps the data in sync
int latch = 4; // tells the shift register when to activate the output sequence
void setup()
{
// set the three control pins to output
pinMode(data, OUTPUT);
pinMode(clock, OUTPUT);
pinMode(latch, OUTPUT);
Serial.begin(9600); // so we can send debug messages to serial monitor
}
void loop(){
outputBytes(); // our basic output which writes 8-bits to show how a shift register works.
//outputIntegers(); // sends an integer value as data instead of bytes, effectively counting in binary.
}
void outputIntegers(){
for (int i=0;i《256;i++){
digitalWrite(latch, LOW);
Serial.println(i); // Debug, sending output to the serial monitor
shiftOut(data, clock, MSBFIRST, i);
digitalWrite(latch, HIGH);
delay(100);
}
}
void outputBytes(){
/* Bytes, or 8-bits, are represented by a B followed by 8 0 or 1s.
In this instance, consider this to be like an array that we‘ll use to control
the 8 LEDs. Here I’ve started the byte value as 00000001
*/
byte dataValues = B00000001; // change this to adjust the starting pattern
/* In the for loop, we begin by pulling the latch low,
using the shiftOut Arduino function to talk to the shift register,
sending it our byte of dataValues representing the state of the LEDs
then pull the latch high to lock those into place.
Finally, we shift the bits one place to the left, meaning the next iteration
will turn on the next LED in the series.
To see the exact binary value being sent, check the serial monitor.
*/
for (int i=0;i《8;i++){
digitalWrite(latch, LOW);
Serial.println(dataValues, BIN); // Debug, sending output to the serial monitor
shiftOut(data, clock, MSBFIRST, dataValues);
digitalWrite(latch, HIGH);
dataValues = dataValues 《《 1; // Shift the bits one place to the left - change to 》》 to adjust direction
delay(100);
}
}
位移位(OutputBytes函數)
在第一個循環示例– outputBytes()–代碼使用8位序列(一個字節),然后在for循環的每次迭代中向左移。重要的是要注意,如果您進行的移位超出了可能,則只會丟失該位。
使用《《或》》加上要移位的位數來完成移位。/p》
查看以下示例,并確保您了解發生了什么:
byte val = B00011010
val = val 《《 3 // B11010000
val = val 《《 2 // B01000000, we lost those other bits!
val = val 》》 5 // B00000010
發送整數而不是(OutputIntegers函數)
數字到移位寄存器而不是字節,它將簡單地將數字轉換為二進制字節序列。在此函數中(取消注釋并上載以查看效果),我們有一個for循環,其計數范圍是0-255(可以用一個字節表示的最大整數),然后發送該循環。它基本上是二進制的,因此除非您的LED排成一排,否則該序列似乎有點隨機。
例如,如果您閱讀二進制的說明文章,就會知道數字44將表示為00101100,因此LED 3、5、6將在序列中的該點點亮。

菊花鏈超過一個移位寄存器
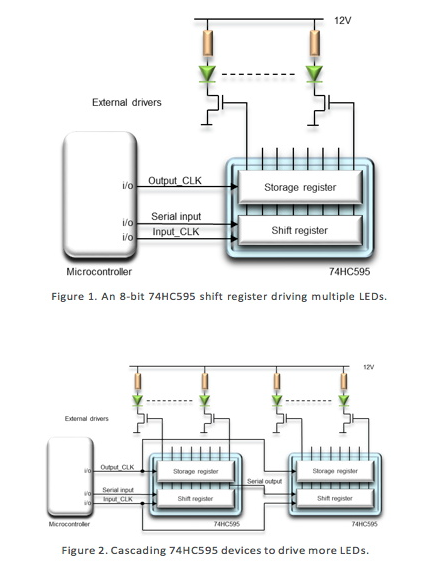
移位寄存器的顯著之處在于,如果它們獲得的信息多于8位(或者其注冊表很大),它們將再次移出其他位。這意味著您可以將它們中的一系列連接在一起,推入一個較長的位鏈,然后將其分別分配到每個寄存器,而無需您進行額外的編碼。
盡管我們不會在這里詳細說明過程或原理圖,如果您有多個移位寄存器,則可以從此處的Arduino官方網站嘗試該項目。
該系列中的其他文章:
什么是Arduino?您可以使用它做什么?
什么是Arduino入門工具包?它包含什么?
您可以通過入門工具包購買更多更酷的組件
》
開始使用Arduino入門套件?安裝驅動程序并設置電路板和端口
Fritzing,這是一個免費的電路圖繪制工具
仔細查看Arduino應用程序和示例閃爍程序的結構
》
Arduino Xmas樹燈項目(又是關于數組的學習)
什么是Binary?
到目前為止,我們將使用移位寄存器,我認為我們涵蓋了很多。一如既往,我鼓勵您使用和調整代碼,并隨時詢問您在注釋中可能遇到的任何問題,甚至共享指向基于出色移位寄存器的項目的鏈接。
責任編輯:wv
-
移位寄存器
+關注
關注
3文章
259瀏覽量
22315
發布評論請先 登錄
相關推薦
XILINX FPGA CLB單元之移位寄存器

移位寄存器的工作原理、類型及應用
移位寄存器中使用的儲存單元是什么
移位寄存器中Dsr有什么用
移位寄存器右移是怎么移位的
PLC移位寄存器指令的工作過程
8位移位寄存器工作原理是什么?
移位寄存器的工作原理與作用
雙向移位寄存器的工作原理、特點及應用
移位寄存器的功能是什么 移位寄存器的工作原理
線性反饋移位寄存器輸出序列怎么算
移位寄存器可降低LED設計的尺寸和成本


 如何使用移位寄存器


評論