資料介紹
描述
無鑰匙進入和智能鎖
智能鎖的想法已經出現了一段時間,但歸根結底,人們最終還是要么攜帶 RFID,要么只使用鎖本身。我們現在幾乎一直隨身攜帶手機,到門口時,我們會自動連接到我們自己的 WiFi 網絡。通過使用Netduino 3 WiFi,我們實際上可以實現真正的無鑰匙體驗,以我們的手機為鑰匙,通過WiFi網絡開鎖。
第 1 步:收集材料
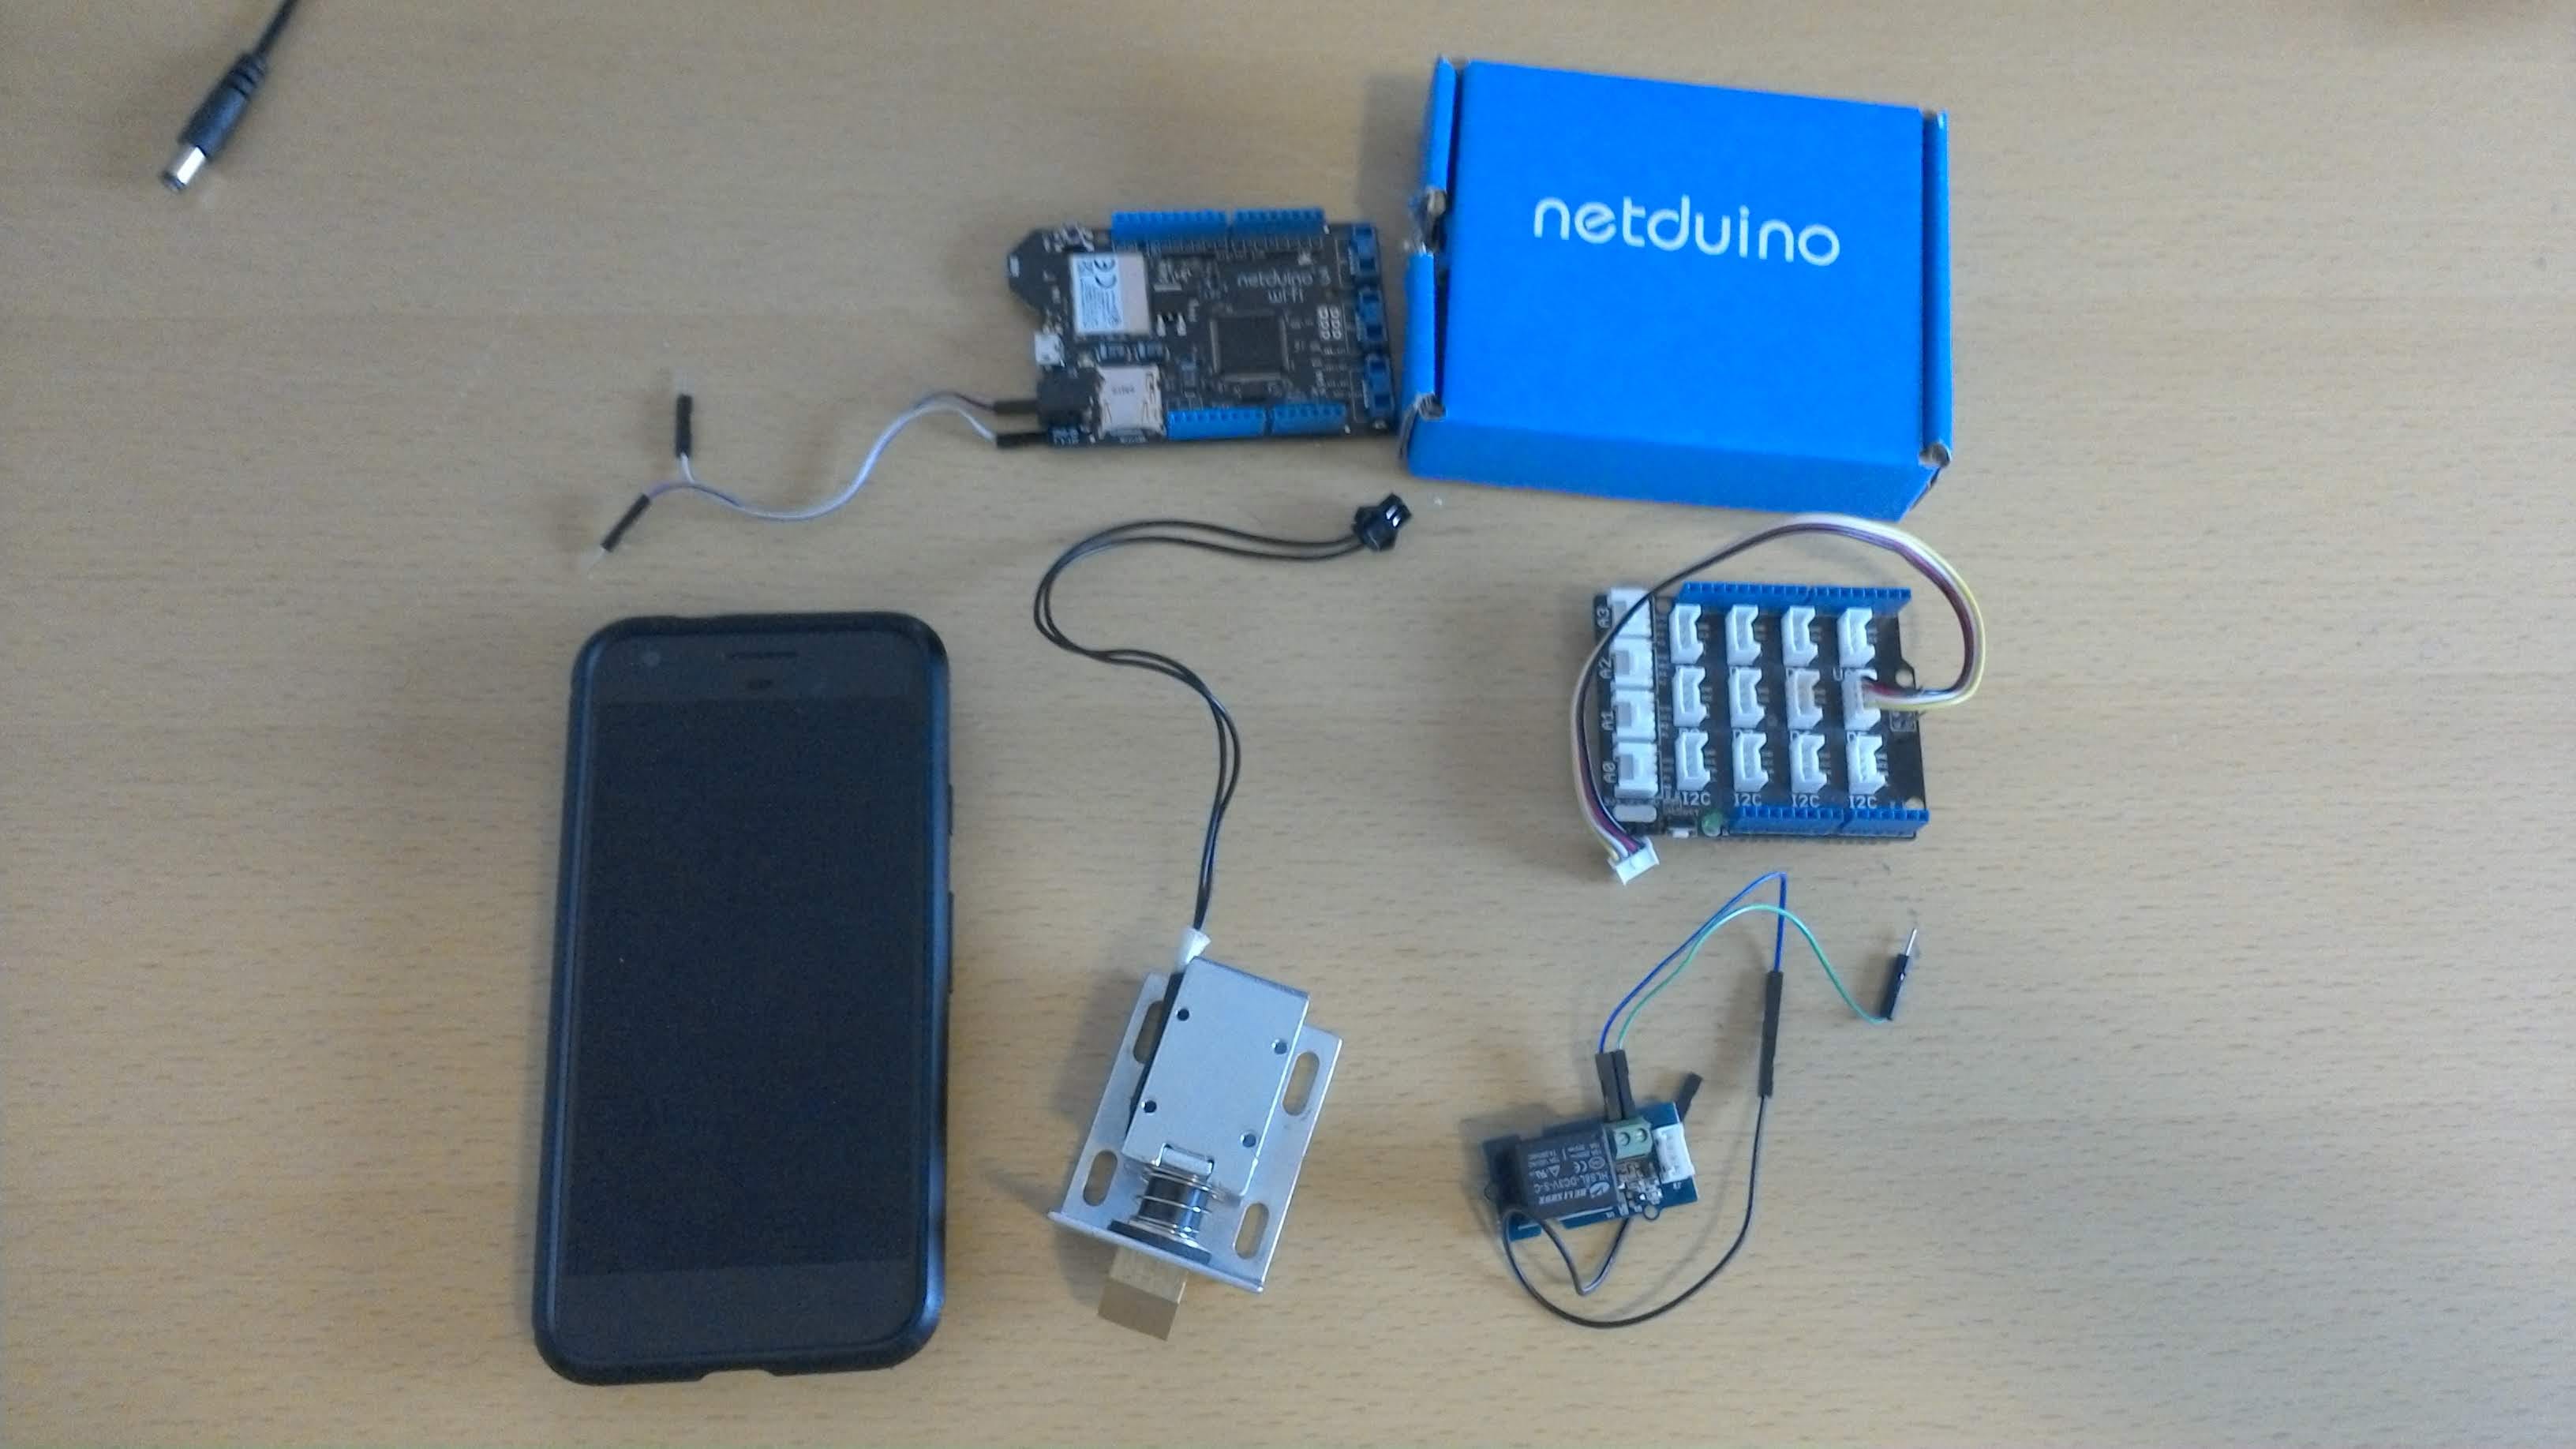
我們將需要以下物品:
- 網絡杜伊諾 3 WiFi
- Seeed Grove 基礎護盾
- 種子繼電器
- 鎖舌
- 安卓手機
- 一個外殼的盒子
?
第 2 步:設置 Netduino 3 WiFi
Netduino 是基于 ac# 和 .net 的物聯網板,具有很多功能,這樣我們就可以基于 C# 創建整個項目。
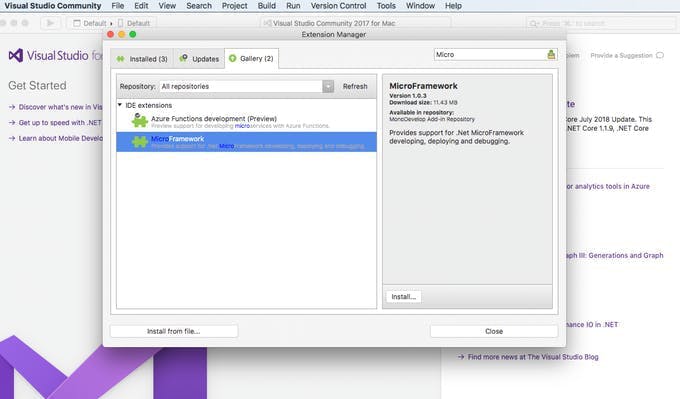
安裝 Visual Studio,在這種情況下,我使用的是 Mac。然后進入 Visual Studio Community menu -> Extension -> Gallery,并搜索“MicroFramework”來安裝 Micro Framework。
按照此頁面的說明更新到最新固件
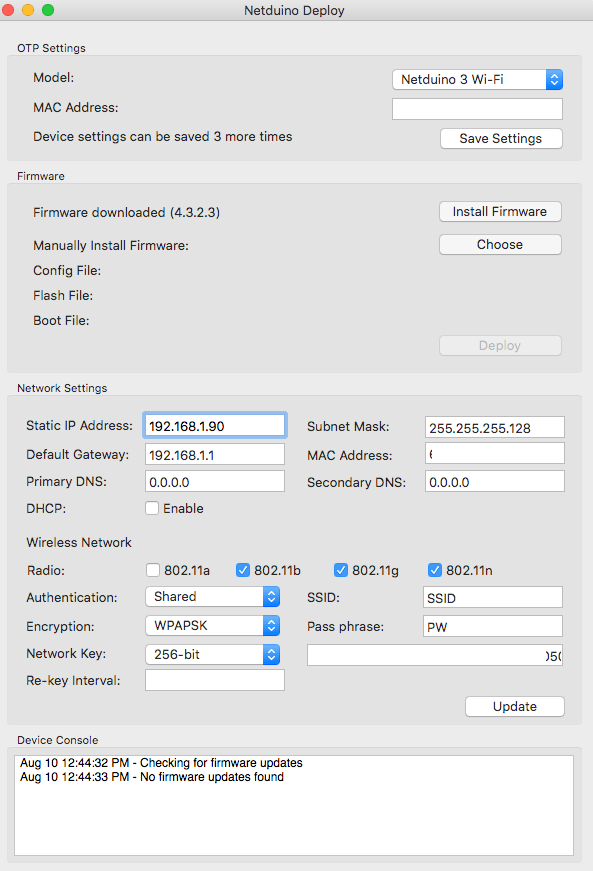
安裝最新固件后,我們需要通過 Netduino Deploy 設置 WiFi 網絡,以便設備連接到互聯網,我們將在這里使用靜態 IP,以便稍后使用手機調用套接字
第 3 步:連接硬件
因為鎖舌需要 12v,而 Netduino 的常規輸出只能提供 5v,所以我們需要通過在頂部焊接 2 根電線來接入 Netduino 的電源,如下所示,這將允許我們在沒有額外電源的情況下打開和關閉鎖舌。
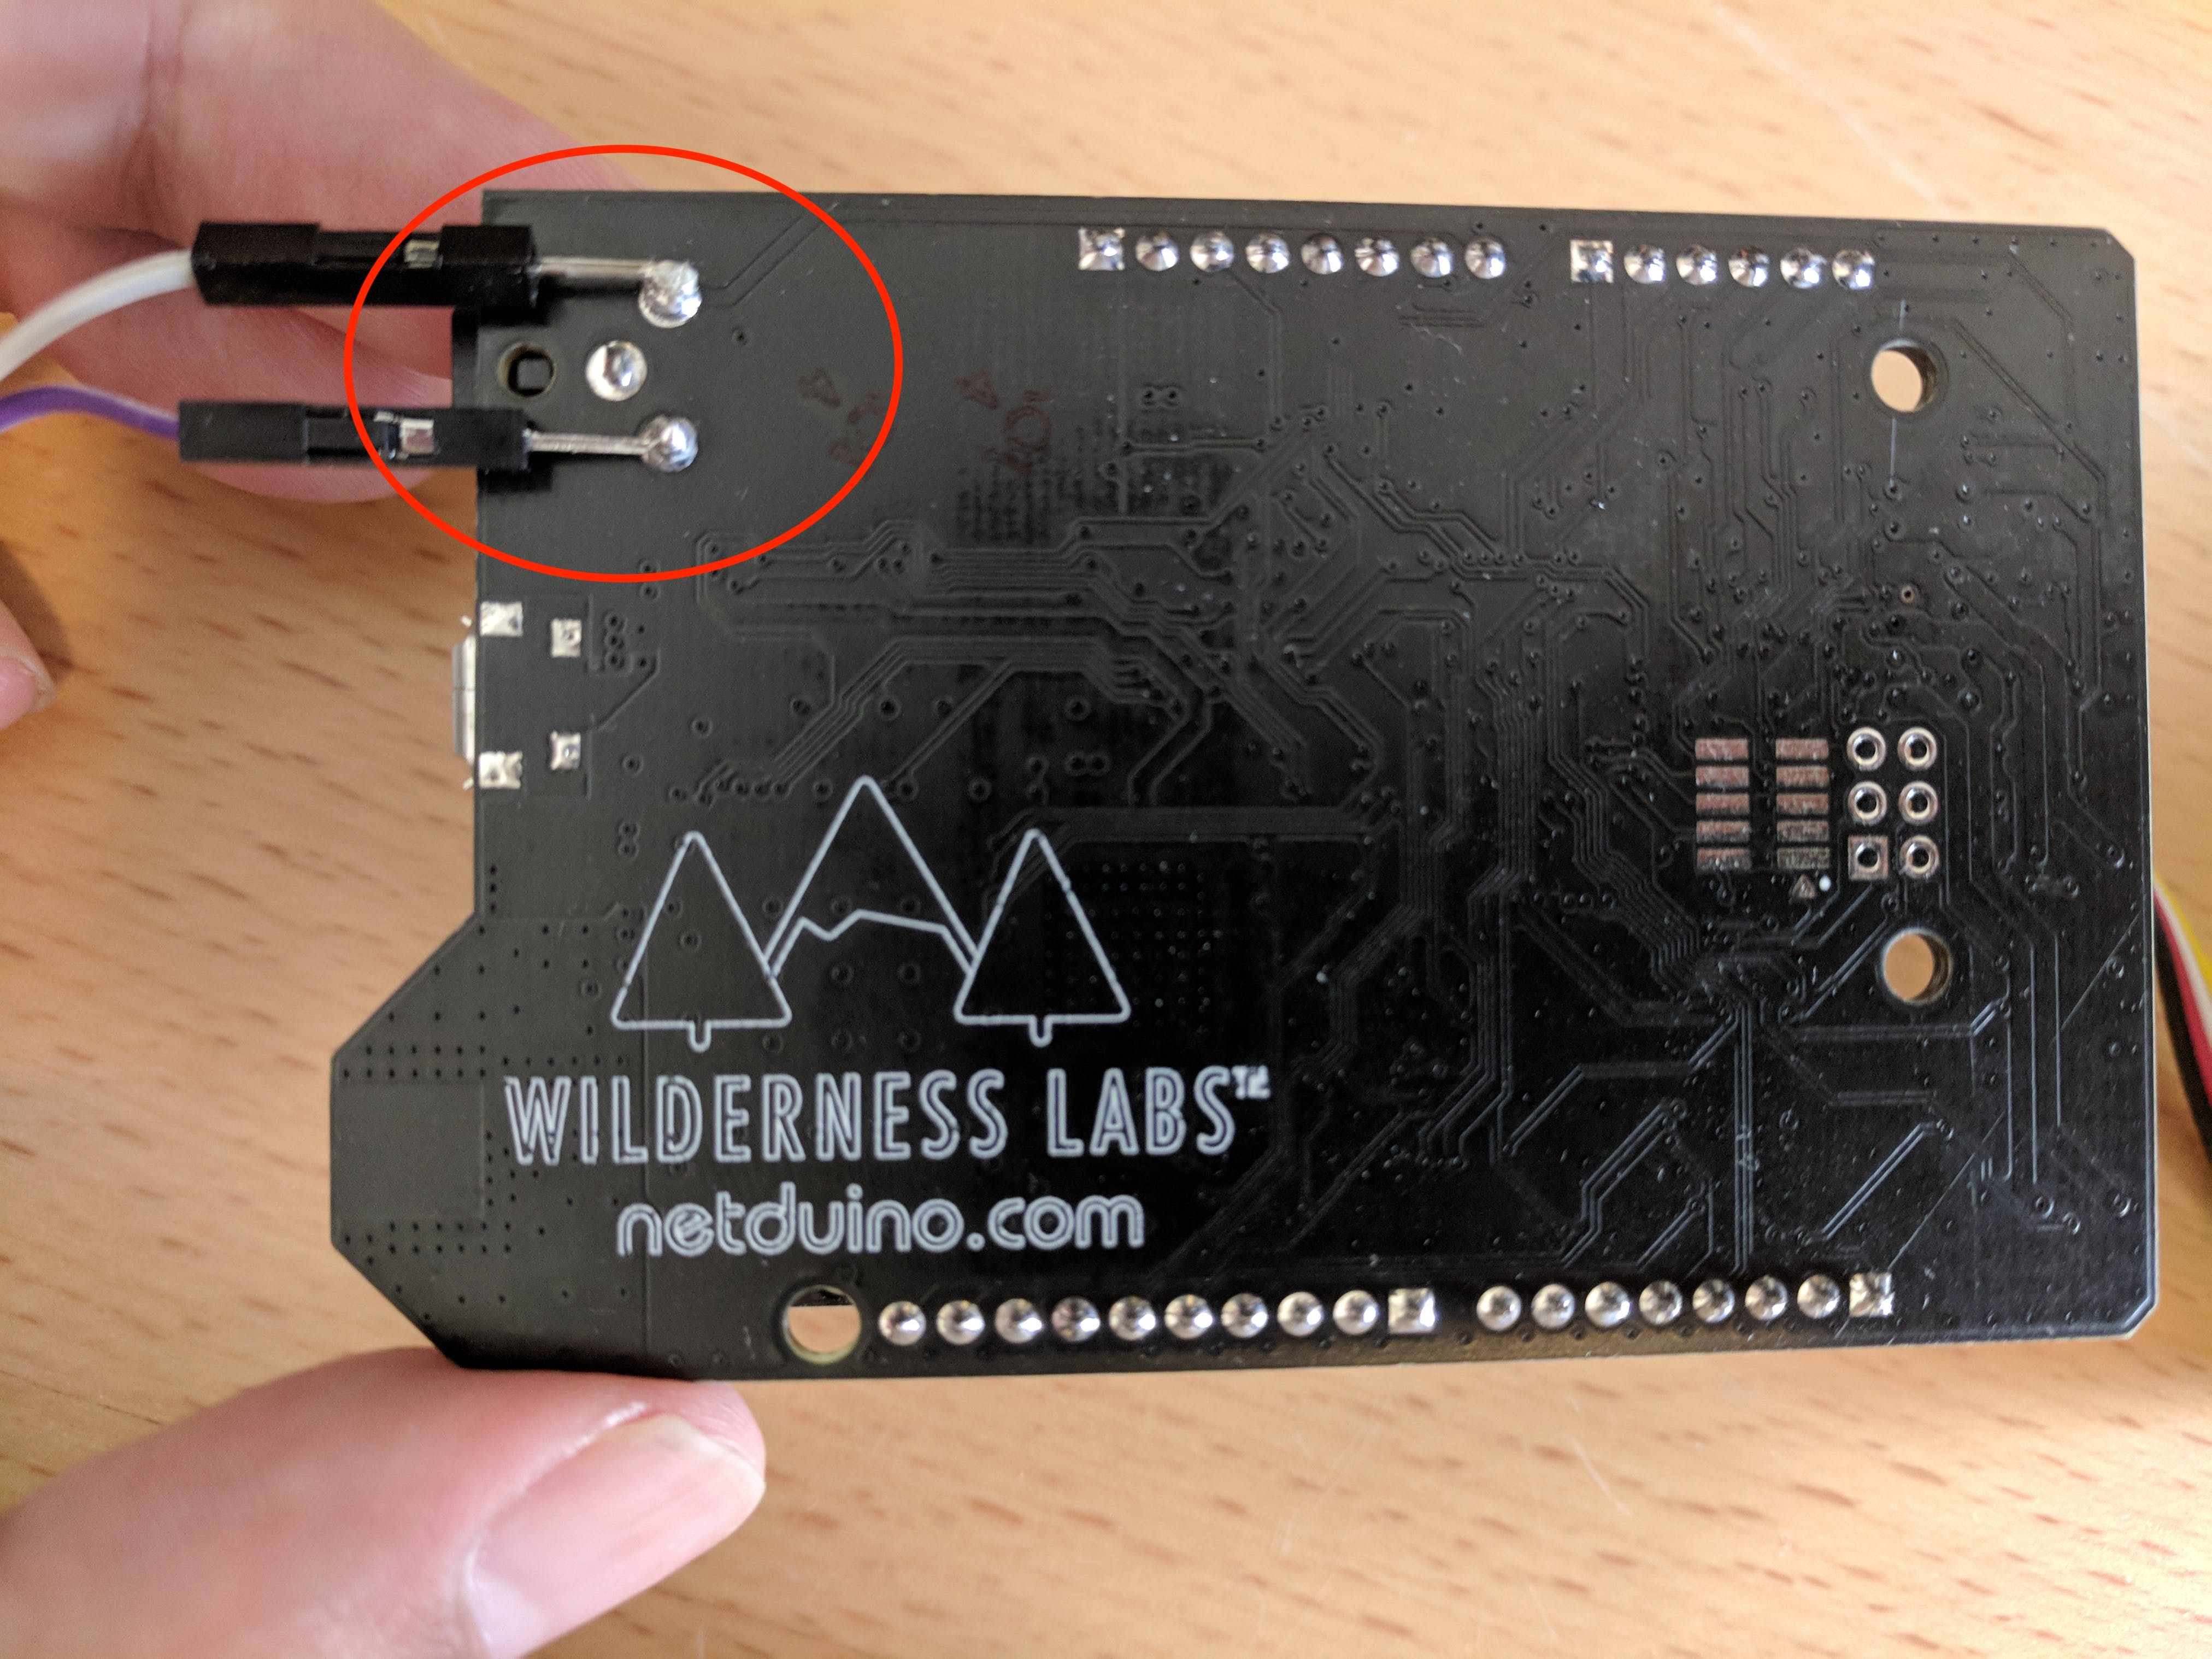
然后,我們可以利用設備的 12v 輸出直接連接到繼電器,一個連接到鎖舌,因此繼電器將從電路板本身接收 12v 正電壓,并從繼電器接收負電壓。當一切都說完了,它應該如下所示
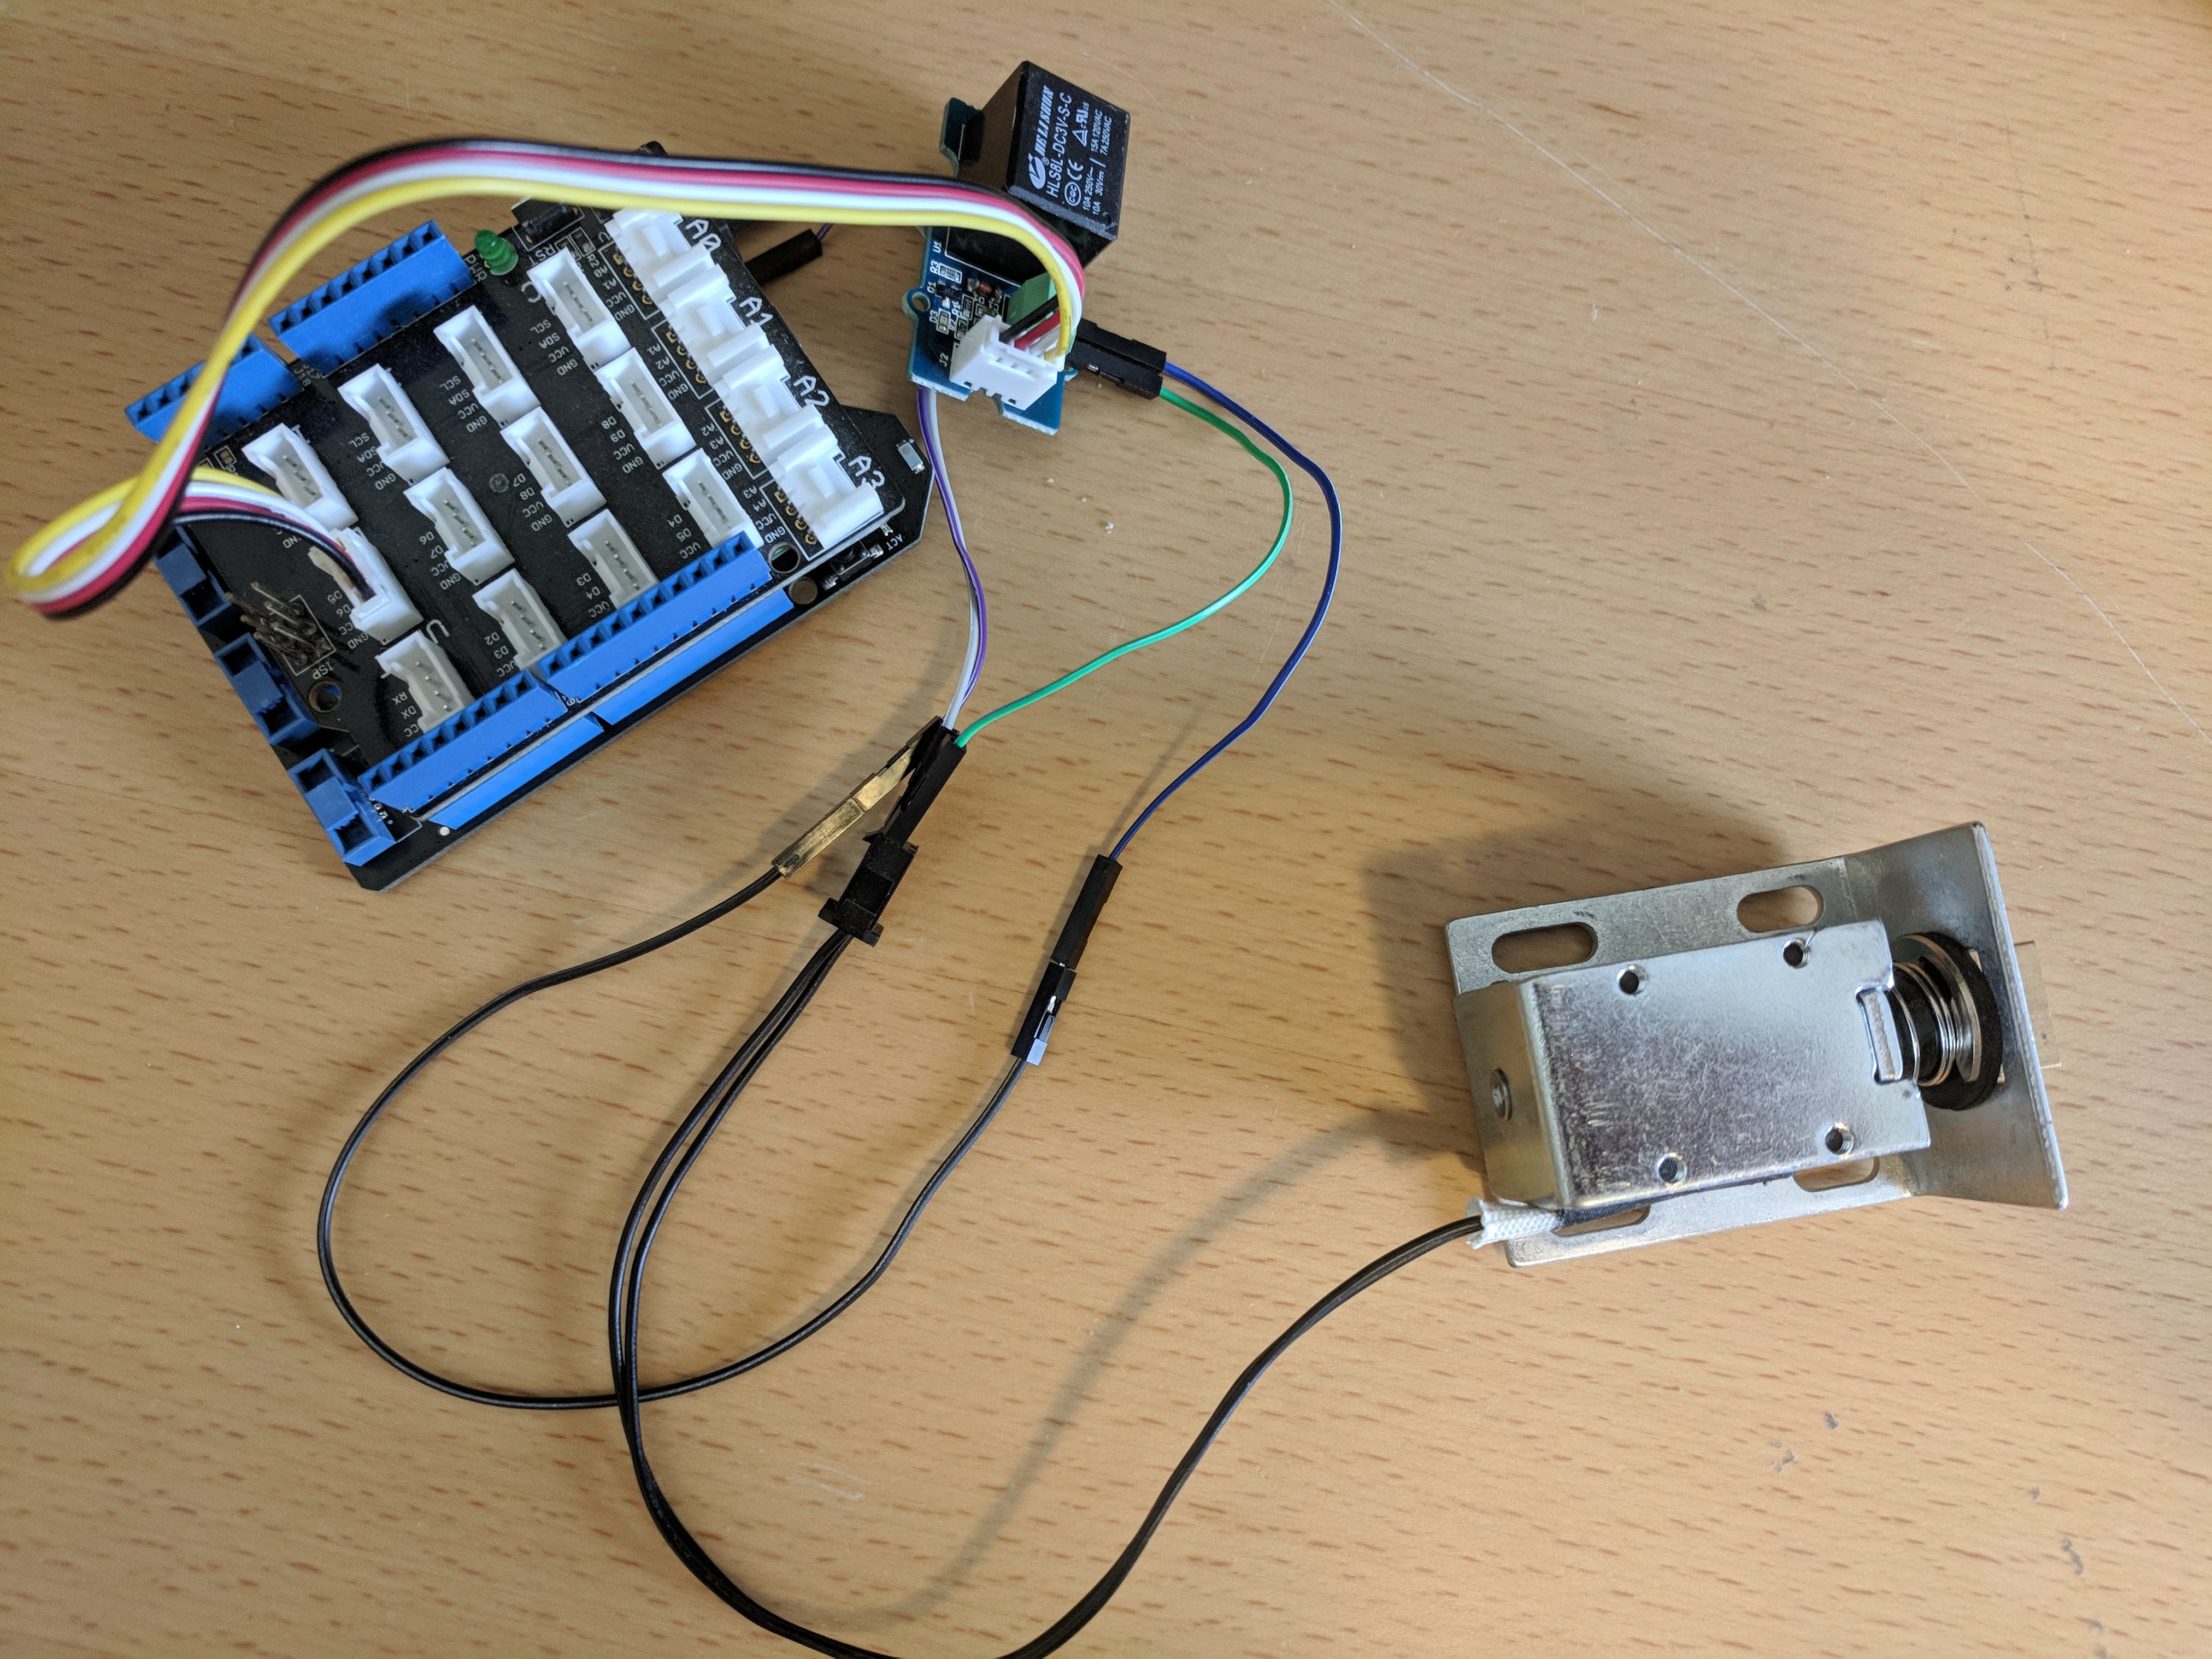
第 4 步:設置 Netduino 網絡服務器
我們現在可以使用以下代碼連接到周圍的計算機。當它工作時,我們可以進入下一步,我們已經創建了一個 NetDuino Webserver 供其他設備通過 Wifi 網絡連接。以下代碼設置插座,當收到“ON”時,它會打開 LED 以及繼電器,這允許我們打開鎖。
using Microsoft.SPOT.Hardware;
using Microsoft.SPOT.Net.NetworkInformation;
using SecretLabs.NETMF.Hardware;
using SecretLabs.NETMF.Hardware.Netduino;
namespace Lock
{
 public class Program
 {
 // Main method is called once as opposed to a loop method called over and over again
 public static void Main()
 {
 Thread.Sleep(5000);
 App app = new App();
 app.Run();
OutputPort led = new OutputPort(Pins.ONBOARD_LED, false);
 OutputPort relay = new OutputPort(Pins.GPIO_PIN_D5, false);
int port = 80;
Socket listenerSocket = new Socket(AddressFamily.InterNetwork,
 SocketType.Stream,
 ProtocolType.Tcp);
 IPEndPoint listenerEndPoint = new IPEndPoint(IPAddress.Any, port);
Debug.Print("setting up socket");
// bind to the listening socket
 listenerSocket.Bind(listenerEndPoint);
 // and start listening for incoming connections
 listenerSocket.Listen(1);
 Debug.Print("listening");
while (true)
 {
 Debug.Print(".");
// wait for a client to connect
 Socket clientSocket = listenerSocket.Accept();
 // wait for data to arrive
 bool dataReady = clientSocket.Poll(5000000, SelectMode.SelectRead);
// if dataReady is true and there are bytes available to read,
 // then you have a good connection.
 if (dataReady && clientSocket.Available > 0)
 {
 byte[] buffer = new byte[clientSocket.Available];
 clientSocket.Receive(buffer);
 string request =
 new string(System.Text.Encoding.UTF8.GetChars(buffer));
Debug.Print(request);
if (request.IndexOf("ON") >= 0)
 {
 led.Write(true);
 relay.Write(true);
 Thread.Sleep(5000);
 led.Write(false);
 relay.Write(false);
 }
string statusText = "Lock is " + (led.Read() ? "ON" : "OFF") + ".";
 // return a message to the client letting it
 // know if the LED is now on or off.
 string response = statusText ;
 clientSocket.Send(System.Text.Encoding.UTF8.GetBytes(response));
}
 // important: close the client socket
 clientSocket.Close();
}
}
 }
public class App
 {
 NetworkInterface[] _interfaces;
public string NetDuinoIPAddress { get; set; }
 public bool IsRunning { get; set; }
public void Run()
 {
 //this.IsRunning = true;
 bool goodToGo = InitializeNetwork();
this.IsRunning = false;
 }
protected bool InitializeNetwork()
 {
 if (Microsoft.SPOT.Hardware.SystemInfo.SystemID.SKU == 3)
 {
 Debug.Print("Wireless tests run only on Device");
 return false;
 }
Debug.Print("Getting all the network interfaces.");
 _interfaces = NetworkInterface.GetAllNetworkInterfaces();
// debug output
 ListNetworkInterfaces();
// loop through each network interface
 foreach (var net in _interfaces)
 {
 // debug out
 ListNetworkInfo(net);
switch (net.NetworkInterfaceType)
 {
 case (NetworkInterfaceType.Ethernet):
 Debug.Print("Found Ethernet Interface");
 break;
 case (NetworkInterfaceType.Wireless80211):
 Debug.Print("Found 802.11 WiFi Interface");
 break;
 case (NetworkInterfaceType.Unknown):
 Debug.Print("Found Unknown Interface");
 break;
 }
// check for an IP address, try to get one if it's empty
 return CheckIPAddress(net);
 }
// if we got here, should be false.
 return false;
 }
public void MakeWebRequest(string url)
 {
 var httpWebRequest = (HttpWebRequest)WebRequest.Create(url);
 httpWebRequest.Method = "GET";
 httpWebRequest.Timeout = 1000;
 httpWebRequest.KeepAlive = false;
httpWebRequest.GetResponse();
 /*
            using (var streamReader = new StreamReader(httpResponse.GetResponseStream()))
            {
                var result = streamReader.ReadToEnd();
                Debug.Print("this is what we got from " + url + ": " + result);
            }*/
 }
protected bool CheckIPAddress(NetworkInterface net)
 {
 int timeout = 10000; // timeout, in milliseconds to wait for an IP. 10,000 = 10 seconds
// check to see if the IP address is empty (0.0.0.0). IPAddress.Any is 0.0.0.0.
 if (net.IPAddress == IPAddress.Any.ToString())
 {
 Debug.Print("No IP Address");
if (net.IsDhcpEnabled)
 {
 Debug.Print("DHCP is enabled, attempting to get an IP Address");
// ask for an IP address from DHCP [note this is a static, not sure which network interface it would act on]
 int sleepInterval = 10;
 int maxIntervalCount = timeout / sleepInterval;
 int count = 0;
 while (IPAddress.GetDefaultLocalAddress() == IPAddress.Any && count < maxIntervalCount)
 {
 Debug.Print("Sleep while obtaining an IP");
 Thread.Sleep(10);
 count++;
 };
// if we got here, we either timed out or got an address, so let's find out.
 if (net.IPAddress == IPAddress.Any.ToString())
 {
 Debug.Print("Failed to get an IP Address in the alotted time.");
 return false;
 }
Debug.Print("Got IP Address: " + net.IPAddress.ToString());
 return true;
//NOTE: this does not work, even though it's on the actual network device. [shrug]
 // try to renew the DHCP lease and get a new IP Address
 //net.RenewDhcpLease ();
 //while (net.IPAddress == "0.0.0.0") {
 //    Thread.Sleep (10);
 //}
}
 else
 {
 Debug.Print("DHCP is not enabled, and no IP address is configured, bailing out.");
 return false;
 }
 }
 else
 {
 Debug.Print("Already had IP Address: " + net.IPAddress.ToString());
 return true;
 }
}
protected void ListNetworkInterfaces()
 {
 foreach (var net in _interfaces)
 {
 switch (net.NetworkInterfaceType)
 {
 case (NetworkInterfaceType.Ethernet):
 Debug.Print("Found Ethernet Interface");
 break;
 case (NetworkInterfaceType.Wireless80211):
 Debug.Print("Found 802.11 WiFi Interface");
 break;
 case (NetworkInterfaceType.Unknown):
 Debug.Print("Found Unknown Interface");
 break;
 }
 }
 }
protected void ListNetworkInfo(NetworkInterface net)
 {
 Debug.Print("MAC Address: " + BytesToHexString(net.PhysicalAddress));
 Debug.Print("DHCP enabled: " + net.IsDhcpEnabled.ToString());
 Debug.Print("Dynamic DNS enabled: " + net.IsDynamicDnsEnabled.ToString());
 Debug.Print("IP Address: " + net.IPAddress.ToString());
 Debug.Print("Subnet Mask: " + net.SubnetMask.ToString());
 Debug.Print("Gateway: " + net.GatewayAddress.ToString());
if (net is Wireless80211)
 {
 var wifi = net as Wireless80211;
 Debug.Print("SSID:" + wifi.Ssid.ToString());
 }
this.NetDuinoIPAddress = net.IPAddress.ToString();
}
private static string BytesToHexString(byte[] bytes)
 {
 string hexString = string.Empty;
// Create a character array for hexadecimal conversion.
 const string hexChars = "0123456789ABCDEF";
// Loop through the bytes.
 for (byte b = 0; b < bytes.Length; b++)
 {
 if (b > 0)
 hexString += "-";
// Grab the top 4 bits and append the hex equivalent to the return string.
 hexString += hexChars[bytes[b] >> 4];
// Mask off the upper 4 bits to get the rest of it.
 hexString += hexChars[bytes[b] & 0x0F];
 }
return hexString;
 }
public string getIPAddress()
 {
 return this.NetDuinoIPAddress;
 }
 }
}
上傳后,您會看到下面的圖像,已連接互聯網。在 Netduino 上部署后,我們可以在終端上使用以下命令
echo "ON" | nc 192.168.1.90 80
第 5 步:構建 Android 應用程序
我們可以構建一個簡單的 Android 應用程序來與我們之前編寫的 Netduino Server 進行通信。使用開源幻燈片視圖。
?
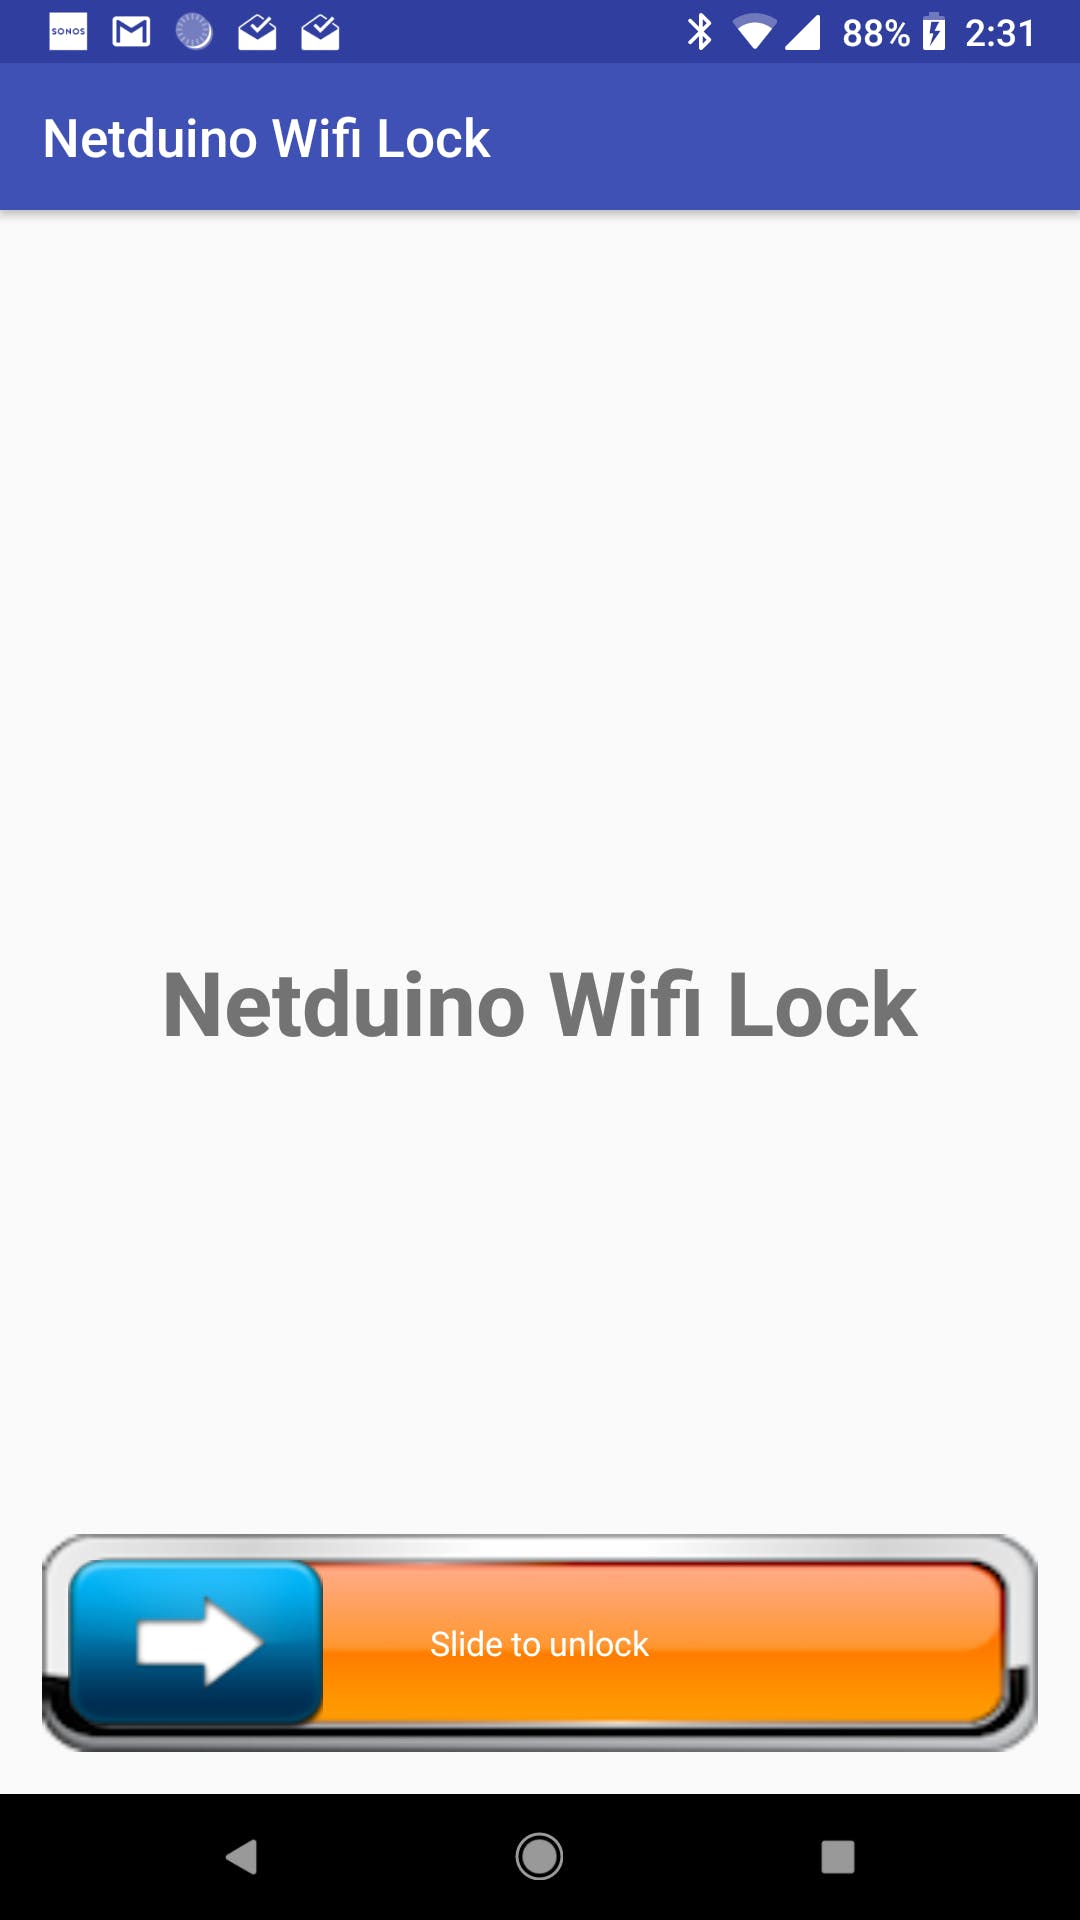
我們使用以下代碼將消息直接發送到 Netduino Webserver,這將啟動繼電器以解鎖死鎖。
package com.demo.netduinolock;
import android.os.AsyncTask;
import android.os.Bundle;
import android.support.v7.app.AppCompatActivity;
import android.util.Log;
import java.io.BufferedWriter;
import java.io.DataOutputStream;
import java.io.IOException;
import java.io.OutputStreamWriter;
import java.io.PrintWriter;
import java.net.InetAddress;
import java.net.Socket;
import java.net.UnknownHostException;
import cheekiat.slideview.SlideView;
public class MainActivity extends AppCompatActivity {
    SlideView mSlideView;
    private Socket socket;
    private static final int SERVERPORT = 80;
    private static final String SERVER_IP = "192.168.1.90";
    @Override
    protected void onCreate(Bundle savedInstanceState) {
        super.onCreate(savedInstanceState);
        setContentView(R.layout.activity_main);
        mSlideView = (SlideView) findViewById(R.id.slide_view);
        mSlideView.setOnFinishListener(new SlideView.OnFinishListener() {
            @Override
            public void onFinish() {
            new ConnectTask().execute();
            mSlideView.reset();
            }
        });
    }
    public class ConnectTask extends AsyncTask, String, String> {
        @Override
        protected String doInBackground(String... message) {
            try {
                InetAddress serverAddr = InetAddress.getByName(SERVER_IP);
                socket = new Socket(serverAddr, SERVERPORT);
                if(socket.isConnected()) {
                    PrintWriter out = new PrintWriter(new BufferedWriter(
                            new OutputStreamWriter(socket.getOutputStream())),
                            true);
                    out.println("ON");
                    out.flush();
                    out.close();
                    socket.close();
                    socket = null;
                }
                else
                {
                    Log.d("doh", "not conneected");
                }
            } catch (UnknownHostException e) {
                e.printStackTrace();
            } catch (IOException e) {
                e.printStackTrace();
            } catch (Exception e) {
                e.printStackTrace();
            }
            return null;
        }
        @Override
        protected void onProgressUpdate(String... values) {
            super.onProgressUpdate(values);
            //response received from server
            Log.d("test", "done ");
            //process server response here....
        }
    }
}
完成后,如果我們連接到 WiFi,我們可以輕松滑過并解鎖螺栓。
第 6 步:演示您的 WiFi 是您的關鍵
現在一切都已設置好,您可以使用手機解鎖螺栓,而 WiFi 就是您的鑰匙。:-)
?
- WIFI PIR傳感器開源分享
- 手勢控制鎖開源分享
- 密碼鎖開源分享
- WIFI氣象站開源分享
- Netduino環境傳感器項目
- 和弦Netduino音樂播放器開源分享
- 使用RGB LED和Netduino顯示彩虹色
- 用于姿勢校正的Netduino
- 使用Netduino構建您自己的西蒙游戲
- Netduino上的立體視覺
- Turning Lock轉鎖拼圖開源分享
- Walabot AI鎖舌開源分享
- WiFi門控板Rev開源分享
- Wifi油門開源項目
- WIFI智能開源電熱水器的原理圖和源代碼免費下載 47次下載
- OpenHamrony4.0去除鎖屏是一種什么體驗?觸覺智能給你支支招 285次閱讀
- 什么是wifi6,與wifi2.4g和wifi5g有什么區別 5.6w次閱讀
- 力維智能鎖業鎖體介紹 3346次閱讀
- 力維智能鎖業指紋鎖 MT-1380/36門鎖介紹 3720次閱讀
- 指紋鎖wifi智能貓眼多功能保障家庭安全 3497次閱讀
- 如何選擇合適的指紋鎖 7106次閱讀
- 從原理結構方面區分智能鎖和機械鎖 6774次閱讀
- 細說WiFi信號與路由器和WiFi模塊的關系 1.3w次閱讀
- wifi探針是什么_wifi探針的工作原理詳解 4.6w次閱讀
- wifi模塊異常是怎么回事_wifi模塊異常怎樣解決 7w次閱讀
- 手機wifi模塊在哪里_手機wifi模塊位置圖解 14.1w次閱讀
- 常用鎖存器芯片有哪些_鎖存器的作用介紹 8.1w次閱讀
- 雙頻wifi是什么意思_雙頻wifi的優點 2.8w次閱讀
- iPhone連不上WIFI的解決方法 2.3w次閱讀
- 帶自鎖功能的密碼鎖設計原理 4182次閱讀
下載排行
本周
- 1山景DSP芯片AP8248A2數據手冊
- 1.06 MB | 532次下載 | 免費
- 2RK3399完整板原理圖(支持平板,盒子VR)
- 3.28 MB | 339次下載 | 免費
- 3TC358743XBG評估板參考手冊
- 1.36 MB | 330次下載 | 免費
- 4DFM軟件使用教程
- 0.84 MB | 295次下載 | 免費
- 5元宇宙深度解析—未來的未來-風口還是泡沫
- 6.40 MB | 227次下載 | 免費
- 6迪文DGUS開發指南
- 31.67 MB | 194次下載 | 免費
- 7元宇宙底層硬件系列報告
- 13.42 MB | 182次下載 | 免費
- 8FP5207XR-G1中文應用手冊
- 1.09 MB | 178次下載 | 免費
本月
- 1OrCAD10.5下載OrCAD10.5中文版軟件
- 0.00 MB | 234315次下載 | 免費
- 2555集成電路應用800例(新編版)
- 0.00 MB | 33566次下載 | 免費
- 3接口電路圖大全
- 未知 | 30323次下載 | 免費
- 4開關電源設計實例指南
- 未知 | 21549次下載 | 免費
- 5電氣工程師手冊免費下載(新編第二版pdf電子書)
- 0.00 MB | 15349次下載 | 免費
- 6數字電路基礎pdf(下載)
- 未知 | 13750次下載 | 免費
- 7電子制作實例集錦 下載
- 未知 | 8113次下載 | 免費
- 8《LED驅動電路設計》 溫德爾著
- 0.00 MB | 6656次下載 | 免費
總榜
- 1matlab軟件下載入口
- 未知 | 935054次下載 | 免費
- 2protel99se軟件下載(可英文版轉中文版)
- 78.1 MB | 537798次下載 | 免費
- 3MATLAB 7.1 下載 (含軟件介紹)
- 未知 | 420027次下載 | 免費
- 4OrCAD10.5下載OrCAD10.5中文版軟件
- 0.00 MB | 234315次下載 | 免費
- 5Altium DXP2002下載入口
- 未知 | 233046次下載 | 免費
- 6電路仿真軟件multisim 10.0免費下載
- 340992 | 191187次下載 | 免費
- 7十天學會AVR單片機與C語言視頻教程 下載
- 158M | 183279次下載 | 免費
- 8proe5.0野火版下載(中文版免費下載)
- 未知 | 138040次下載 | 免費
 電子發燒友App


 創作
創作 發文章
發文章 發帖
發帖  提問
提問  發資料
發資料 發視頻
發視頻 上傳資料賺積分


評論