設(shè)置應(yīng)用頁(yè)面
本小節(jié)以“設(shè)置”應(yīng)用頁(yè)面為例,介紹如何使用自適應(yīng)布局能力和響應(yīng)式布局能力適配不同尺寸窗口。
頁(yè)面設(shè)計(jì)
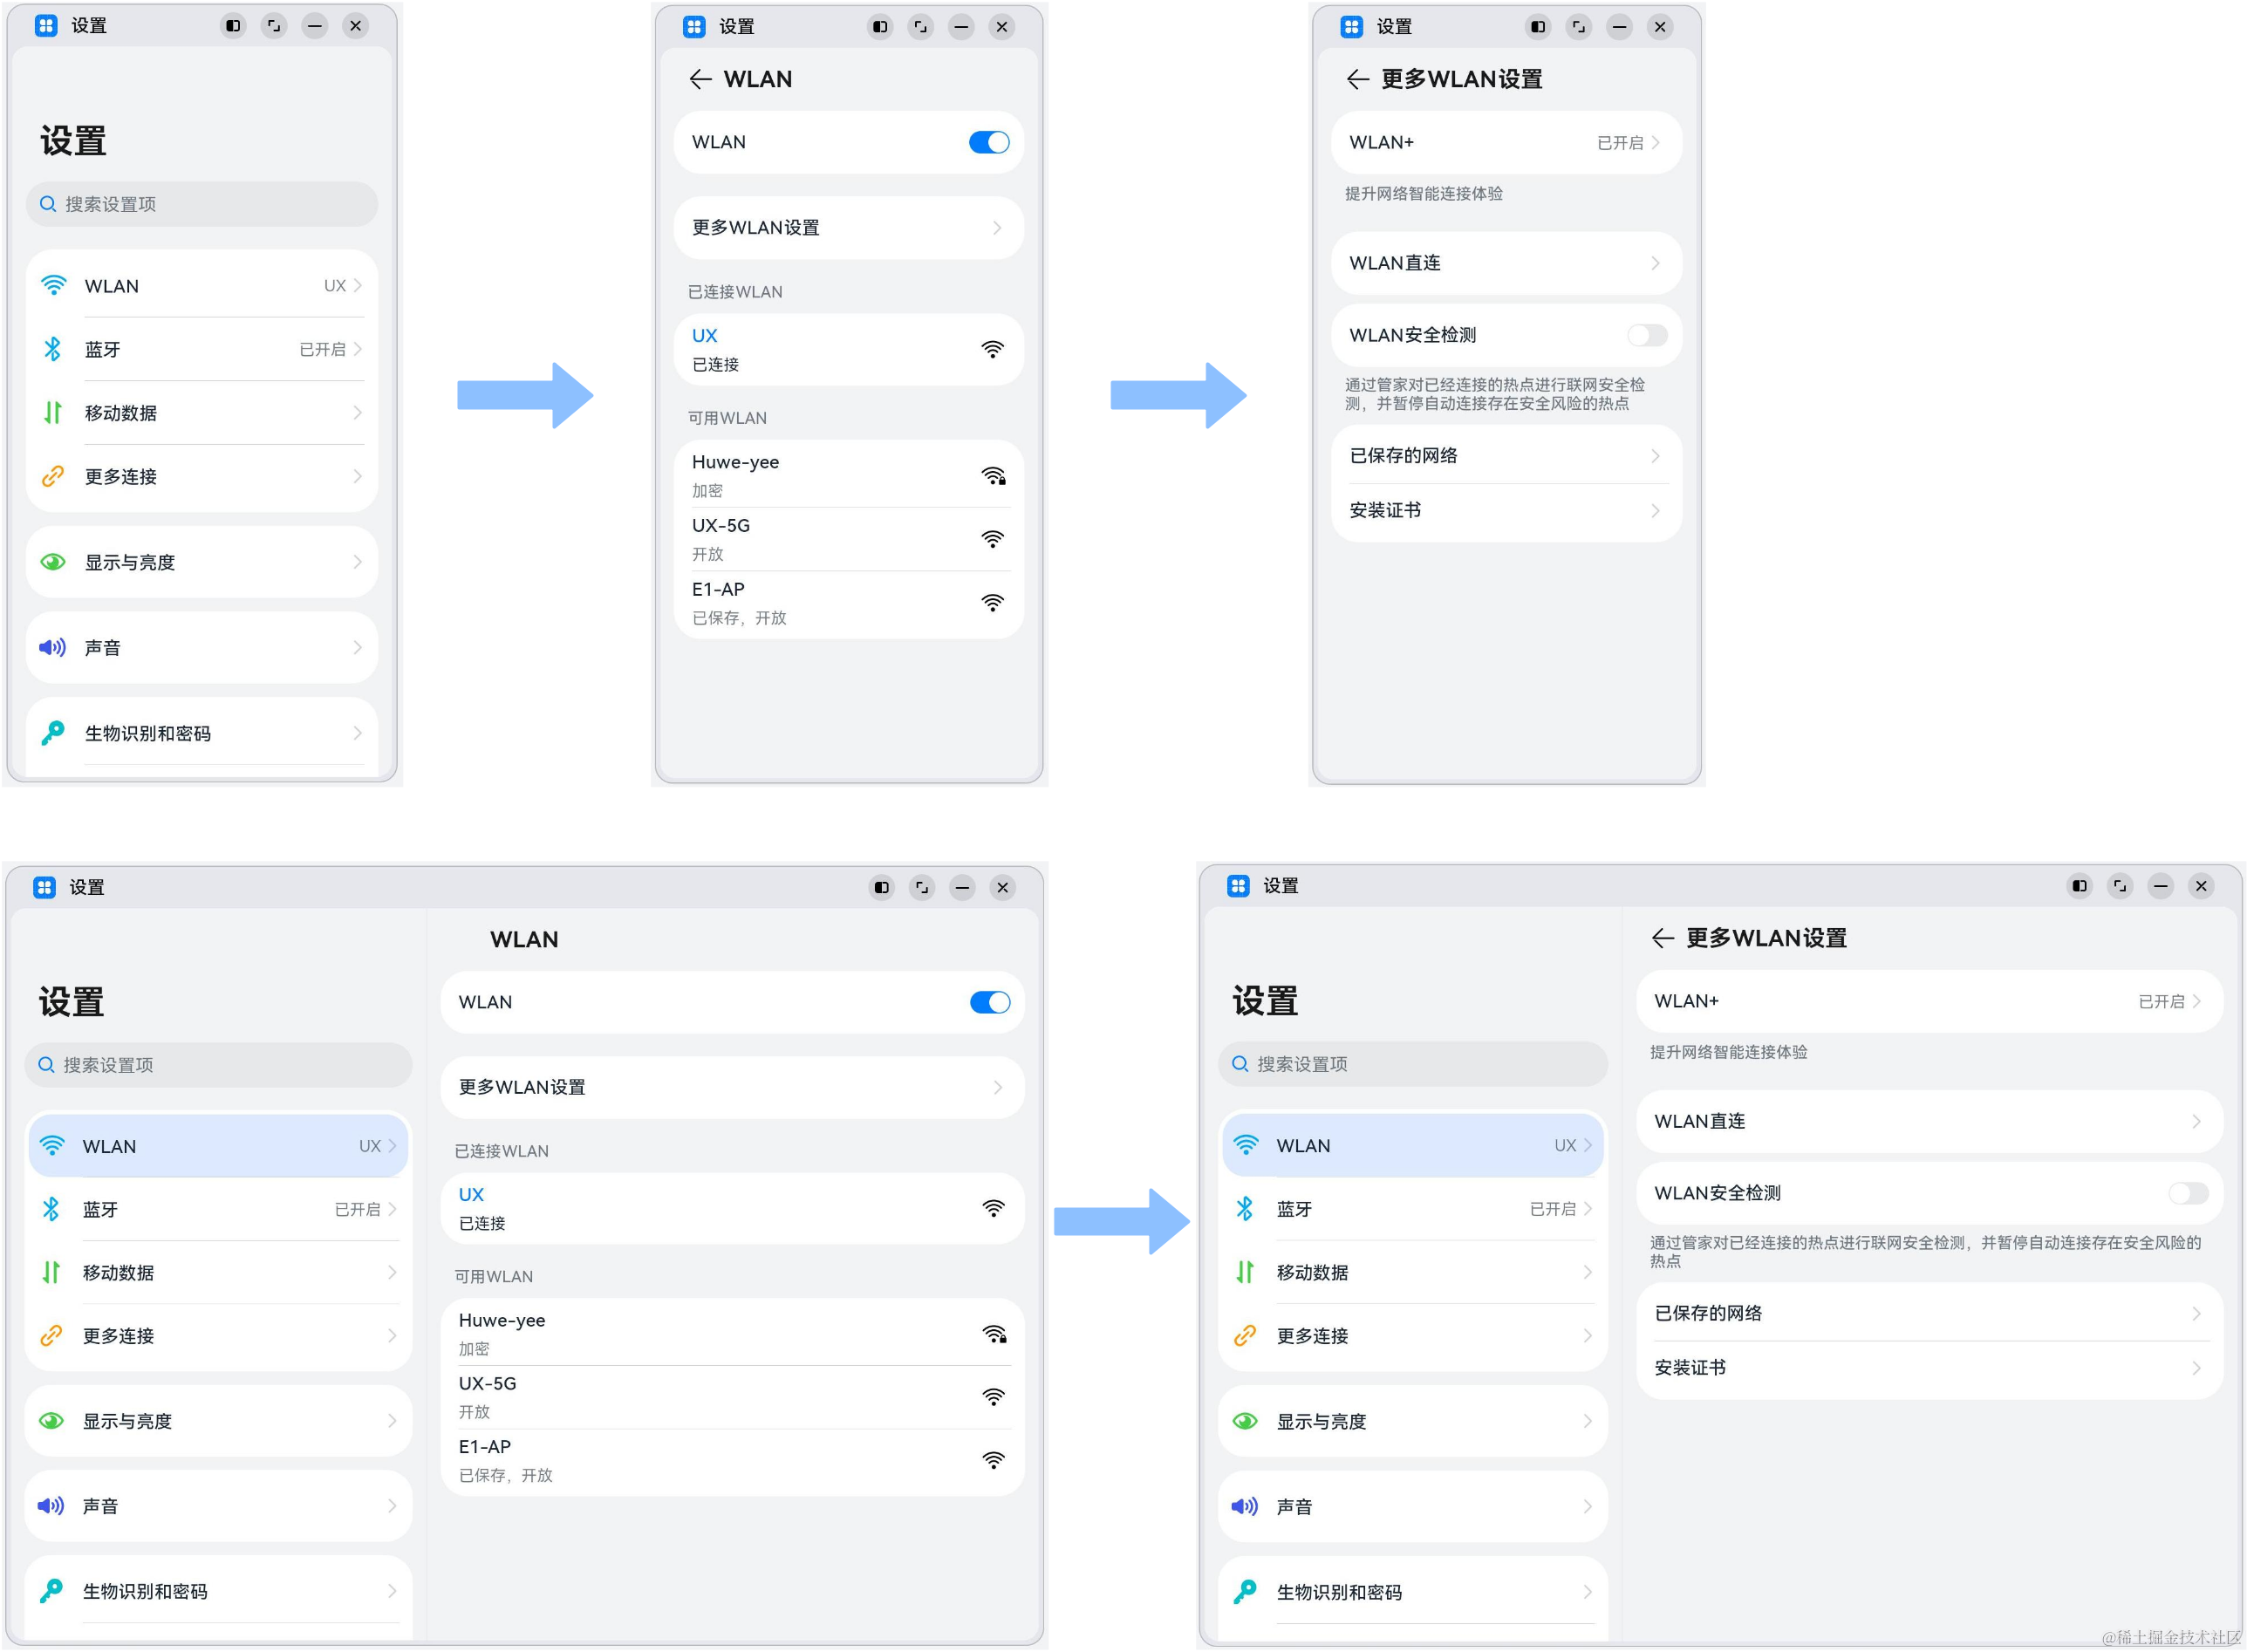
為充分利用屏幕尺寸優(yōu)勢(shì),應(yīng)用常常有在小屏設(shè)備上單欄顯示,大屏設(shè)備上左右分兩欄顯示的設(shè)計(jì),設(shè)置應(yīng)用頁(yè)面設(shè)計(jì)如下。
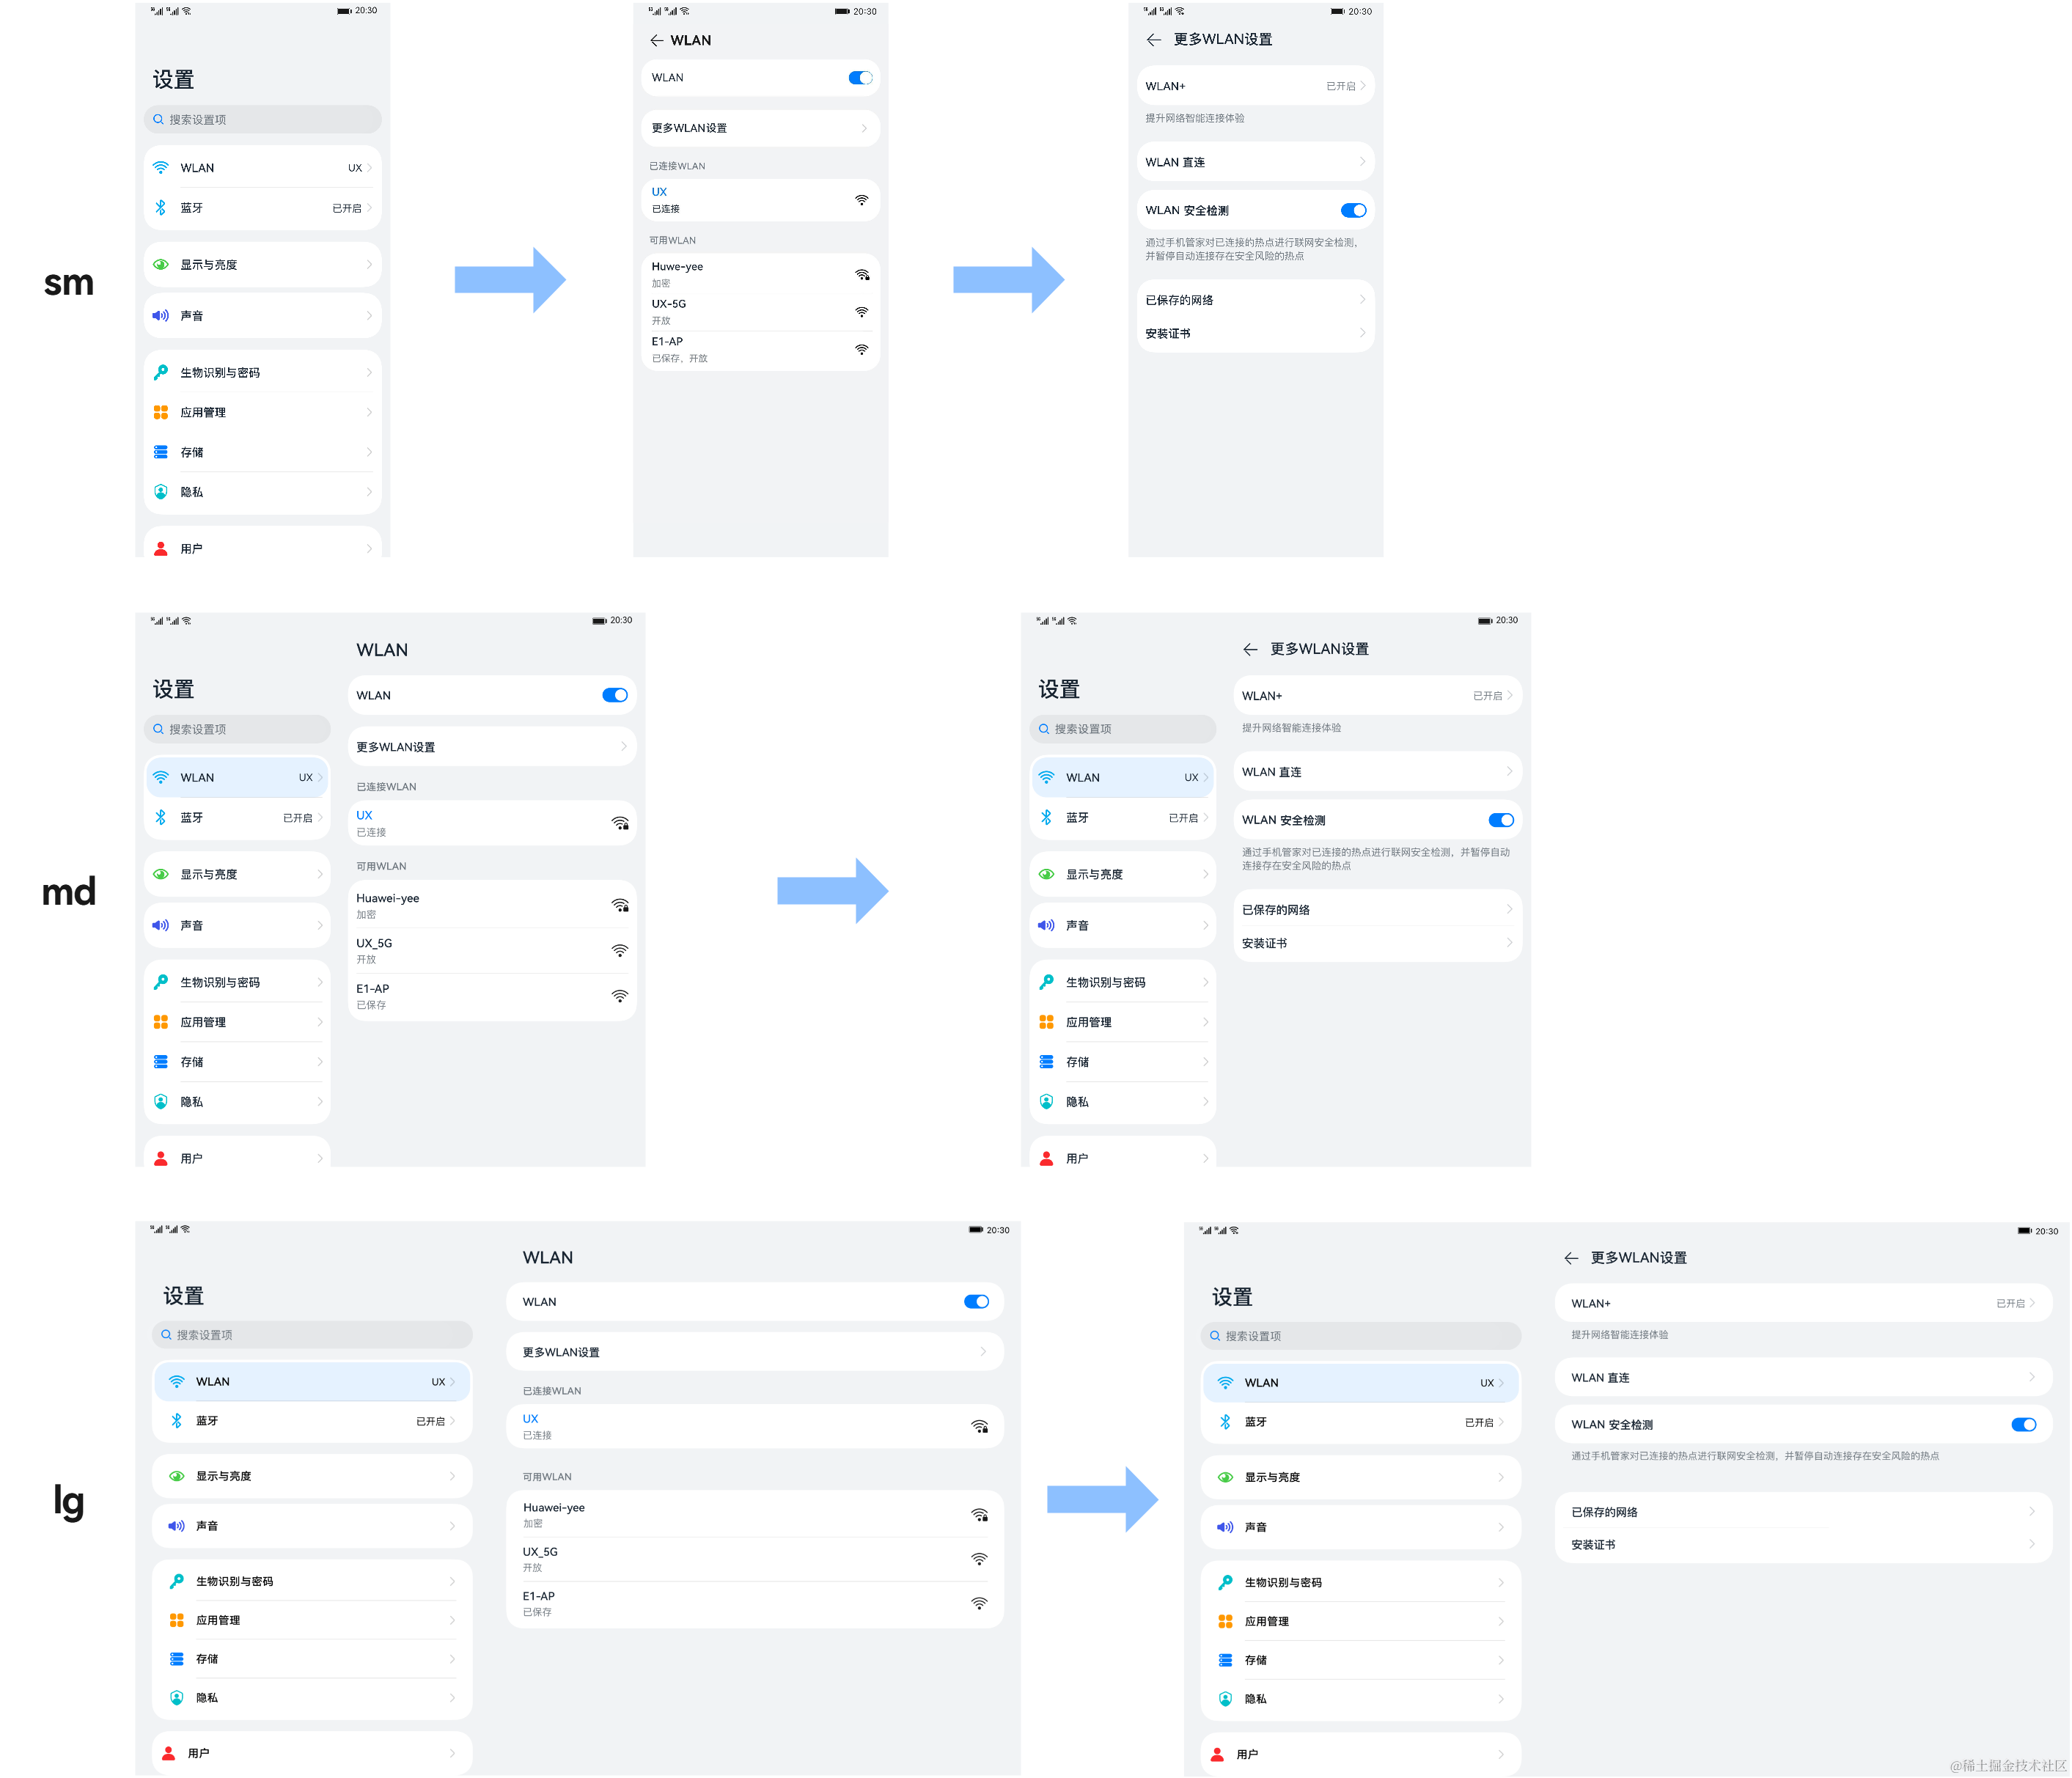
觀(guān)察“設(shè)置”應(yīng)用頁(yè)面設(shè)計(jì),不同斷點(diǎn)下“設(shè)置主頁(yè)”、“WLAN頁(yè)面”和“更多WLAN設(shè)置頁(yè)面”幾乎完全一致,只是在sm斷點(diǎn)下采用單欄顯示,在md和lg斷點(diǎn)下采用雙欄顯示。
在前面的典型頁(yè)面場(chǎng)景中,已經(jīng)介紹了如何分析及實(shí)現(xiàn)不同斷點(diǎn)下設(shè)計(jì)相似的單個(gè)頁(yè)面,本小節(jié)將展開(kāi)介紹如何實(shí)現(xiàn)不同斷點(diǎn)下存在單欄和雙欄設(shè)計(jì)的場(chǎng)景。
為了方便讀者理解,本小節(jié)將圍繞以下三個(gè)問(wèn)題進(jìn)行介紹。
- [如何實(shí)現(xiàn)單/雙欄的顯示效果]
- [如何實(shí)現(xiàn)點(diǎn)擊跳轉(zhuǎn)或刷新]
- [如何實(shí)現(xiàn)多級(jí)跳轉(zhuǎn)]
- 開(kāi)發(fā)前請(qǐng)熟悉鴻蒙開(kāi)發(fā)指導(dǎo)文檔 :[
gitee.com/li-shizhen-skin/harmony-os/blob/master/README.md]
如何實(shí)現(xiàn)單/雙欄的顯示效果
開(kāi)發(fā)者可以使用Row、Column、[RowSplit]等基礎(chǔ)的組件,實(shí)現(xiàn)分欄顯示的效果,但是需要較多的開(kāi)發(fā)工作量。方舟開(kāi)發(fā)框架在A(yíng)PI 9重構(gòu)了[Navigation組件],開(kāi)發(fā)者可以通過(guò)配置Navigation組件的屬性,控制其按照單欄或雙欄的效果進(jìn)行顯示。
Navigation組件由Navbar和Content兩部分區(qū)域組成,Navigation組件支持Stack、Split以及Auto三種模式。Stack及Split模式下Navigation組件的表現(xiàn)如下圖所示。
- Stack模式

- Split模式

- Auto模式
Auto模式是指Navigation組件可以根據(jù)應(yīng)用窗口尺寸,自動(dòng)選擇合適的模式:窗口寬度小于520vp時(shí),采用Stack模式顯示;窗口寬度大于等于520vp時(shí),采用Split模式顯示。當(dāng)窗口尺寸發(fā)生改變時(shí),Navigation組件也會(huì)自動(dòng)在Stack模式和Split模式之間切換。
說(shuō)明:
設(shè)置主頁(yè)的核心代碼如下所示。Navigation組件默認(rèn)處于A(yíng)uto模式,其樣式會(huì)根據(jù)應(yīng)用窗口尺寸在單欄和雙欄之間自動(dòng)切換。
import { SettingList } from '@ohos/settingItems';

@Entry
@Component
struct Index {
  build() {
    Navigation() {
      SettingList()
    }
    .title($r('app.string.settings'))
    .navBarWidth('40%')
    .width('100%')
    .height('100%')
    .backgroundColor($r("sys.color.ohos_id_color_sub_background"))
  }
}
//核心代碼 SettingList.ets
import { MainItem } from '../components/MainItem';
import { ItemGroup } from '../components/ItemGroup';
import { SearchBox } from '../components/SearchBox';
import { MoreConnectionsItem } from '../moreconnections/MoreConnectionsItem';
import { WlanSettingItem } from '../wlan/WlanSettingItem';

class  ItemObj {
  title?: Resource
  tag?: Resource
  icon?:Resource
}
let bluetoothTab:ItemObj={
  title: $r('app.string.bluetoothTab'),
  tag: $r('app.string.enabled'),
  icon: $r('app.media.blueTooth'),
}
let mobileData:ItemObj={
  title: $r('app.string.mobileData'),
  icon: $r('app.media.mobileData'),
}
let brightnessTab:ItemObj={
  title: $r('app.string.brightnessTab'),
  icon: $r('app.media.displayAndBrightness'),
}
let volumeControlTab:ItemObj={
  title: $r('app.string.volumeControlTab'),
  icon: $r('app.media.volume'),
}
let biometricsAndPassword:ItemObj={
  title: $r('app.string.biometricsAndPassword'),
  icon: $r('app.media.biometricsAndPassword'),
}
let applyTab:ItemObj={
  title: $r('app.string.applyTab'),
  icon: $r('app.media.application'),
}
let storageTab:ItemObj={
  title: $r('app.string.storageTab'),
  icon: $r('app.media.storage'),
}
let security:ItemObj={
  title: $r('app.string.security'),
  icon: $r('app.media.security'),
}
let privacy:ItemObj={
  title: $r('app.string.privacy'),
  icon: $r('app.media.privacy'),
}
let usersAccountsTab:ItemObj={
  title: $r('app.string.usersAccountsTab'),
  icon: $r('app.media.userAccounts'),
}
let systemTab:ItemObj={
  title: $r('app.string.systemTab'),
  icon: $r('app.media.system'),
}
let aboutTab:ItemObj={
  title: $r('app.string.aboutTab'),
  icon: $r('app.media.aboutDevice'),
}

@Component
export struct SettingList {
  @Builder
  CustomDivider() {
    Divider()
      .strokeWidth('1px')
      .color($r('sys.color.ohos_id_color_list_separator'))
      .margin({ left: 48, right: 8 })
  }

   build() {
     List({ space: 12 }) {
       ListItem() {
        SearchBox()
       }
       .padding({ top: 8, bottom: 8 })
       .width('100%')

      ListItem() {
        ItemGroup() {
          WlanSettingItem()

          this.CustomDivider()

          MainItem(bluetoothTab)

          this.CustomDivider()

          MainItem(mobileData)

          this.CustomDivider()
          MoreConnectionsItem()
        }
      }

      ListItem() {
        ItemGroup() {
          MainItem(brightnessTab)
        }
      }

      ListItem() {
        ItemGroup() {
          MainItem(volumeControlTab)
        }
      }

      ListItem() {
        ItemGroup() {
          MainItem(biometricsAndPassword)

          this.CustomDivider()

          MainItem(applyTab)

          this.CustomDivider()

          MainItem(storageTab)

          this.CustomDivider()

          MainItem(security)

          this.CustomDivider()

          MainItem(privacy)
        }
      }

      ListItem() {
        ItemGroup() {
          MainItem(usersAccountsTab)

          this.CustomDivider()

          MainItem(systemTab)

          this.CustomDivider()

          MainItem(aboutTab)
        }
      }

    }
    .padding({ left: 12, right: 12 })
    .width('100%')
    .height('100%')
    .backgroundColor($r('sys.color.ohos_id_color_sub_background'))
   }
}
如何實(shí)現(xiàn)點(diǎn)擊跳轉(zhuǎn)或刷新
Navigation組件通常搭配[NavRouter組件]以及[NavDestination組件]一起使用:
- NavRouter組件用于控制Navigation組件Content區(qū)域的顯示和刷新邏輯。
- NavDestination組件用于實(shí)際刷新Navigation組件Content區(qū)域的顯示。
刷新控制
NavRouter組件用于控制Navigation組件中Content區(qū)域的刷新邏輯,其必須包含兩個(gè)孩子節(jié)點(diǎn)。
| 節(jié)點(diǎn)類(lèi)型 | 節(jié)點(diǎn)功能 | |
|---|---|---|
| 第一個(gè)孩子節(jié)點(diǎn) | 容器類(lèi)組件 | 直接控制NavRouter的顯示效果 |
| 第二個(gè)孩子節(jié)點(diǎn) | NavDestination組件 | 刷新Navigation組件Content區(qū)域的顯示 |
NavRouter組件默認(rèn)提供了點(diǎn)擊響應(yīng)處理,不需要開(kāi)發(fā)者自定義點(diǎn)擊事件邏輯。另外,NavRouter組件還提供了onStateChange回調(diào)事件,用于通知開(kāi)發(fā)者NavRouter的狀態(tài):用戶(hù)點(diǎn)擊NavRouter,激活NavRouter并加載對(duì)應(yīng)的NavDestination子組件時(shí),回調(diào)onStateChange(true);NavRouter對(duì)應(yīng)的NavDestination子組件不再顯示時(shí),回調(diào)onStateChange(false)。

結(jié)合設(shè)置應(yīng)用的具體場(chǎng)景來(lái)看,上圖1號(hào)小紅框是NavRouter的第一個(gè)孩子節(jié)點(diǎn),2號(hào)紅框是NavRouter的第二個(gè)孩子節(jié)點(diǎn),相應(yīng)的核心代碼實(shí)現(xiàn)如下。
import { MainItem } from '../components/MainItem';
import { WlanMoreSettingItem } from '../components/WlanMoreSettingItem';
import { SubItemToggle } from '../components/SubItemToggle';
import { SubItemWifi } from '../components/SubItemWifi';
import { ItemDescription } from '../components/ItemDescription';
import { ItemGroup } from '../components/ItemGroup';

class  MainItemObj {
  title?: Resource
  tag?: string
  icon?:Resource
  label?: string
}
let mainItem:MainItemObj={
  title: $r('app.string.wifiTab'),
  tag: 'UX',
  icon: $r('app.media.wlan'),
  label: 'WLAN'
}
@Component
export struct WlanSettingItem {
  @LocalStorageLink('selectedLabel') selectedLabel: string  = ''

  build() {
    Column() {
      NavRouter() {
        MainItem(mainItem)

        NavDestination() {
          WlanSetting()
        }
        .title($r('app.string.wifiTab'))
        .backgroundColor($r('sys.color.ohos_id_color_sub_background'))
      }
    }
  }
}
@Component
struct WlanSetting {
  @Builder CustomDivider() {
    Divider()
      .strokeWidth('1px')
      .color($r('sys.color.ohos_id_color_list_separator'))
      .margin({left: 12, right: 8})
  }

  build() {
    Column() {
      Column() {
        ItemGroup() {
          SubItemToggle({title: $r('app.string.wifiTab'), isOn: true})
        }

        Row().height(16)

        ItemGroup() {
          WlanMoreSettingItem()
        }
      }
      .margin({bottom: 19.5})
      .flexShrink(0)

      Scroll() {
        Column() {
          ItemDescription({description: $r('app.string.wifiTipConnectedWLAN')})
            .padding({
              left: 12,
              right: 12,
              bottom: 9.5
            })

          ItemGroup() {
            SubItemWifi({
              title: 'UX',
              subTitle: $r('app.string.wifiSummaryConnected'),
              isConnected: true,
              icon: $r('app.media.ic_wifi_signal_4_dark')
            })
          }

          Column() {
            ItemDescription({description: $r('app.string.wifiTipValidWLAN')})
              .margin({
                left: 12,
                right: 12,
                top: 19.5,
                bottom: 9.5
              })

            ItemGroup() {
              SubItemWifi({
                title: 'Huwe-yee',
                subTitle: $r('app.string.wifiSummaryEncrypted'),
                isConnected: false,
                icon: $r('app.media.ic_wifi_lock_signal_4_dark')
              })

              this.CustomDivider()

              SubItemWifi({
                title: 'UX-5G',
                subTitle: $r('app.string.wifiSummaryOpen'),
                isConnected: false,
                icon: $r('app.media.ic_wifi_signal_4_dark')
              })

              this.CustomDivider()

              SubItemWifi({
                title: 'E1-AP',
                subTitle: $r('app.string.wifiSummarySaveOpen'),
                isConnected: false,
                icon: $r('app.media.ic_wifi_signal_4_dark')
              })
            }
          }
        }
      }
      .scrollable(ScrollDirection.Vertical)
      .scrollBar(BarState.Off)
      .width('100%')
      .flexShrink(1)
    }
    .width('100%')
    .height('100%')
    .padding({left: 12, right: 12})
  }
}
顯示刷新
NavDestination組件用于實(shí)際刷新Navigation組件Content區(qū)域的顯示。激活后的NavRouter對(duì)應(yīng)的NavDestination組件,會(huì)占滿(mǎn)整個(gè)Content區(qū)域并刷新其顯示。
開(kāi)發(fā)者可以通過(guò)NavDestination組件提供的如下屬性,調(diào)整其最終顯示效果:
- backgroundColor:設(shè)置NavDestination組件的背景色。
- title:自定義NavDestination組件的標(biāo)題。
- hideTitleBar:隱藏NavDestination組件的標(biāo)題欄。
特別的,Navigation組件會(huì)根據(jù)當(dāng)前的狀態(tài)決定是否在NavDestination組件標(biāo)題欄起始部分自動(dòng)添加返回鍵圖標(biāo)。當(dāng)Navigation組件添加了返回鍵圖標(biāo)時(shí),還可以自動(dòng)響應(yīng)及處理系統(tǒng)三鍵導(dǎo)航中的返回鍵事件。

如何實(shí)現(xiàn)多級(jí)跳轉(zhuǎn)
可以在NavDesination組件中,繼續(xù)使用NavRouter組件,以實(shí)現(xiàn)多級(jí)跳轉(zhuǎn)。多級(jí)跳轉(zhuǎn)場(chǎng)景下,Navigation組件同樣會(huì)根據(jù)當(dāng)前的狀態(tài)決定是否自動(dòng)添加返回鍵圖標(biāo)及響應(yīng)系統(tǒng)三鍵導(dǎo)航中的返回鍵事件。

結(jié)合具體場(chǎng)景,紅框3是一個(gè)NavRouter組件,點(diǎn)擊后可以控制Navigation組件中的Content區(qū)域刷新為紅框4對(duì)應(yīng)的NavDestination組件嗎,其核心代碼實(shí)現(xiàn)如下所示。
import { SubItemArrow } from '../components/SubItemArrow';//組件請(qǐng)參考相關(guān)示例
import { SubItemToggle } from '../components/SubItemToggle';
import { ItemGroup } from '../components/ItemGroup';
import { ItemDescription } from '../components/ItemDescription';

class SubItemArrowObj{
  title?: Resource
}
let subItemArrow:SubItemArrowObj={
  title: $r('app.string.moreWlanSettings')
}
@Component
export struct WlanMoreSettingItem {
  @LocalStorageLink('selectedLabel') selectedLabel: string = ''

  build() {
    NavRouter() {
      SubItemArrow(subItemArrow)

      NavDestination() {
        WlanMoreSetting()
      }
      .title($r('app.string.moreWlanSettings'))
      .backgroundColor($r('sys.color.ohos_id_color_sub_background'))
    }
  }
}

@Component
export struct WlanMoreSetting {
  build() {
    Scroll() {
      Column() {
        ItemGroup() {
          SubItemArrow({
            title: $r('app.string.wlanPlus'),
            tag: $r('app.string.enabled')
          })
        }
        ItemDescription({description: $r('app.string.wlanPlusTip')})
          .margin({
            top: 8,
            bottom: 24,
            left: 12,
            right: 12
          })

        ItemGroup() {
          SubItemArrow({ title: $r('app.string.wlanDirect') })
        }

        Blank().height(12)

        ItemGroup() {
          SubItemToggle({title: $r('app.string.wlanSecurityCheck')})
        }

        ItemDescription({description: $r('app.string.wlanSecurityCheckTip')})
          .margin({
            top: 8,
            bottom: 24,
            left: 12,
            right: 12
          })

        ItemGroup() {
          SubItemArrow({title: $r('app.string.savedWlan')})
          Divider()
            .strokeWidth('1px')
            .color($r('sys.color.ohos_id_color_list_separator'))
            .margin({left: 12, right: 8})
          SubItemArrow({title: $r('app.string.installCertificates')})
        }
      }
      .backgroundColor($r('sys.color.ohos_id_color_sub_background'))
      .padding({left: 12, right: 12})
    }
    .scrollBar(BarState.Off)
    .width('100%')
  }
}

`HarmonyOS與OpenHarmony鴻蒙文檔籽料:mau123789是v直接拿`
總結(jié)

本示例的基礎(chǔ)導(dǎo)航結(jié)構(gòu)上圖所示:
- 激活
SettingList中的WLANSettingItem,可以加載及顯示WlanSetting。 - 激活
WlanSetting中的WlanMoreSettingItem,可以加載及顯示WlanMoreSetting。
Navigation組件支持自動(dòng)切換單欄和雙欄的顯示效果,同時(shí)可以根據(jù)當(dāng)前狀態(tài)自動(dòng)添加返回鍵及響應(yīng)系統(tǒng)的返回鍵事件。借助Navigation組件,開(kāi)發(fā)者不用關(guān)心單欄和雙欄場(chǎng)景的差異而更關(guān)注于應(yīng)用本身,極大的減少開(kāi)發(fā)工作量及提高開(kāi)發(fā)效率。
審核編輯 黃宇
-
鴻蒙
+關(guān)注
關(guān)注
57文章
2371瀏覽量
42910 -
鴻蒙OS
+關(guān)注
關(guān)注
0文章
189瀏覽量
4462
發(fā)布評(píng)論請(qǐng)先 登錄
相關(guān)推薦
HarmonyOS開(kāi)發(fā)案例:【一次開(kāi)發(fā),多端部署-音樂(lè)專(zhuān)輯】
鴻蒙OS開(kāi)發(fā):【一次開(kāi)發(fā),多端部署】(天氣應(yīng)用)案例
鴻蒙OS開(kāi)發(fā):【一次開(kāi)發(fā),多端部署】(一多天氣)項(xiàng)目
鴻蒙OS開(kāi)發(fā):【一次開(kāi)發(fā),多端部署】(音樂(lè)專(zhuān)輯頁(yè)面)

鴻蒙OS開(kāi)發(fā):【一次開(kāi)發(fā),多端部署】(視頻應(yīng)用)
鴻蒙OS開(kāi)發(fā):【一次開(kāi)發(fā),多端部署】(典型布局場(chǎng)景)
鴻蒙OS開(kāi)發(fā):典型頁(yè)面場(chǎng)景【一次開(kāi)發(fā),多端部署】實(shí)戰(zhàn)(應(yīng)用市場(chǎng)首頁(yè))
鴻蒙OS開(kāi)發(fā):典型頁(yè)面場(chǎng)景【一次開(kāi)發(fā),多端部署】實(shí)戰(zhàn)(音樂(lè)專(zhuān)輯頁(yè)2)
鴻蒙OS開(kāi)發(fā):典型頁(yè)面場(chǎng)景【一次開(kāi)發(fā),多端部署】實(shí)戰(zhàn)(設(shè)置典型頁(yè)面)
鴻蒙OS開(kāi)發(fā):典型頁(yè)面場(chǎng)景【一次開(kāi)發(fā),多端部署】(資源使用)
鴻蒙OS開(kāi)發(fā):典型頁(yè)面場(chǎng)景【一次開(kāi)發(fā),多端部署】(短信)案例介紹
鴻蒙OS開(kāi)發(fā):【一次開(kāi)發(fā),多端部署】(多設(shè)備自適應(yīng)能力)簡(jiǎn)單介紹
鴻蒙OS開(kāi)發(fā):【一次開(kāi)發(fā),多端部署】( 設(shè)置app頁(yè)面)

鴻蒙OS開(kāi)發(fā):典型頁(yè)面場(chǎng)景【一次開(kāi)發(fā),多端部署】(交互歸一)
鴻蒙OS開(kāi)發(fā):典型頁(yè)面場(chǎng)景【一次開(kāi)發(fā),多端部署】(功能開(kāi)發(fā))


 鴻蒙OS開(kāi)發(fā):典型頁(yè)面場(chǎng)景【一次開(kāi)發(fā),多端部署】(設(shè)置應(yīng)用頁(yè)面)


評(píng)論