前言
VLAN(Virtual Local Area Network)即虛擬局域網,是將一個物理的LAN在邏輯上劃分成多個廣播域的通信技術。
本文主要介紹通過流策略實現VLAN間三層隔離,也就是我們常說的對用戶增加訪問權限。
01
過流策略實現VLAN間三層隔離
1.1 組網需求
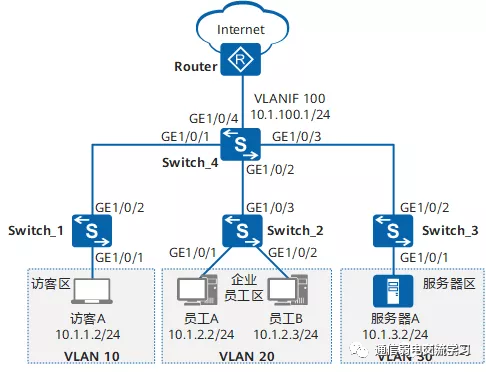
如圖 1 所示,為了通信的安全性,某公司將訪客、員工、服務器分別劃分到VLAN10、VLAN20、VLAN30中。公司希望:
員工、服務器主機、訪客均能訪問Internet。
訪客只能訪問Internet,不能與其他任何VLAN的用戶通信。
員工A可以訪問服務器區的所有資源,但其他員工只能訪問服務器A的21端口(FTP服務)。
 ?
?
圖片
圖 1 配置通過流策略實現VLAN間三層隔離組網圖
1.2 配置思路
可采用如下思路配置通過流策略實現VLAN間互訪控制:
配置VLAN并將各接口加入VLAN,使員工、服務器、訪客間二層隔離。
配置VLANIF接口及其IP地址,使員工、服務器、訪客間可三層互通。
配置上行路由,使員工、服務器、訪客均可通過Switch訪問Internet。
配置并應用流策略,使員工A可以訪問服務器區的所有資源,其他員工只能訪問服務器A的21端口,且只允許員工訪問服務器;使訪客只能訪問Internet。
1.3 操作步驟
【1】配置VLAN并將各接口加入VLAN,使員工、服務器、訪客間二層隔離
# 在Switch_1上創建VLAN10,并將接口GE1/0/1以Untagged方式加入VLAN10,接口GE1/0/2以Tagged方式加入VLAN10。Switch_2和Switch_3的配置與Switch_1類似,不再贅述。
[HUAWEI] sysname Switch_1
[Switch_1] vlan batch 10
[Switch_1] interface gigabitethernet 1/0/1
[Switch_1-GigabitEthernet1/0/1] port link-type access
[Switch_1-GigabitEthernet1/0/1] port default vlan 10
[Switch_1-GigabitEthernet1/0/1] quit
[Switch_1] interface gigabitethernet 1/0/2
[Switch_1-GigabitEthernet1/0/2] port link-type trunk
[Switch_1-GigabitEthernet1/0/2] port trunk allow-pass vlan 10
[Switch_1-GigabitEthernet1/0/2] quit
# 在Switch_4上創建VLAN10、VLAN20、VLAN30、VLAN100,并配置接口GE1/0/1~GE1/0/4分別以Tagged方式加入VLAN10、VLAN20、VLAN30、VLAN100。
[HUAWEI] sysname Switch_4
[Switch_4] vlan batch 10 20 30 100
[Switch_4] interface gigabitethernet 1/0/1
[Switch_4-GigabitEthernet1/0/1] port link-type trunk
[Switch_4-GigabitEthernet1/0/1] port trunk allow-pass vlan 10
[Switch_4-GigabitEthernet1/0/1] quit
[Switch_4] interface gigabitethernet 1/0/2
[Switch_4-GigabitEthernet1/0/2] port link-type trunk
[Switch_4-GigabitEthernet1/0/2] port trunk allow-pass vlan 20
[Switch_4-GigabitEthernet1/0/2] quit
[Switch_4] interface gigabitethernet 1/0/3
[Switch_4-GigabitEthernet1/0/3] port link-type trunk
[Switch_4-GigabitEthernet1/0/3] port trunk allow-pass vlan 30
[Switch_4-GigabitEthernet1/0/3] quit
[Switch_4] interface gigabitethernet 1/0/4
[Switch_4-GigabitEthernet1/0/4] port link-type trunk
[Switch_4-GigabitEthernet1/0/4] port trunk allow-pass vlan 100
[Switch_4-GigabitEthernet1/0/4] quit
 ?
?
【2】配置VLANIF接口及其IP地址,使員工、服務器、訪客間可以三層互通
# 在Switch_4上創建VLANIF10、VLANIF20、VLANIF30、VLANIF100,并分別配置其IP地址為10.1.1.1/24、10.1.2.1/24、10.1.3.1/24、10.1.100.1/24。
[Switch_4] interface vlanif 10
[Switch_4-Vlanif10] ip address 10.1.1.1 24
[Switch_4-Vlanif10] quit
[Switch_4] interface vlanif 20
[Switch_4-Vlanif20] ip address 10.1.2.1 24
[Switch_4-Vlanif20] quit
[Switch_4] interface vlanif 30
[Switch_4-Vlanif30] ip address 10.1.3.1 24
[Switch_4-Vlanif30] quit
[Switch_4] interface vlanif 100
[Switch_4-Vlanif100] ip address 10.1.100.1 24
[Switch_4-Vlanif100] quit
【3】配置上行路由,使員工、服務器、訪客均可通過Switch訪問Internet。
# 在Switch_4上配置OSPF基本功能,發布用戶網段以及Switch_4與Router之間的互聯網段。
[Switch_4] ospf
[Switch_4-ospf-1] area 0
[Switch_4-ospf-1-area-0.0.0.0] network 10.1.1.0 0.0.0.255
[Switch_4-ospf-1-area-0.0.0.0] network 10.1.2.0 0.0.0.255
[Switch_4-ospf-1-area-0.0.0.0] network 10.1.3.0 0.0.0.255
[Switch_4-ospf-1-area-0.0.0.0] network 10.1.100.0 0.0.0.255
[Switch_4-ospf-1-area-0.0.0.0] quit
[Switch_4-ospf-1] quit
Router上需要進行如下配置:
將連接Switch的接口以Tagged方式加入VLAN100,并指定VLANIF100的IP地址與10.1.100.1在同一網段。
配置OSPF基本功能,并發布Switch與Router之間的互聯網段。
【4】配置并應用流策略,控制員工、訪客、服務器之間的訪問
A、通過ACL定義每個流
# 在Switch_4上配置ACL 3000,禁止訪客訪問員工區和服務器區。
[Switch_4] acl 3000
[Switch_4-acl-adv-3000] rule deny ip destination 10.1.2.1 0.0.0.255
[Switch_4-acl-adv-3000] rule deny ip destination 10.1.3.1 0.0.0.255
[Switch_4-acl-adv-3000] quit
# 在Switch_4上配置ACL 3001,使員工A可以訪問服務器區的所有資源,其他員工只能訪問服務器A的21端口。
[Switch_4] acl 3001
[Switch_4-acl-adv-3001] rule permit ip source 10.1.2.2 0 destination 10.1.3.1 0.0.0.255
[Switch_4-acl-adv-3001] rule permit tcp destination 10.1.3.2 0 destination-port eq 21
[Switch_4-acl-adv-3001] rule deny ip destination 10.1.3.1 0.0.0.255
[Switch_4-acl-adv-3001] quit
B、配置流分類,區分不同的流
# 在Switch_4上創建流分類c_custom、c_staff,并分別配置匹配規則3000、3001。
[Switch_4] traffic classifier c_custom
[Switch_4-classifier-c_custom] if-match acl 3000
[Switch_4-classifier-c_custom] quit
[Switch_4] traffic classifier c_staff
[Switch_4-classifier-c_staff] if-match acl 3001
[Switch_4-classifier-c_staff] quit
C、配置流行為,指定流動作
# 在Switch_4上創建流行為b1,并配置允許動作。
[Switch_4] traffic behavior b1
[Switch_4-behavior-b1] permit
[Switch_4-behavior-b1] quit
D、配置流策略,關聯流分類和流行為
# 在Switch_4上創建流策略p_custom、p_staff,并分別將流分類c_custom、c_staff與流行為b1關聯。
[Switch_4] traffic policy p_custom
[Switch_4-trafficpolicy-p_custom] classifier c_custom behavior b1
[Switch_4-trafficpolicy-p_custom] quit
[Switch_4] traffic policy p_staff
[Switch_4-trafficpolicy-p_staff] classifier c_staff behavior b1
[Switch_4-trafficpolicy-p_staff] quit
E、應用流策略,實現員工、訪客、服務器之間的訪問控制
# 在Switch_4上,分別在VLAN10、VLAN20的入方向應用流策略p_custom、p_staff。
[Switch_4] vlan 10
[Switch_4-vlan10] traffic-policy p_custom inbo
審核編輯:劉清
-
VLAN
+關注
關注
1文章
279瀏覽量
35698 -
OSPF協議
+關注
關注
0文章
17瀏覽量
9399 -
VLAN技術
+關注
關注
0文章
45瀏覽量
6400
原文標題:如何通過流策略實現VLAN間的訪問權限,一看便知!!!
文章出處:【微信號:通信弱電交流學習,微信公眾號:通信弱電交流學習】歡迎添加關注!文章轉載請注明出處。
發布評論請先 登錄
相關推薦
請問如何實現VLAN?
Linux改變文件或目錄的訪問權限命令
VLAN的實現及VLAN間路由


 如何通過流策略實現VLAN間的訪問權限?


評論