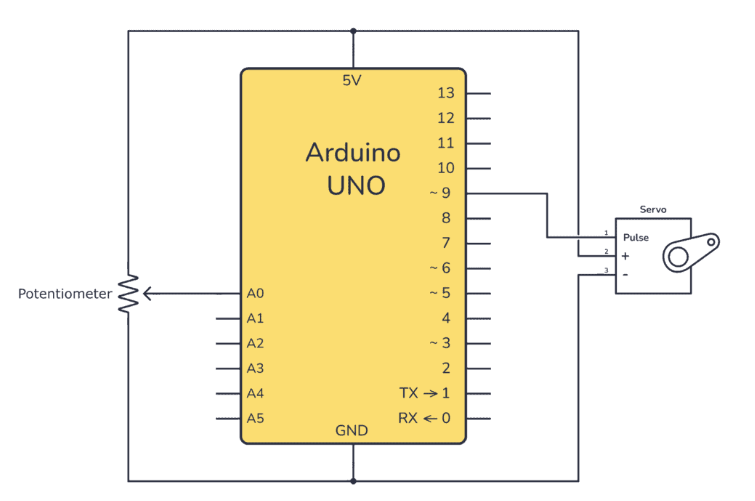
電路圖
黃色線是信號線。將其連接到Arduino上的數字引腳2。
棕色線是地線。將它連接到Arduino上的GND 。
紅色線是電源線。將其連接到Arduino上的 5V 引腳。
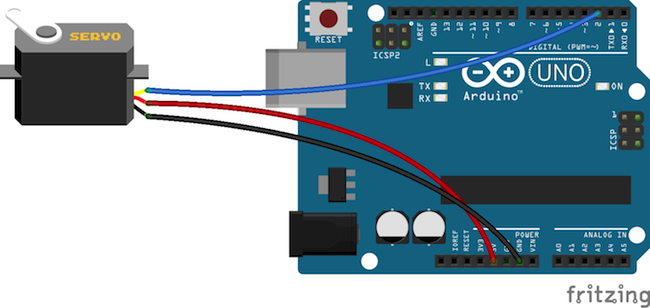
根據上面的電路圖在伺服電機和Arduino UNO之間建立連接。
編程Arduino
在Arduino代碼中,我們首先包含了伺服庫并為伺服初始化了一些變量。
然后在設置函數中,我們將伺服連接到Arduino的引腳2并開始串行通信。
在循環功能中,我們查找了輸入數據,如果有任何數據可用,我們將讀取它并根據此值伺服電機將移動。
// Code to control servo motor from openframeworks using wekinator
#include //including the servo library
Servo sg90; //including a variable for servo named sg90
int servo_pin = 2;
void setup() {
sg90.attach(servo_pin); //Giving the command to arduino to control pin 2 for servo
// Start the serial communication
Serial.begin(9600);
}
void loop() {
if (Serial.available()) { // If there is any data available
int inByte = Serial.read(); // Get the incoming data
sg90.write(inByte);
}
}
編程openFrameworks
在openFrameworks方面,我們有三個用于發送和的文件從Wekinator接收數據,也將幫助我們將數據發送到Arduino。
Main.cpp
Main .cpp運行應用程序并打開輸出窗口。
以下代碼適用于Main.cpp:
#include “ofMain.h”
#include “ofApp.h”
//========================================================================
int main( ){
ofSetupOpenGL(600, 480, OF_WINDOW); // 《-------- setup the GL context
// this kicks off the running of my app
// can be OF_WINDOW or OF_FULLSCREEN
// pass in width and height too:
ofRunApp(new ofApp());
}
OfApp.cpp
OfApp.cpp代碼是Arduino和openFrameworks之間存在串行通信的地方。它也是openFrameworks和Wekinator之間的OSC通信。
#include “ofApp.h”
#include “ofxOsc.h”
//--------------------------------------------------------------
void ofApp::setup(){
sender.setup(HOST, SENDPORT);
receiver.setup(RECEIVEPORT);
serial.listDevices();
vector deviceList = serial.getDeviceList();
// this should be set to whatever com port your serial device is connected to.
// (ie, COM4 on a pc, /dev/tty.。.. on linux, /dev/tty.。. on a mac)
// arduino users check in arduino app.。..
int baud = 9600;
serial.setup(0, baud);
//open the first device
// windows example
//serial.setup(“COM10”, baud);
// mac osx example
//serial.setup(“/dev/tty.usbserial-A4001JEC”, baud);
//linux example
//serial.setup(“/dev/ttyUSB0”, baud);
}
//--------------------------------------------------------------
void ofApp::update(){
// Sending data to the wekinator
ofxOscMessage m;
m.setAddress(string(SENDMESSAGE));
m.addFloatArg((float)mouseX);
m.addFloatArg((float)mouseY);
sender.sendMessage(m, false);
// looking for incoming messages from wekinator
while (receiver.hasWaitingMessages()) {
ofxOscMessage msg;
receiver.getNextMessage(&msg); // Get Message
if (msg.getAddress() == RECEIVEMESSAGE) {
outputData = msg.getArgAsFloat(0); // Stored it
}
}
serial.writeByte(outputData); // sending the data to arduino
}
//--------------------------------------------------------------
void ofApp::draw(){
ofSetColor(255, 0, 0);
string buf = “Sending message ” + string(SENDMESSAGE) + “ to ” + string(HOST) + “ on port ” + ofToString(SENDPORT);
ofDrawBitmapString(buf, 10, 20);
buf = “X=” + ofToString(mouseX) + “, Y=” + ofToString(mouseY);
ofDrawBitmapString(buf, 10, 50);
ofSetColor(0, 255, 0);
ofDrawRectangle(mouseX, mouseY, boxSize, boxSize);
}
//--------------------------------------------------------------
void ofApp::mouseDragged(int x, int y, int button){
mouseX = x;
mouseY = y;
}
在設置功能中,我們首先設置發送器和接收器,然后查找串口。一旦找到,它將自動連接。
在更新功能中,我們首先將滑塊的X和Y值發送到Wekinator。然后,我們從接收器中查找傳入的消息。當任何數據可用時,它將存儲它并將其發送到Arduino。
在繪圖功能中,我們制作了一個滑塊,當我們拖動它時它會移動。
OfApp.h
OfApp.h文件是頭文件。
#pragma once
#include “ofMain.h”
#include “ofxOsc.h”
//Defaults for OSC:
#define HOST “127.0.0.1”
#define SENDPORT 6448
#define RECEIVEPORT 12000
#define SENDMESSAGE “/wek/inputs”
#define RECEIVEMESSAGE “/wek/outputs”
class ofApp : public ofBaseApp{
public:
void setup();
void update();
void draw();
void mouseDragged(int x, int y, int button);
ofxOscSender sender;
ofxOscReceiver receiver;
ofSerial serial;
int mouseX = 0;
int mouseY = 0;
int boxSize = 30;
char outputData;
};
如何運行openFrameworks草圖
使用openFrameworks中的項目生成器創建一個新項目。此項目需要‘Ofxosc’插件。
將上一節中給出的代碼復制到相應的文件中并構建項目。構建項目后,您將看到如下所示的輸出窗口。
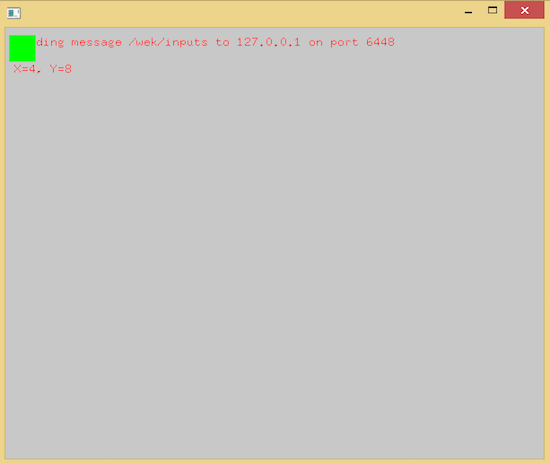
openFrameworks中的輸出窗口。
在Wekinator中設置項目
設置openFrameworks后,打開Wekinator并調整設置以匹配下圖所示的設置。
將輸入設置為2,輸出設置為1.選擇輸出類型為“custom”,然后單擊“configure”。
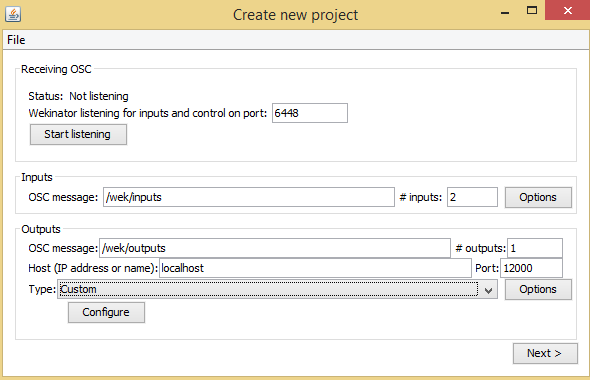
在Wekinator中設置輸入,輸出和類型字段以匹配上面顯示的字段。
接下來,將最小值設置為0,將最大值設置為180,然后單擊“完成”。
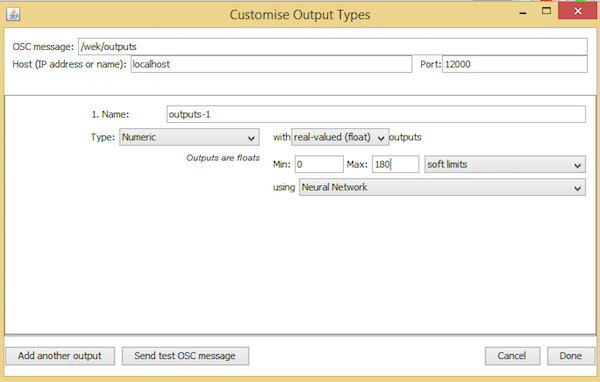
自定義輸出類型至少為0和a最多180個。
點擊“下一步”,將出現“新建項目”窗口。
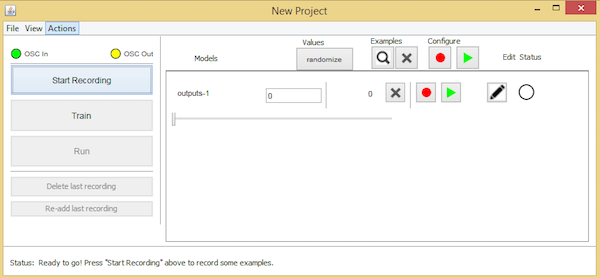
按照上面列出的步驟并單擊下一步后,您將進入Wekinator的New Project窗口。
將處理窗口中的綠色框拖動到屏幕左側的中心,然后單擊“隨機化” ”。開始錄制一秒鐘,讓Wekinator記錄一些樣本。
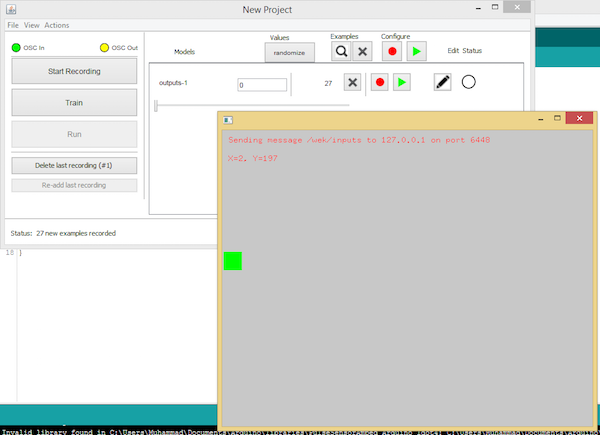
將綠色框拖到屏幕左側以記錄您的第一個輸出。
現在將處理窗口中的綠框拖到窗口中心,然后單擊“隨機化”。開始錄制半秒。
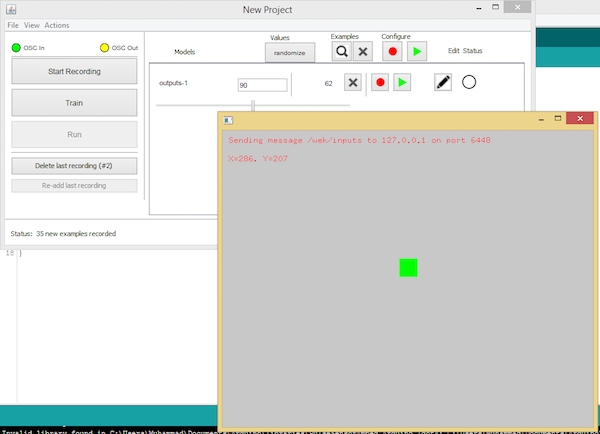
將綠色框移動到中心以允許Wekinator記錄更多樣本。
最后,將處理窗口中的綠色框拖動到右側中心,然后單擊隨機化。開始錄制半秒。
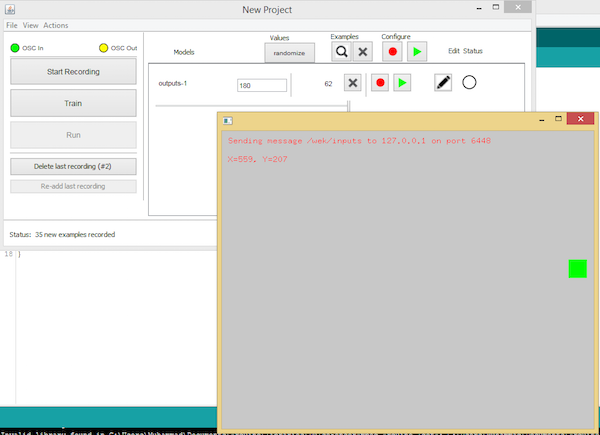
將綠色框移動到窗口的右側,以允許Wekinator制作第三組樣本。
為Wekinator制作了三組樣本后,點擊“ train”,然后點擊“運行”。
現在,當您在openFrameworks窗口中拖動滑塊時,它將控制并移動連接到Arduino的伺服。
-
伺服電機
+關注
關注
85文章
2051瀏覽量
57964 -
機器學習
+關注
關注
66文章
8424瀏覽量
132766
發布評論請先 登錄
相關推薦


 怎樣用機器學習和openFrameworks控制伺服電機


評論